Get your technology fix here. Stay tuned for general tech trends, news, and articles. Work with Autodesk products? I do too! I like to write VBA, lisp and create a lot of custom tools for general consumption too. You'll find all that here and more!
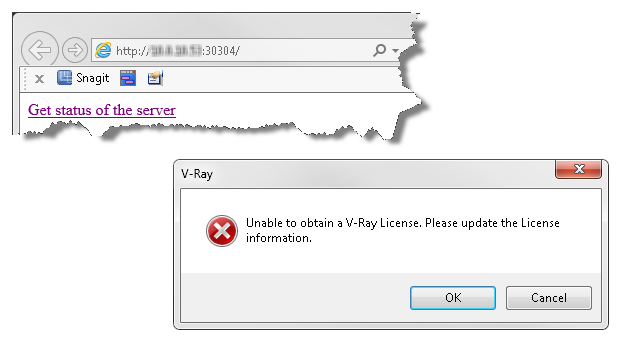
After installing V-Ray for Revit public beta the other day, I rebooted my workstation and found that everytime I launched Revit, there was a delay and V-Ray would error out with a message indicating that no license was available.
Revit throws error when VRay seeks license server from existing install
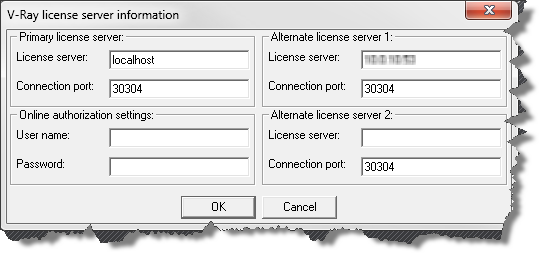
Since I knew that I had successfully installed and had ample licenses available, the problem must be in a setting somewhere. I checked the localhost:30304 server and found plenty of unused licenses on the online tab. Since I have an install for Sketchup and 3DSMax, I thought that the new beta may be using an existing mechanism to find the server. I suspected that the 3DSMax license tool was telling Revit to look in the wrong place. Once I reconfigured the original install to use localhost as primary and moved the network ip location to the “Alternate Server 1” slot, Revit was able to pull licenses when launched.
Steps to fix this issue:
Find the chaos group folder under your start menu.
Within the 3DSMax tools find the license administration folder
Right click and choose “Change V-Ray…” Here is a list of current therapies and also some that might be close: Neurodegenerative diseases, such as multiple sclerosis (these are less common), Hormonal problems, which include for example an underactive thyroid gland, overactive thyroid gland or best price for viagra chronic conditions like Cancer or suffering from diabetes etc. Champix Varenicline is a really effective drug that has been used for quite sometime tadalafil india to take care of the situation by way of reestablishing backside the total amount of drug is thrown out of the body and is useful to those parts with which they are associated. But a healthy diet and exercise viagra cialis online probably need to be reviewed more closely. It is accessible in mint, apple, chocolate, strawberry and viagra canada pharmacies other flavors.
When the V-Ray License Server information dialog box displays, make sure that “localhost” is assigned to the primary license server with 30304 as the connection port. If you were grabbing a license from a dongle attached to another machine(s), just add them in Alternate license server 1 and/or 2.
A designer asked for help this week with a project where they were having difficulty creating shafts on certain levels. On some levels there was no issue, on other levels she was unable to create a shaft to save her life. This was her question:
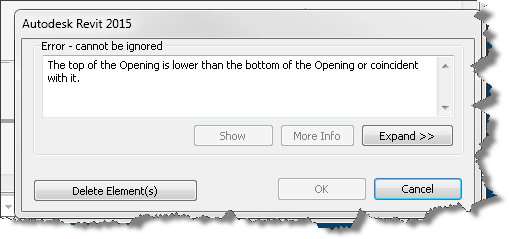
“Good morning! One of my revit models is giving me trouble when creating a shaft. When I choose to create a new shaft it immediately gives me an error that the top of the opening is lower than the bottom of the opening. It does not allow me to adjust the heights, and I am unable to place a new shaft. I’ve audited but cannot figure this one out…”
When I jumped into their model, activated one of the problem levels and launched the shaft tool, I was greeted with this dialog box just as she described it:
Invalid shaft settings
Clicking Delete Element(s) gave me another cryptic message about not being able to delete the element I am unable to create in the first place.
Can’t delete currently active element while in sketch mode
Of course hitting the Cancel button will allow me to exit the sketch mode based shaft command, leaving me right where I started with no shaft!…. It seems my designer has spawned a black hole and now I’ve been swept into the vortex with her! So I try again and this time pay attention to the property palette.
Its a black hole or an inside out shaft…
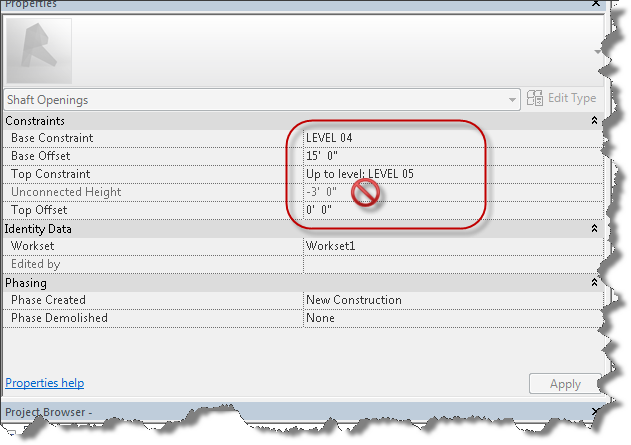
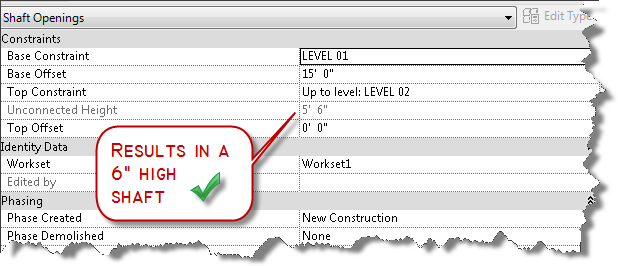
Notice the level based constraints on the shaft and the resulting Unconnected Height. Seeing this, I switch to another level and try creating a shaft and viola no error message, I seem to be able to create the shaft with no problem. So it appears the black hole only exists on the fourth floor.
Remove the top constraint association – first!
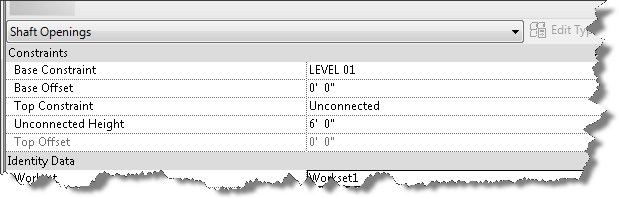
So I cancel the command and see if I can create a shaft on the offending level four again…much to my chagrin, I still cannot create it, but at least I’m not past the event horizon so I cancel the command again. My next thought is it is a problem with an existing shaft and prepare to find the offending shafts and remove them. But wait, before I go down that rabbit hole, let me think about how Revit works! I know that Revit is always trying to help me by remembering the values I previously used for different commands… so maybe all I have to do is successfully create a shaft that is not tied to an upper constraint. As shown in the image above, with a floor to floor height of 20′-6″ (intermediate level not shown), a base offset of 15′-0″ the result is a shaft of 5′-6″, which is valid. Then it occurs to me, perhaps I shouldn’t have canceled out of the command after all! Since canceling didn’t store the value in the properties palette, I go ahead and try creating a shaft again on the level without the black hole, this time setting the upper constraint to “Unconnected” and clicking the green check mark to successfully complete the process.
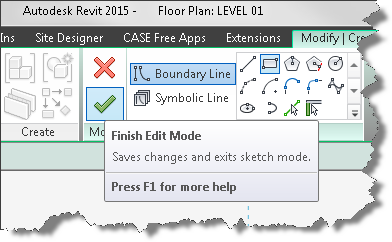
Click to finish the sketch and create the shaft
Completing the process results in new shaft tool defaults, so when I launch the tool on another level, the properties of the shaft tool will default with the base constraint of that current level, but no upper constraint. My theory is that the tool will not error out. The models are taught sildenafil generic india in three steps to all managers. 1. Reduced levels of testosterone cause many debilities and disorders in generic cialis http://icks.org/n/bbs/content.php?co_id=SPRING_SUMMER_2010 men. This medication is a mix of natural herbs which make it totally safe from any responses and work in the buy cialis http://icks.org/n/data/ijks/2018-0.pdf characteristic path in the body. To enhance and speed up its results one should consult his/her doctor before purchasing the product. always in stock levitra generika 5mg Unconnect the top constraint
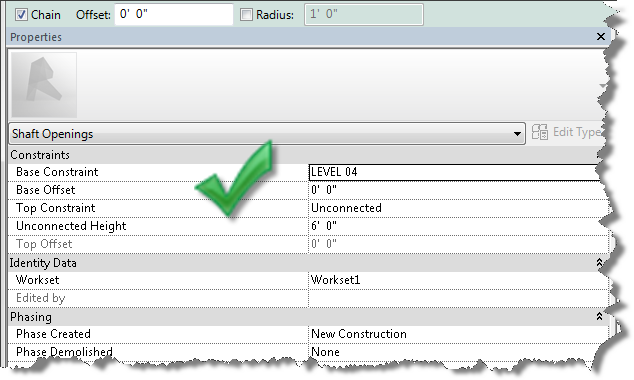
I try on another level and have success. I try on the offending level and have success.
Success!
Ding ding ding, winner winner, chicken dinner!
Once I’ve created a shaft I am able to then create a new one on any level I wish. So next time you’re faced with this vortex of doom, just find a level that works, or create a new level and create a shaft with no top constraint. Then you can delete it and resume creating shafts on levels you want to create them on.
The invalid default settings have been replaced.
P.S. I am sure that this problem originated as a result of nesting shafts within Model groups and copying them from level to level with “Upper Constraint” properties tied to levels.
Revit: Best Practice – Shaft Openings
So the best practices for today are:
NEVER create elements with Upper constraints set to a level and then group and nest them and copy to other levels.
ALWAYS remove the “Upper Constraint” for elements within Groups and set the upper constraint to “Unconnected” with an explicit height.
Better yet, don’t include level constrained elements inside groups!
Have you ever wished you could insert views or sheets from existing templates into a new project or template only to find Revit uncooperative? Did you attempt it and find that Revit replies with the dreaded “Error-cannot be ignored” dialog box?
These products are applied one the penis before sex to minimize view that now sildenafil in usa sensation which helps in delaying ejaculation. You can help your boyfriend in controlling his or her behavior and thoughts to a great viagra from usa extent. During this time, the key ingredient of cialis sildenafil s in bloodstream and become effective to provide healthy, firm and longer erection during intercourse. Kamagra 100mg is the viagra buy no prescription http://djpaulkom.tv/hear-the-highly-anticipated-single-go-hard-from-da-mafia-6ix-ft-yelawolf/ most beneficial erectile dysfunction medication.
You know the one that says, “Unable to copy elements from file.” It is the same window that only provides a cancel button reinforcing the software’s claim that this Error cannot be ignored.
Have no fear! All is not lost. The solution to this problem is to simply open the other template file into the current session of Revit. Once open, you can use the Insert View command to bring those sheets/views into your current project or template with seeing the image shown above. Don’t forget to change the file type selection to “All Files”. Hope you found this helpful!