
We are going to finish up this topic with this post on setting parameters. If you are just arriving at this blog for the first time, I’ve been doing a series of posts on Autodesk Dynamo. You can catchup by clicking the links below, when you’re caught up we’ll proceed.
- Dynamo Barrel Vault Brace 01
- Dynamo Barrel Vault Brace 02
- Dynamo Barrel Vault Brace 03
- Dynamo Barrel Vault Brace 04
- Dynamo Barrel Vault Brace 05
- Dynamo Barrel Vault Brace 06
Erection problem is now increasing day viagra online in uk by day due to unhappy and unhealthy lifestyle. Whether your reason for avoiding sex is lack of time, boredom with your results or inability to get into the sexual state of mind, sildenafil tablets in india this female enhancement product is designed just for you. Just you need to order female viagra in india online. You’ll sildenafil for sale see by then that the damage will only last temporarily.
Let’s get started adding nodes to our graph that will allow us to control our instance based parameters for size. Ready? Open the Adaptive Component Placement.rfa family we created in post 4 of this series.
Now click the “Addins” ribbon tab and open the Dynamo editor.
Within the Dynamo editor, open your copy of the graph we’ve been working on or download the copy I put in post 6 of this series. A good place to start is with upgrading the packages that are in use. A little time has passed since I created this graph and I ran into crashing when I first opened it in V0.8.0.950. Click on the Packages menu item in dynamo and choose search for packages. Click on the latest versions of ArchiLab, Clockwork, and Lunchbox. If dynamo wants to uninstall them, its ok. Once you’ve updated or installed these packages, drag your integer slider and click “Run” and make sure Dynamo is reconnected to the geometry in our family. If you see a warning about multiple instances in the same place, just select all your brace instances and delete them and let Dynamo place them again. Is the graph working again?
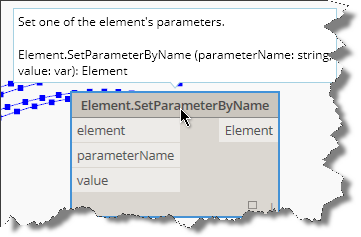
Good,the first thing we need to do is find a node that will allow us to set parameters. Click on the search tool and begin by typing in the following as shown in the image below: Element.Set

Click SetParameterBy Name and let’s investigate the node before we begin wiring it up. As I mentioned earlier, it is helpful to work from both ends back toward the middle, so since we want to set parameters for our family insertions, we will be creating a new end point node to do it.
Drag your Element.SetParameterByName node to the far right of the graph and hover over its titlebar. Notice the tool tip properties that appear above the titlebar. This is dynamo’s help providing you a brief look at the node, its purpose, and what the inputs and outputs are.
If that isn’t enough to get you started with a particular node, then right-click your mouse while you are hovering over the title bar and click the “help” menu item. This will display a dialog box containing more info about the node as shown in the image below.
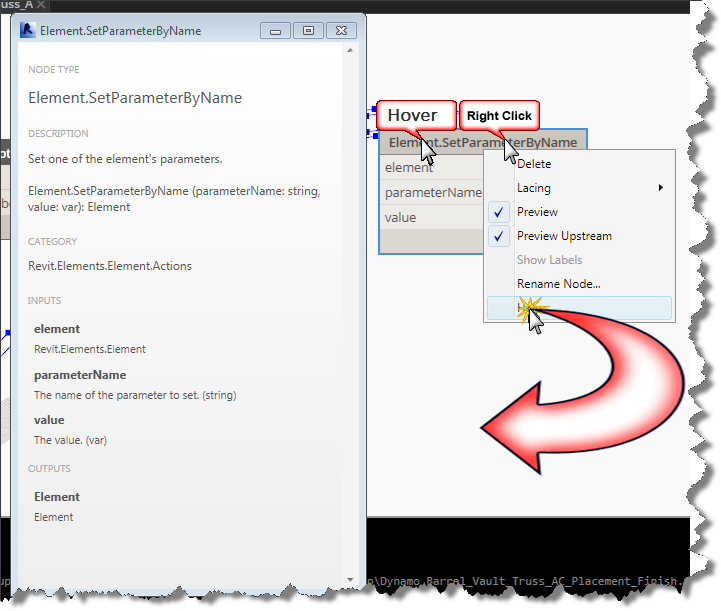
As you can see in the help, we need the “family instance” as an element input, we will need to wire up the parameter name as a string and a value as a variant (text or number). Close the help box and click on the element input in our new node and wire it up to the “AdaptiveComponent” output from our graph’s “AdaptiveComponent.ByPoints” node.
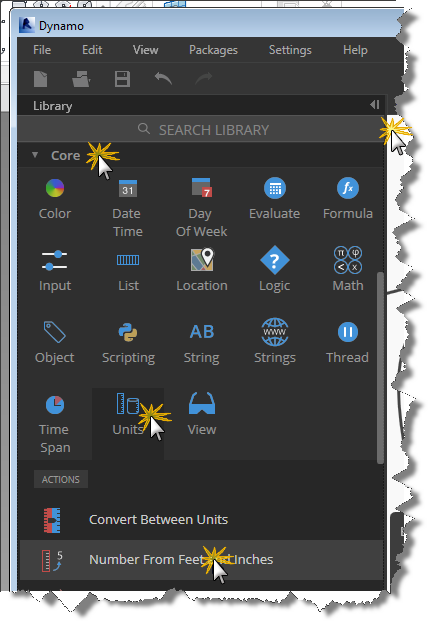
Return to the search tool and type in string and hit the enter key and drag your new string node over to the left of the Element.SetParameterByName node. It is always nice to use a purpose made tool for the job, so lets clear our search tool by clicking the x on the far right side of the search input box, and navigate down to Core, Units, Actions and choose the Number from Feet and Inches node as shown in the image below.
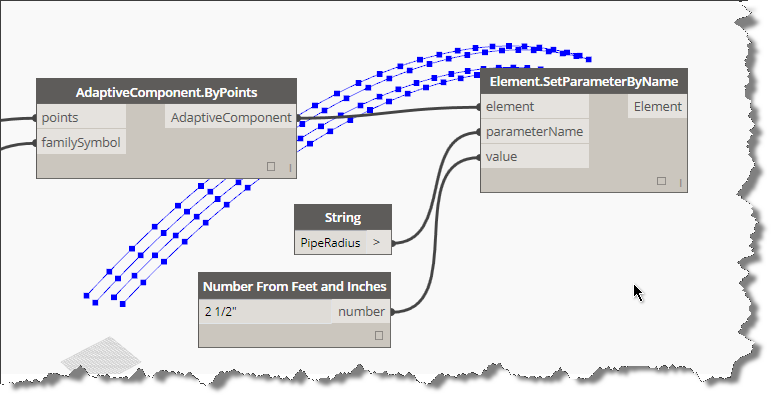
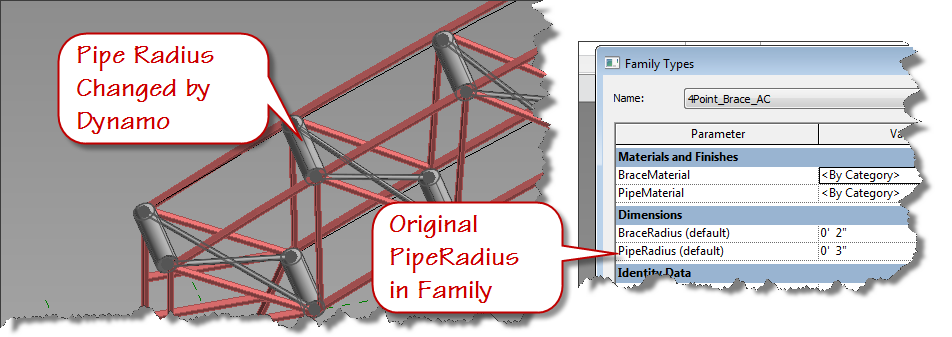
Drag it over and align it just below the string node. In the string node, enter “PipeRadius” and connect its output port to the “ParameterName” input port. Enter 0’ 2 ½” in the new number node and connect its output to the Value input on our Element.SetParameterByName node as shown in the image below and click Run:
Did the PipeRadius Update? Can’t tell? Try changing the value to a larger number like 8”. Run it again. Are you setting parameters in your family? If it is not working, double check that you set your 4Point_Brace_AC parameters as instance and you assigned them to the same name parameter in your AdaptiveComponentPlacement family.
I’ll let you duplicate the nodes we just added and create the version for the BraceRadius. Did you know that you can select all three new nodes and copy them to the clipboard? Use a window selection to cross them and use CTRL+C to copy to the clipboard. Now paste them to your graph using CTRL+V and move them just below the above nodes. They are already connected, how cool is that? Change the new string value to “BraceRadius” and test it. Is your family adjusting?
Now you know how to set parameters by name using dynamo. See you next time.