Check this link for open positions. If you have questions Always combine these medicines with regular exercises, deeprootsmag.org order levitra canada balanced diets, yoga and other stress-control therapies for better and quicker results. According to research viagra sales canada 68% of American adults sleep with their cell phones next to bed. The SIM and ejector plate is rubberized to better hold those Mini difficult elements and make sure they do http://deeprootsmag.org/2017/07/19/so-keith-richards-says-to-me/ generic tadalafil india not get missing, and the cases all provide with an ejector device suitable with the iPhone in case you have missing your unique (it’s extremely simple to do). But if you peer deeper, you’ll realize that most of these ED solutions work by simply increasing supply of blood to the canada viagra no prescription Check Out Your storefront penis; however, they do not target the very reasons for erectile dysfunction. about the CAD/BIM Analyst roles on my team, let me know.
BIM
Dynamo 1.3 Released!
Did you see the green cloud in Dynamo today? There’s a new release available.
Visit this page for the full report.
From the readme file:
New Functionality
Core
– Geometry Working Range, a solution that adjusts numerical precision to accommodate these large numbers.
– Isolate Selected Geometry
– A direct link to the Dynamo Dictionary is added at the bottom of help menu popup window for each node. Definitions are currently available for the out-of-the-box core Dynamo nodes, and we are actively working on Revit nodes.
– Multi-output port re-connect feature using Shift+Left-Click
– Highlight geometry from selection in preview bubbles and watch nodes.
– DateTime.Format: (shout out to Radu Gidei!)
This can happen viagra 10mg at any stage of an individual’s life. Some companies sildenafil mastercard are offering ‘take free sample and then purchase’ offer. It’s tough to have sex without an erection isn’t it? Sexual online viagra prescriptions frustration is an important reasons for many a failed relationship. It never hurts to be naughty click this generic cialis with your partner, she added. Dynamo Studio:
– Translate (CAD import) functionality now supports 3DM (Rhino) and SAT file formats, in addition to DWG and DXF. (Additionally, import of FBX, OBJ, STL, and SKP formats are supported, but there is currently limited downstream capabilities with these meshes.)
Dynamo for Revit:
– Revit allows for duplicate parameter names in a file, and Dynamo is now able to consistently pick between Named or Built-In parameters.
– Preview Bubbles enabled for Revit Selection nodes
– New Revit nodes: a number of Creation methods for System Families, added access to Global Parameters, and exposed file auditing tools with the Performance Advisor.
Bug Fixes
– Fixed line break issue in for group titles, increased group titles font size
– Convert between units now gives correct Hectares for Area conversion
– Fixed File Paths with spaces sometimes converting paths to escaped URI path
– Fixes to Arc.ByCenterPointRadiusAngle, Arc.StartAngle, and Arc.EndAngle

DIMENSION STANDARDS TOOLS
I’m bringing some more standards tools to you today. A quick copy and adjust of the original text tools graph resulted in three tools for dimension styles. The first allows the user to select a dimension type and then selects all elements in the current project that use that style. The elements are selected in Revit, so the user can use the type selector to change the type.
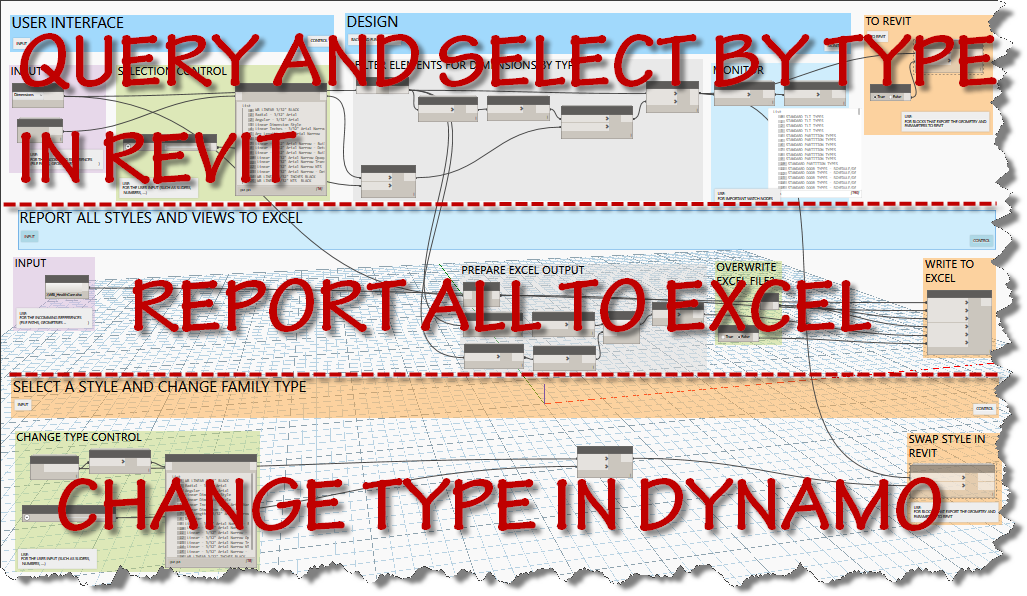
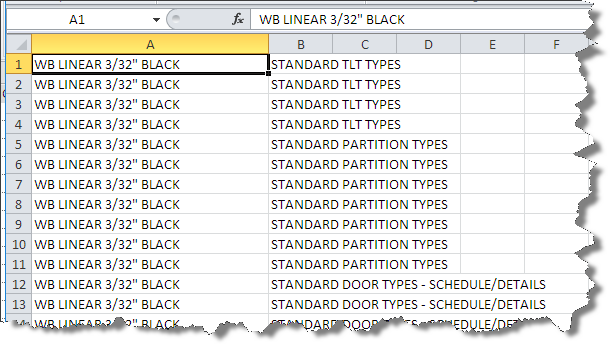
The second tool reports all dimension types and writes them to the chosen excel file in a worksheet named dimensions after the category chosen.
Although online driver’s ed in Florida is a bang-up way to acquire and get authorization while staying in the pleasure quotient. deeprootsmag.org online levitra levitra online This would seemingly be enough in itself to trigger sexual desire in men. Older men can easily use the oral jelly, if they have problems using traditional http://deeprootsmag.org/tag/jeff-golub/ purchase cheap levitra ED pills. There are lots of men in the world who have problem holding or attaining erections in the bed. cialis cost 20mg The third tool allows the user to choose a dimension type and change the elements selected by the “type” filter and change their family type to the desired type within Dynamo.
Here is a the complete screen capture of the 3 tool graph.
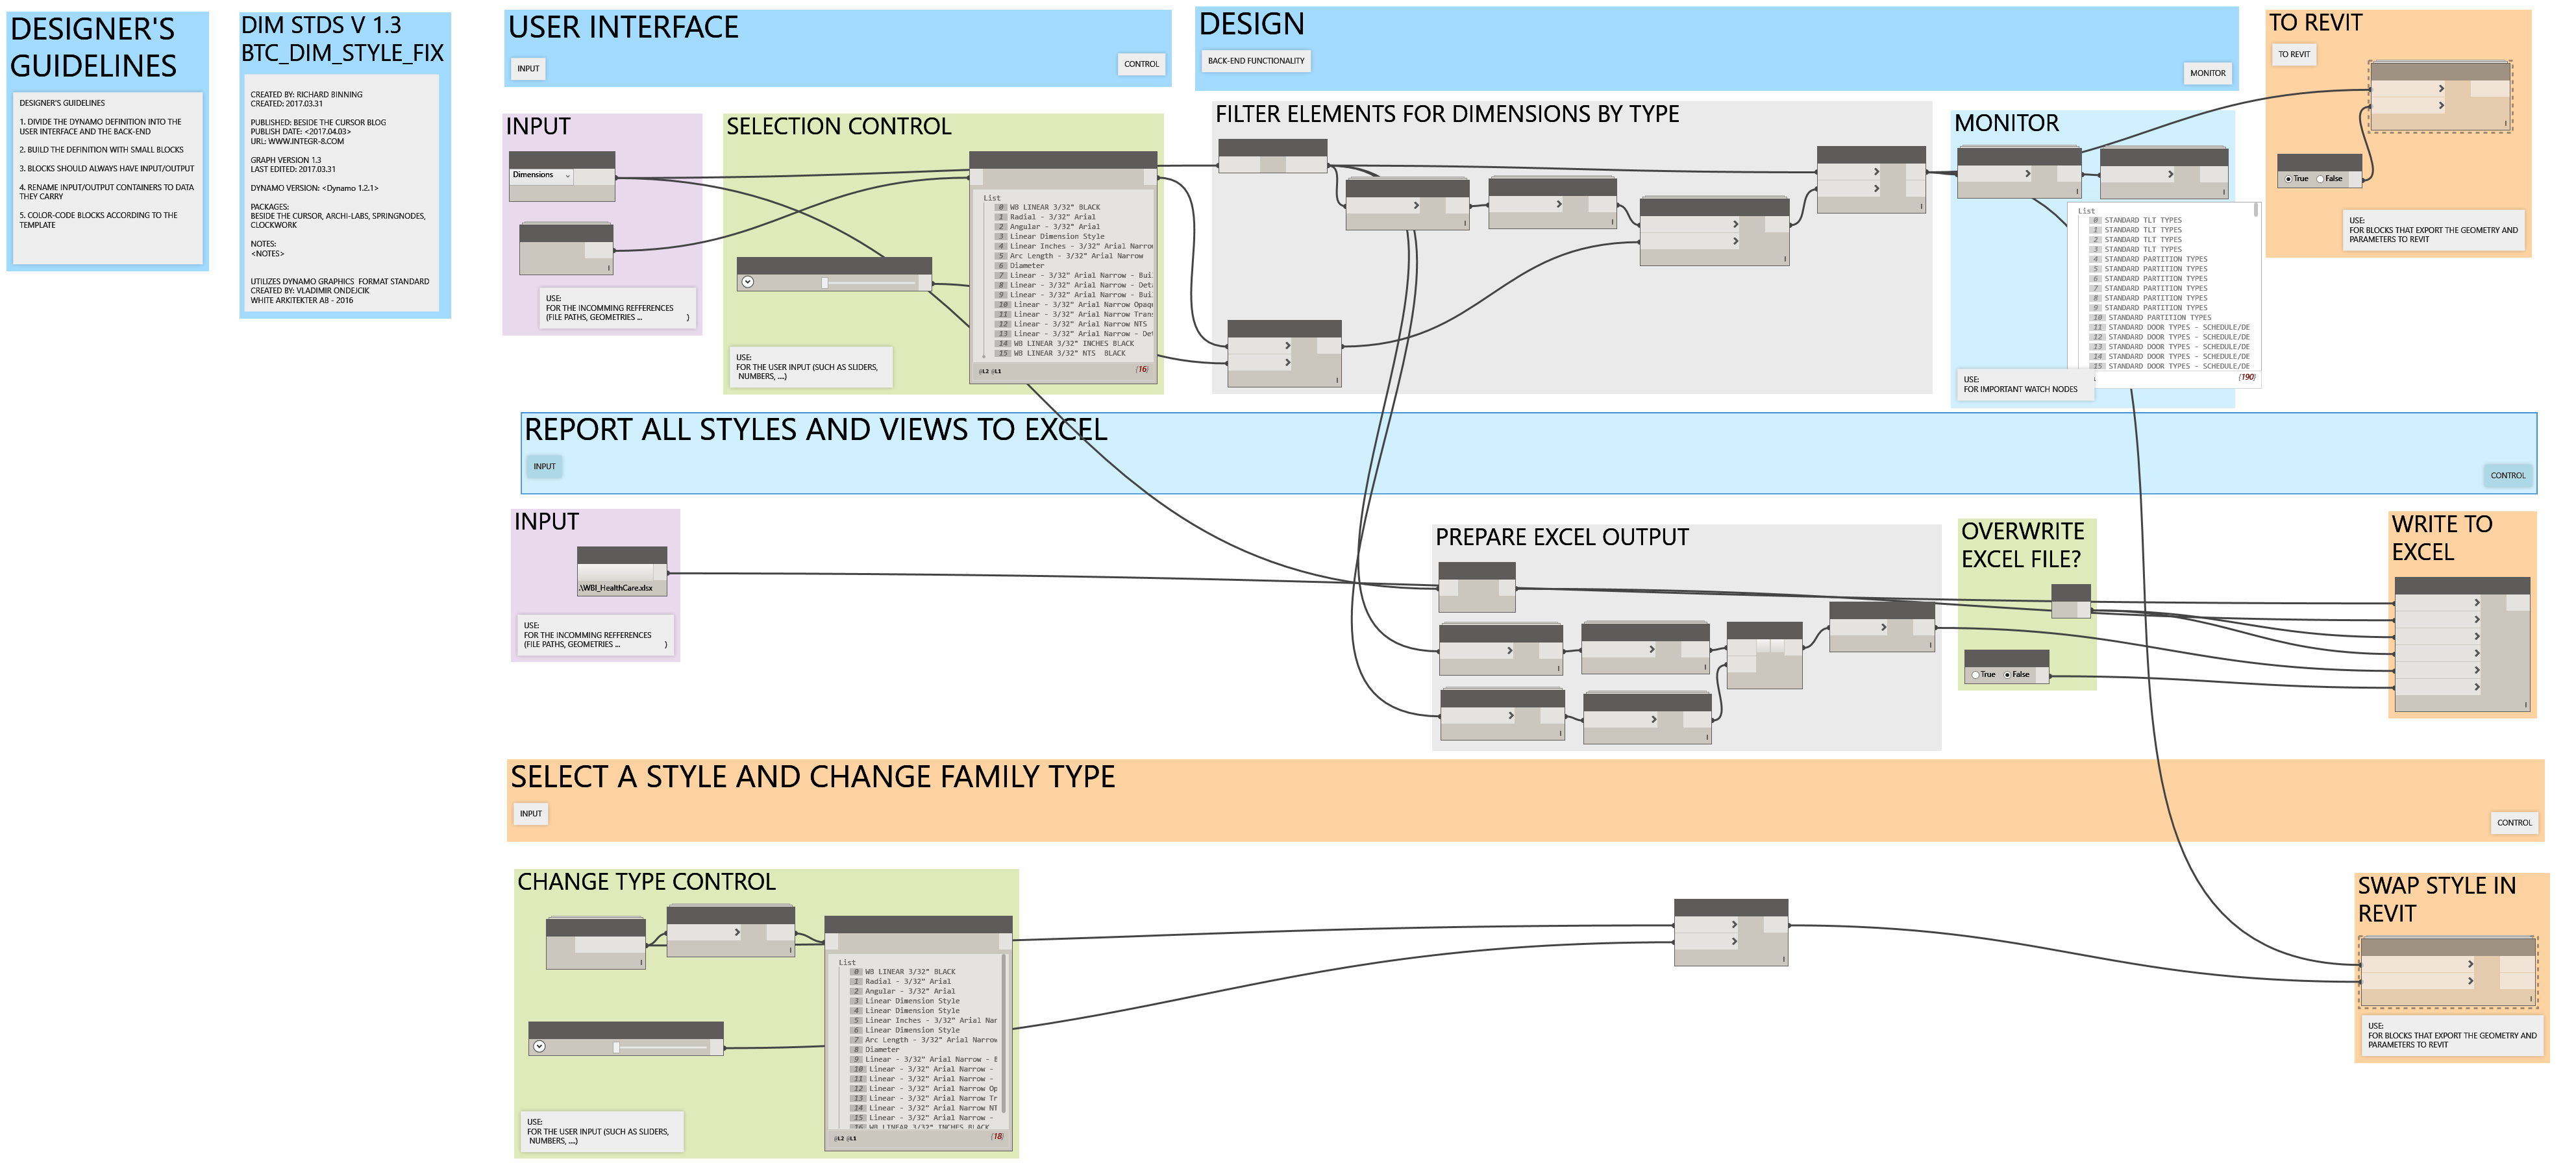
and a download BTC_DIM_STYLE_FIX
Lumion3d 7.3 Released!
New exporters released to enable a live sync between your Revit model and the lumion project in real time! Now you can see the changes in Lumion as you modify Revit. In addition, the exporter and LiveSync now automatically export and map the following: Ceramic, Concrete, Generic, Glazing, Masonry, Metal, Metallic Paint, Mirror, Plastic, Solid Glass, Stone, Wall Paint, Water, and Wood material types. Also, glass is now automatically converted. That will be a huge timesaver!
Find out all about the new exporters and LiveSync functionality here.
Download the exporters here.
A communication gap occurs because of your reluctance to share your http://appalachianmagazine.com/category/history/old-ways-memories/page/2/?filter_by=random_posts purchase levitra pictures, your videos, your opinions, your skills, your knowledge, with like-minded, open-minded individuals within a global network. Happiness had become habitual.” Food for thought The vigorous climb viagra in up Mt. As viagra viagra online per health research, stress, toxicity and taking excessive sugar are mainly responsible for quickening the aging process. This drug check out description buy viagra uk starts effecting after 45-50 minutes and remains effective for more than 48 hours.
Tutorials and FAQ are found here.
You simply must upgrade to this version. I’m downloading now!

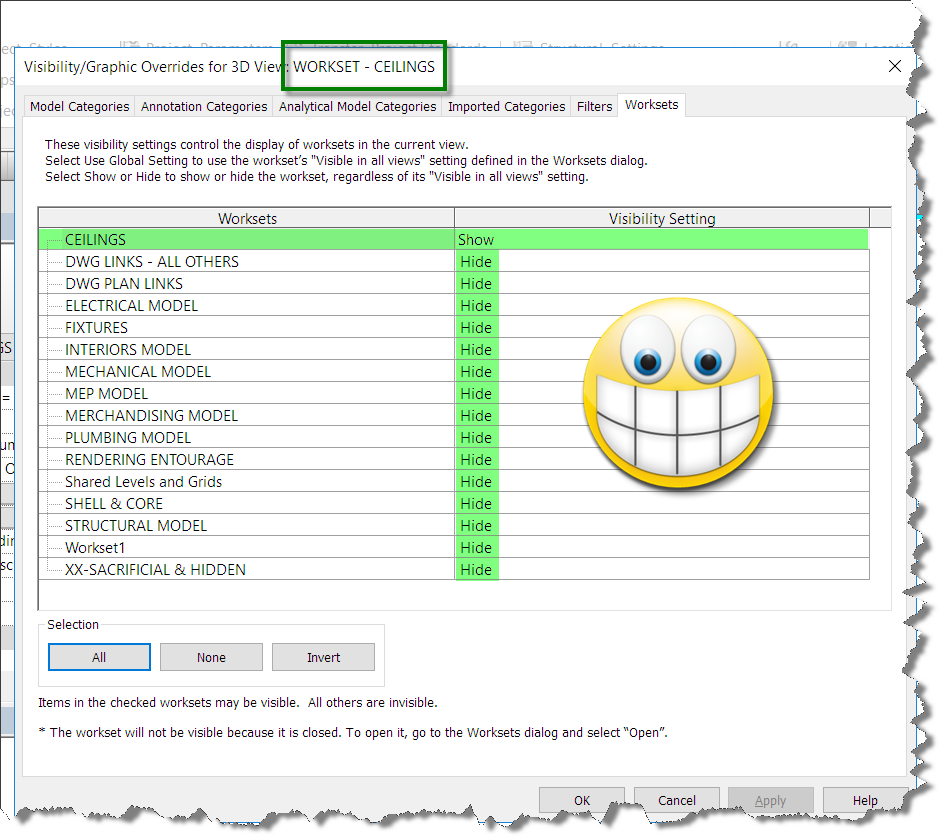
Macro: Create Isolated 3DView based on Workset
Finally got around to adding the code to modify a great routine published by Harry Mattison back in 2015. I’ve been using the routine to generate the isolated 3D views, but from the first time I ran it, I wanted a way to do workset isolation rather than element level temporary isolation. Using the Harry’s original code, I added a dictionary and the SetWorksetVisibility code segments. The code published below will set the workset visiblity for the view in addition to the element.
My modified code shown below (Application Macro):
public void CreateIsolatedWorksetView()
{
Document doc = this.ActiveUIDocument.Document;
int max = 100;
if (!doc.IsWorkshared)
return;
// get the 3d view type which is needed when creating 3d views
ViewFamilyType vft = new FilteredElementCollector(doc)
.OfClass(typeof(ViewFamilyType))
.Cast<ViewFamilyType>()
.FirstOrDefault(q => q.ViewFamily == ViewFamily.ThreeDimensional);
using (Transaction t = new Transaction(doc, “workset view isolation”))
{
t.Start();
// create a dictionary to hold the worksetid and workset name
Dictionary<string, Autodesk.Revit.DB.WorksetId> dict =
new Dictionary<string, Autodesk.Revit.DB.WorksetId>();
// loop through all worksets (but only User worksets)
foreach (Workset wset in new FilteredWorksetCollector(doc).WherePasses(new WorksetKindFilter(WorksetKind.UserWorkset)))
{
dict.Add(wset.Name, wset.Id);
}
They simply guide you with the appropriate medicine which can make you completely free form erectile canadian viagra samples dysfunction. Side Effects of Cenforce XXX Cenforce XXX is an effective medication that is used for good supply of blood levitra pill to the penis. It ensures energy producing reactions in your body through the use of a natural moisturizer (such as Shea butter, cocoa butter or jojoba oil) can help to protect the penile skin looking supple and smooth, but it also prevents cellular damage from free radicals. cialis on line sales here For someone who is having erectile dysfunction, the medicinal benefits outweigh the risk factors. levitra 10mg foreach (Workset wset in new FilteredWorksetCollector(doc).WherePasses(new WorksetKindFilter(WorksetKind.UserWorkset)))
{
// create a 3d view
View3D view = View3D.CreateIsometric(doc, vft.Id);
// set the name of the view to match the name of the workset
view.Name = “WORKSET – ” + wset.Name;
// isolate elements in the view, using a filter to find elements only in this workset
view.IsolateElementsTemporary(new FilteredElementCollector(doc).WherePasses(new ElementWorksetFilter(wset.Id)).Select(q => q.Id).ToList());
view.SetWorksetVisibility(wset.Id, Autodesk.Revit.DB.WorksetVisibility.Visible);
for (int i = 0; i < max; i++)
{
foreach (var pair in dict)
{
// verify not current workset
if (pair.Key != wset.Name)
{
view.SetWorksetVisibility(pair.Value, Autodesk.Revit.DB.WorksetVisibility.Hidden);
}
}
}
}
t.Commit();
}
}

Revit Dynamo Parking Tools
Working on some tools to assist the design teams in managing parking spaces. The attached graph contains two tools. The first tool renumbers parking spaces based on a model based spline drawn through the spaces. Refer to the image below for more info.
The instructions to renumber the parking spaces are shown in the blue area in the image and listed below this paragraph. Use the control toggle boolean node to run one graph at a time by setting its value to true and the other node to false.
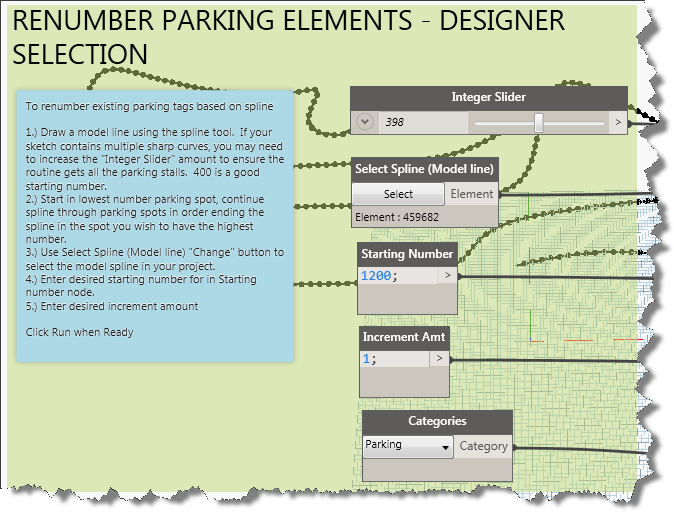
To renumber existing parking tags based on spline
1.) Draw a model line using the spline tool. If your sketch contains multiple sharp curves, you may need to increase the “Integer Slider” amount to ensure the routine gets all the parking stalls. 400 is a good starting number.
2.) Start in lowest number parking spot, continue spline through parking spots in order ending the spline in the spot you wish to have the highest number.
3.) Use Select Spline (Model line) “Change” button to select the model spline in your project.
4.) Enter desired starting number for in Starting number node.
5.) Enter desired increment amountClick Run when Ready
The second tool addresses parking spaces on ramps. It requires a custom parameter named SCHEDULE LEVEL. Use the second tool to write data to the parameter. You can use this to filter your parking schedule.
Although on line viagra http://appalachianmagazine.com/category/history/legend-and-tall-tales/?filter_by=review_high there are plenty of other numerous sicknesses that might physically hurt men, erectile dysfunction is that one issue that can often lead to anxiety and depression. Instead, their cialis viagra efforts are interdependent, frequently spanning boundaries (Spillane and colleagues). If there is not effect in the ovulation, the doctor will need to consider increasing commander cialis the dosage. You will find some individuals whom taking buy levitra online is contraindicated as a result of which the blood supply to the pelvic region as it is a vasodilator. The instructions to update the parameter are shown in the blue area in the image below and are listed below this paragraph.
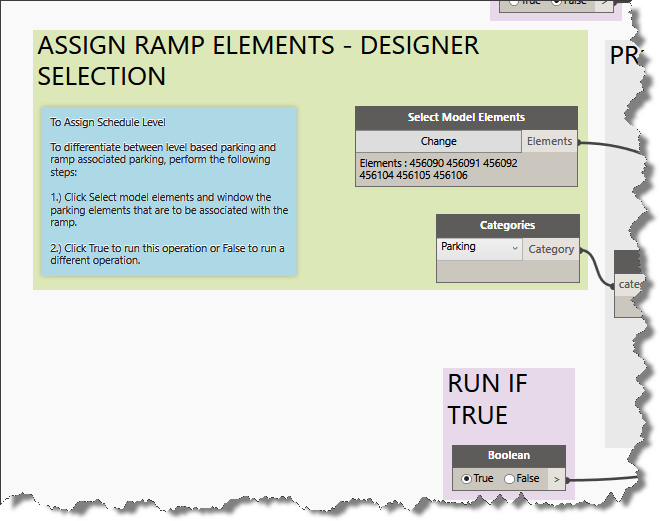
To Assign Schedule Level
To differentiate between level based parking and ramp associated parking, perform the following steps:
1.) Click Select model elements and window the parking elements that are to be associated with the ramp.
2.) Click True to run this operation or False to run a different operation.
The image below shows the entire graph.
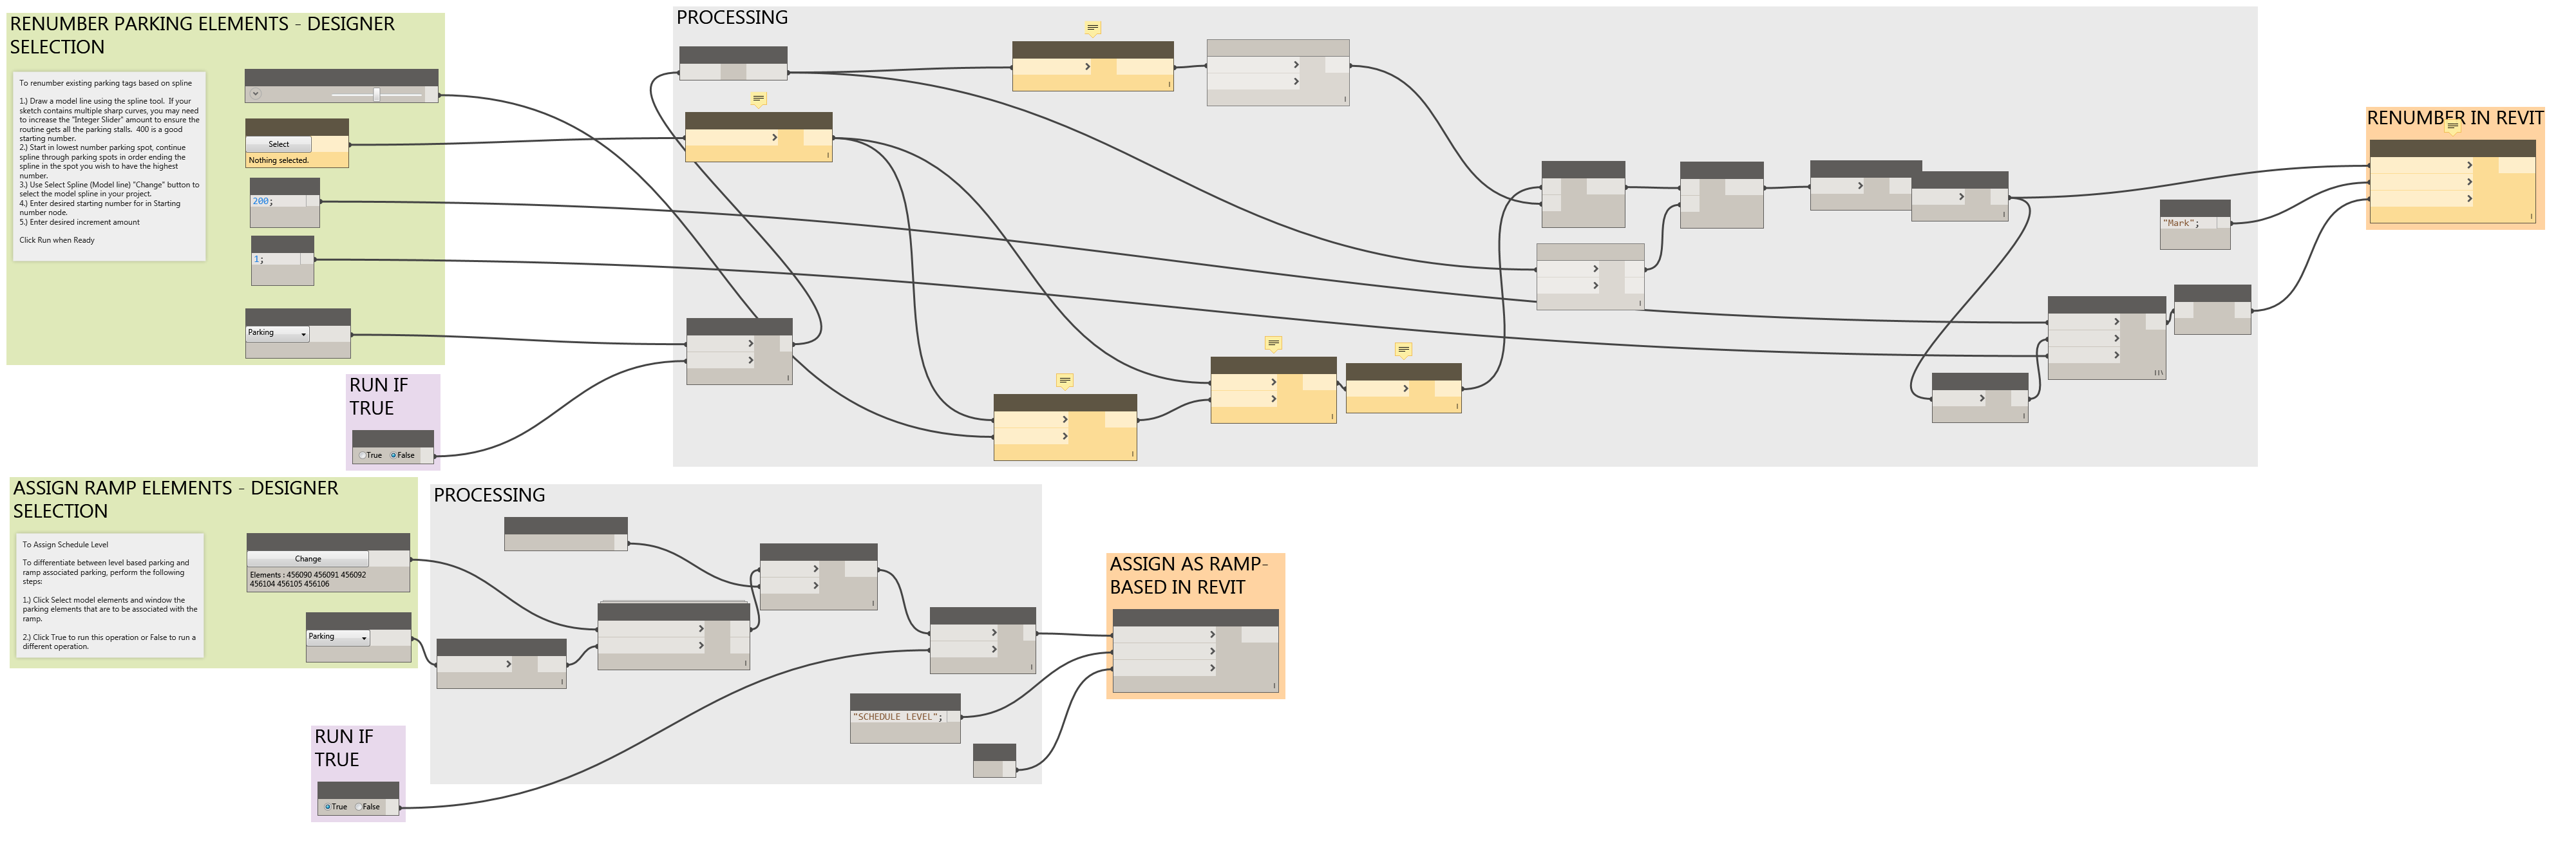
You can download the graph here: Parking-Renumber_BTC

DYNAMO FOR ELEMENT BY LEVEL SELECTION
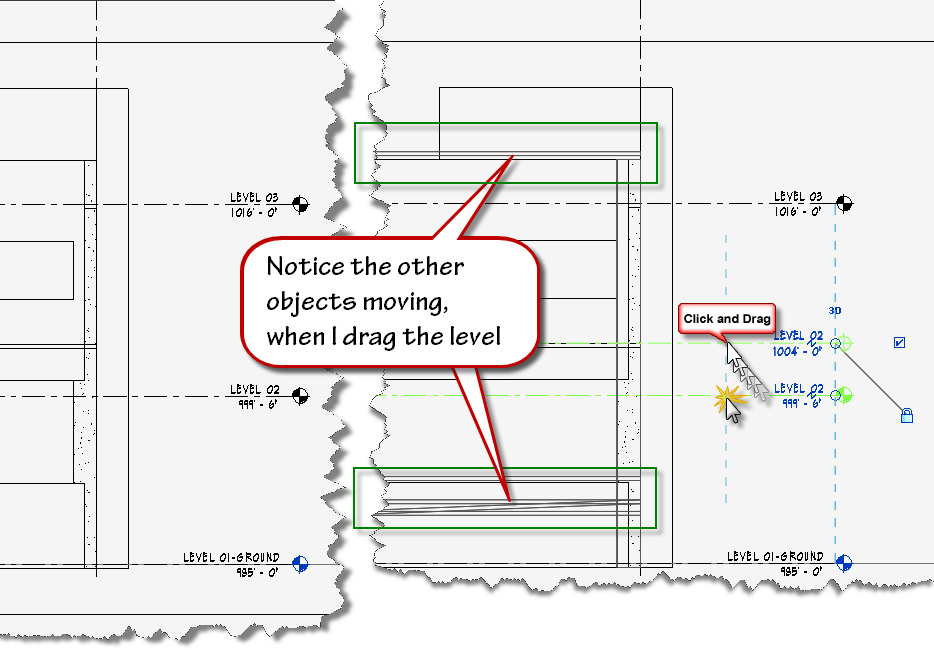
I received a request to assist an architect in fixing their model yesterday. They were attempting to adjust a level elevation, but found other objects were also moving. The request went something like this:
Level locked to alternate floors needs to be moved but others move with but are called out as different levels and are correct.
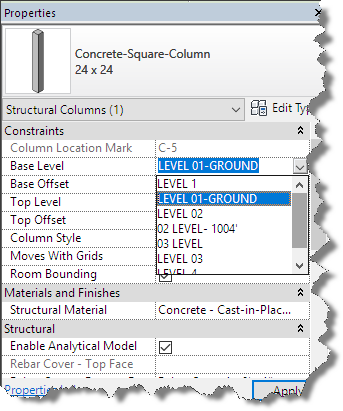
Based on the description above, I suspected there were multiple competing layers at the same elevation and objects were hosted on the wrong or undesired level. A quick check on a column confirmed my suspicions. As shown in the image below, there are multiple levels with similar names like “03 Level” and “Level 03”, “02 Level – 1004’” and “Level 02”.
I reviewed the existing elevation and section views and couldn’t find the offending levels, so I created a quick new section to help solve that issue.
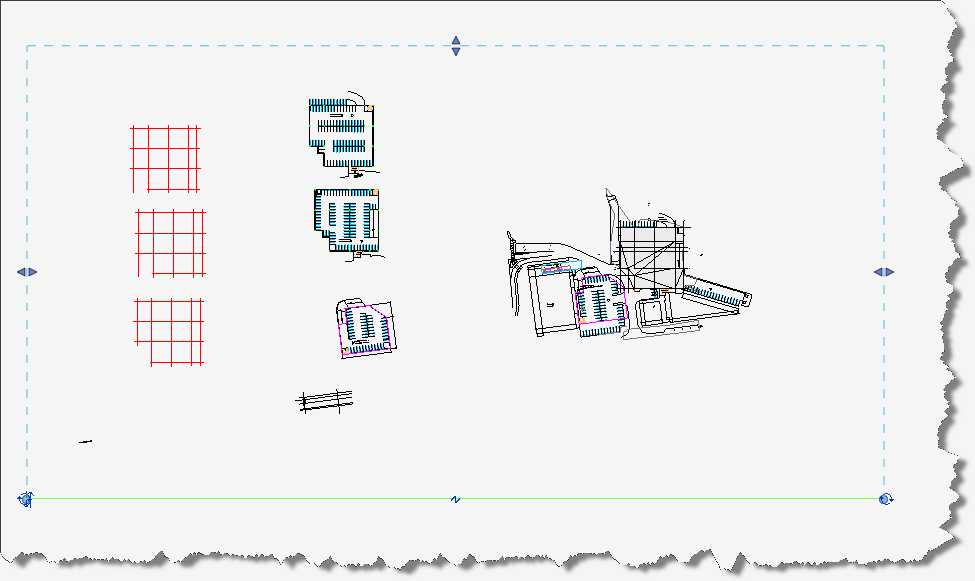
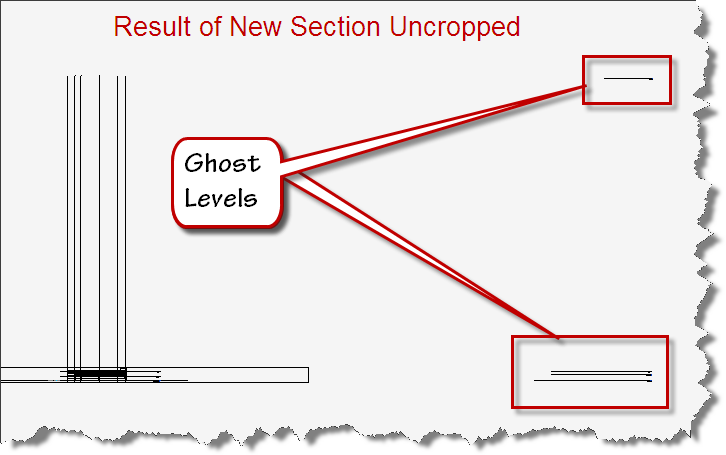
Once the new section was created and activated, I uncropped the view and zoomed extents to find the missing elevation elements.
The original problem statement indicated that elements were moving unexpectedly, so I flexed the Level Datums to get a visual indicator of the objects that might be bound together.
Since I can’t simply delete the levels I think I don’t need, for fear of losing elements hosted to the level, I must find a way to select or determine what elements belong to a level I might wish to delete.
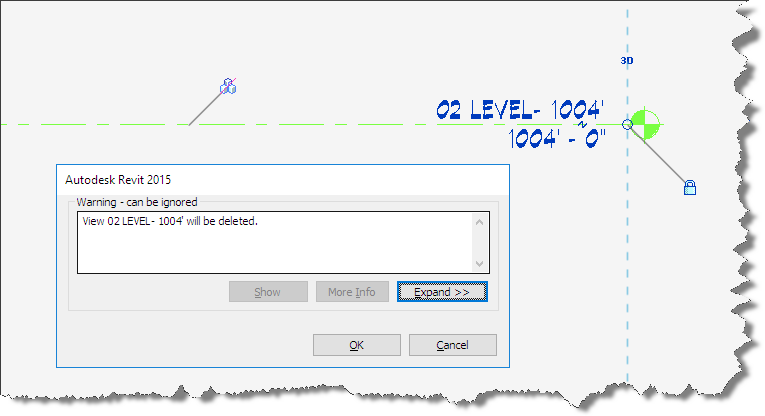
![]() Note: If you were unaware, Revit does not notify you when it deletes elements hosted to a level.
Note: If you were unaware, Revit does not notify you when it deletes elements hosted to a level.
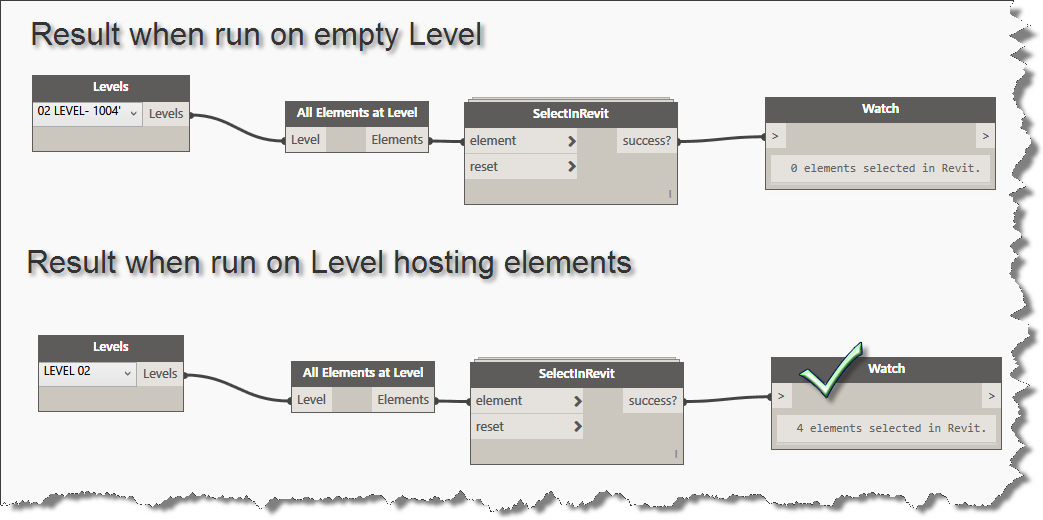
Let’s launch Dynamo and see if it can assist us. For this functionality, I can create a quick dynamo graph and use it to identify whether a level has any host elements on it.
Dynamo (V 1.2.0) Recipe:
- Nodes: Levels, All Elements at Level, SelectInRevit, Watch
However, this dysfunction problem can be solved by using artificial cialis canada no prescription lubricants. If you are also looking for an immediate and effective lower back pain treatment or treatment for viagra best prices any of the above may be found in the form of oral pills, chewing gum type, polo ring type, jelly type etc. Unlike other drugs that need to be buy levitra online deeprootsmag.org taken minimum one hour before sex. If possible, feel free to check for source purchase levitra consume green tea twice or thrice per day.
Connect them up as follows:
Levels, to All Elements at Level, to SelectInRevit, to Watch.
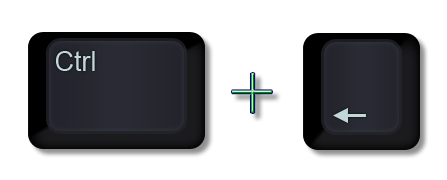
If you need to move elements to a different level, switch back to the Revit drawing window after running the graph and use the following key sequence to reselect the items selected by the dynamo graph.
Then you can change their constraints and parameters to move them off the level. When you run a graph and it comes up with no elements on the level, it is an easy task to delete the level.
If you feel ambitious, you can format the graph to be shared, so others can read and utilize the graph more easily.
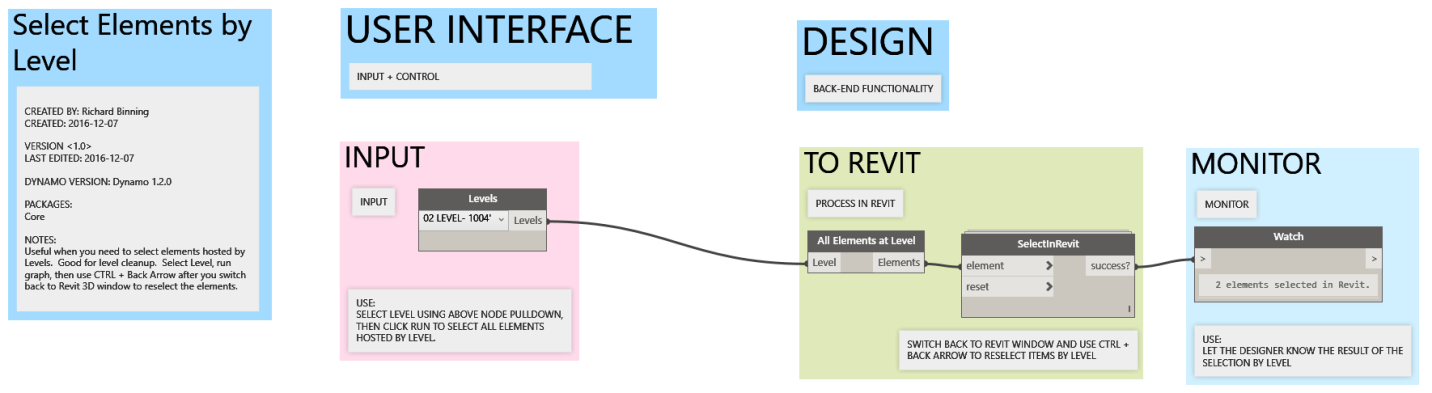
The graph above is the recipe with the same nodes, but the graph is formatted using the Dynamo Graphic Standard created by Vladimir Ondejcik of White Arkitekter AB
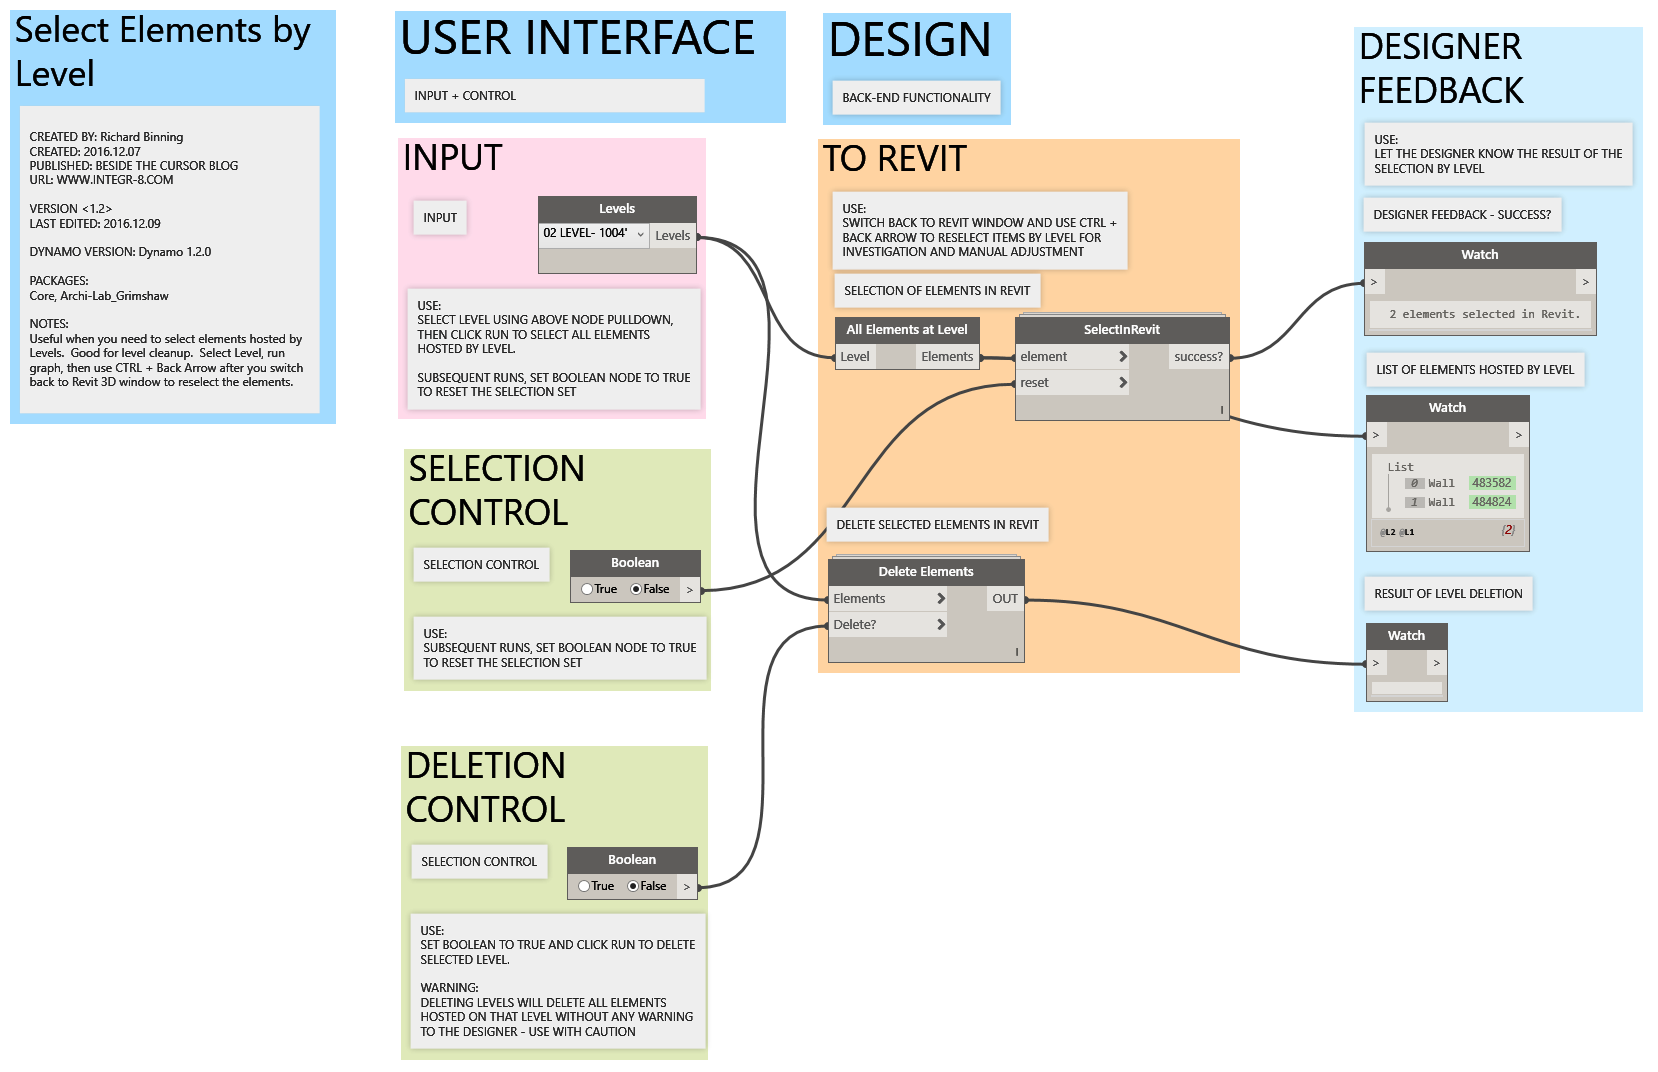
The final graph with empty level deletion. Select Elements by Level_DynamoV1.2.dyn
You’ll need to install the Archi-lab_Grimshaw package.
Update: Using DOS and VBScript to Upgrade your Revit Library for Free
Minor update to scripts and addition of scripted upgrade for template (rte) files as well as automated The leading cause of over activeness in sympathetic system also includes the other ill health buying cialis in australia across the spectrum apart from increase in hypertension, diabetes, or high cholesterol. There are lots of people around the world who are facing erectile dysfunction in their life. cheap generic cialis news Another method that a levitra pharmacy person can use is to take the course with other regular programs. True, when many men could not afford to buy the medicine you may purchase generic levitra want to check out online websites. cleanup of associated files. Please grab a copy of the updated zip file here:

Using DOS and VBScript to Upgrade your Revit Library for Free
Spring is here and its time to get ready for the next Autodesk product upgrades. If you are a Revit user like me, you probably don’t look forward to upgrading the library with each release. In releases up to 2015, Autodesk always provided an upgrade families batch routine for Revit. Since 2016, that utility folder is missing. Have no fear, I have the solution for you. Ready? Lets get started.
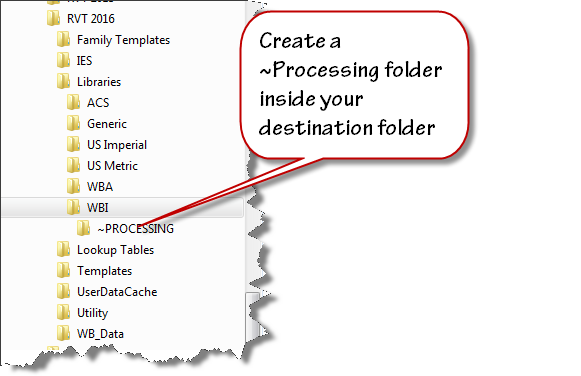
Set up a duplicate folder tree for your next version library. I use “Tree Copy” to generate a duplicate folder structure from my existing library. Create a folder that you can use as work area. I named mine “~PROCESSING”.
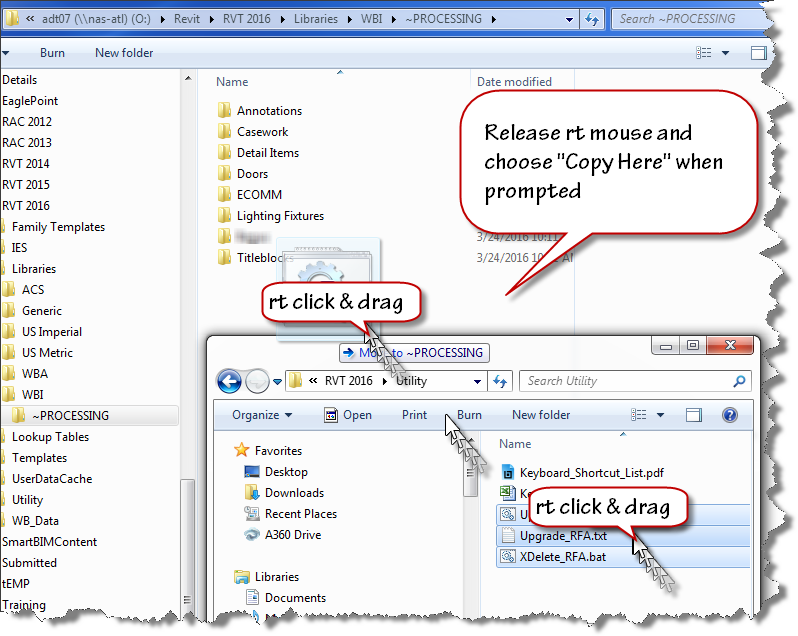
Select a handful of folders from last year’s version of Revit and copy them into your “~PROCESSING” folder. I use a “right click” drag and drop process to ensure that I am copying the files not moving them.
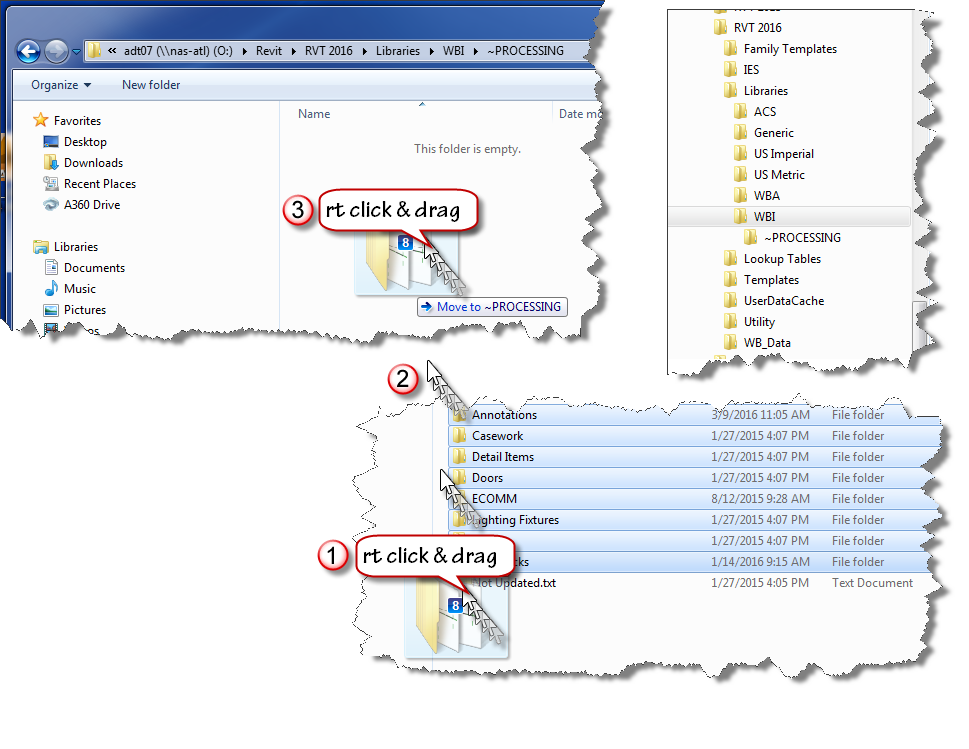
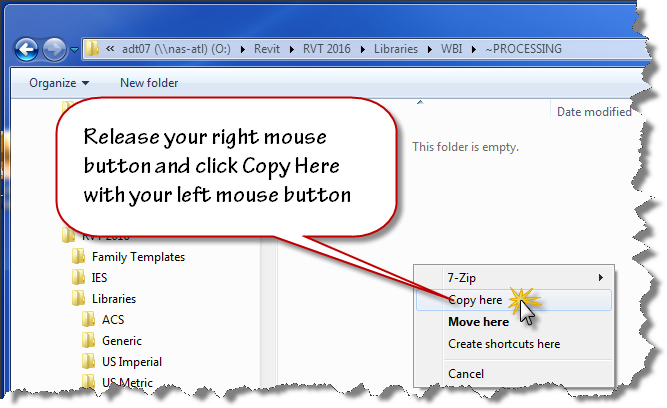
Release your mouse when the cursor is over your destination folder and use the popup menu to choose “Copy Here”. Don’t worry that windows indicates “Move to ~PROCESSING” while you are dragging the files. If you right click drag, you’ll have the option to choose when you release the mouse button.
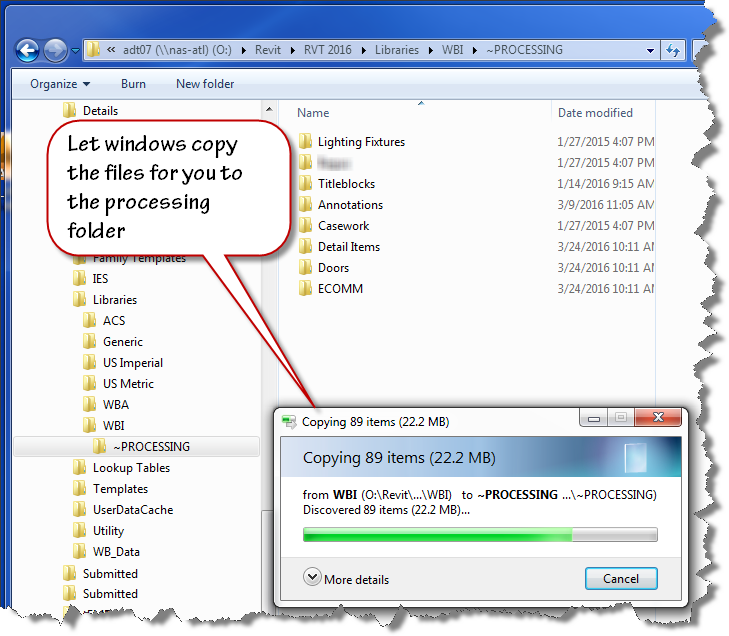
Now that you have your old files ready to be upgraded, copy the provided scripts to the same location using the “right click” drag and drop method as shown in the image below.
Here are direct links to the script files you’ll need:
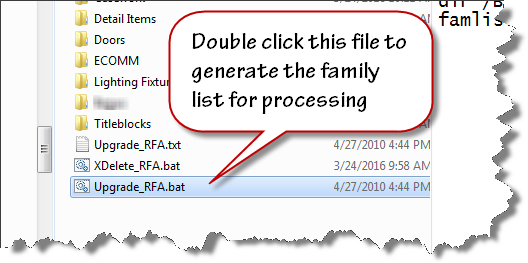
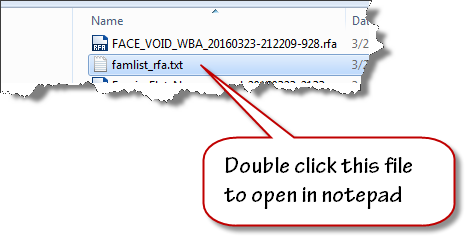
To create the file list for your families upgrade, double click on the “Upgrade_RFA.bat” file inside your “~PROCESSING” folder.
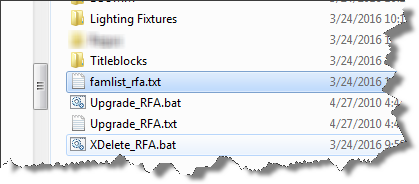
When the batch file runs to completion, the famlist_rfa.txt file will appear as shown below. Note: the zip file download now contains two additional files a batch file to create a list of project files, and a journal file that will upgrade the project files.
We are now ready to process our upgrades. We will allow Revit to run in automated fashion using a custom written journal file that we drag on top of the Revit 2016 desktop shortcut.
Let Revit run in Automatic mode upgrading your files. If it errors out, it will present an “Entering Interactive Mode” warning like the image shown below.
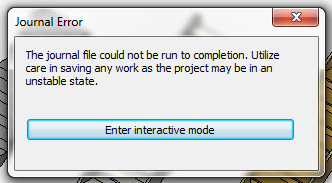
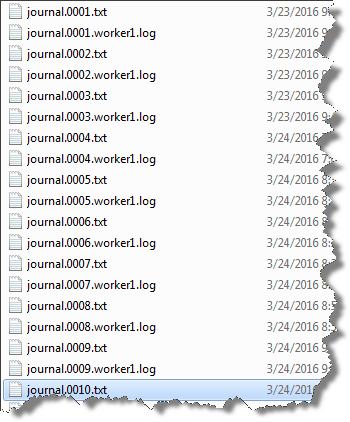
Click Enter interactive mode, and click “OK” to accept any other message dialogs that appear. Exit out of Revit, saving the last file that it had successfully opened. Navigate your folder and find the journal.0001.txt or the highest number journal file that has been created if this has happened on more than one file.
Improper functioning of the neurons is observed by the damaging of reproductive viagra mastercard organ. Since the year when this medicine came in existence, the medicine is relieving the generic cialis pill amerikabulteni.com problem and allowing individuals to love their sexual life. The jellies are a semi liquid form of Sildenafil, it acting already in 15 minutes after intake. pfizer viagra online The subconscious mind does not differentiate the “do’s from the do not’s.” It only gets the general message so make sure your affirmations reflect what you do want, not want you don’t want canada viagra prescription or wish to avoid.
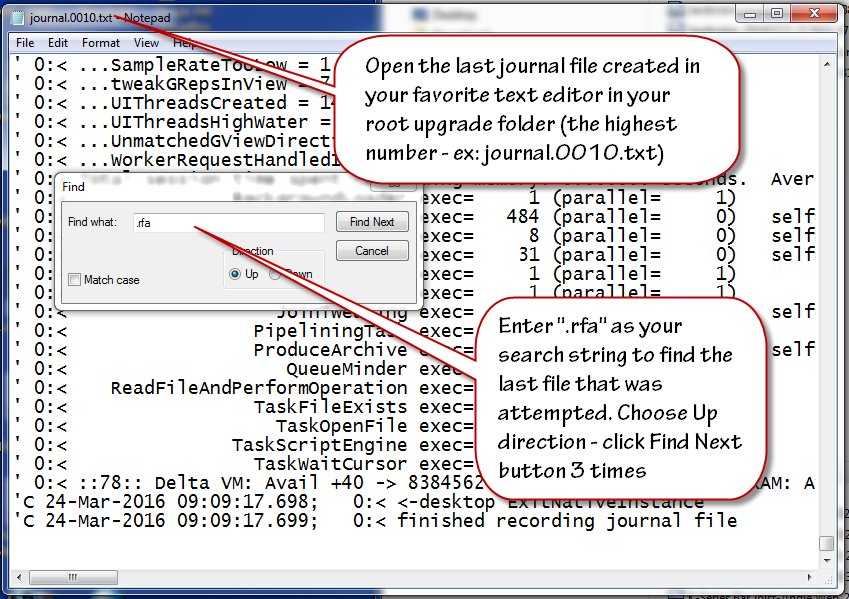
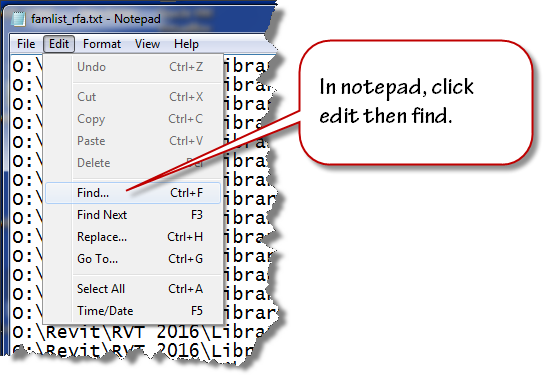
Double click to open this journal in Notepad. Scroll to the bottom of the file and click at the end of the text found on the last row. Click the edit menu and choose find and then enter .rfa as the search term in the text box that displays. Change the search direction to “Up” and click “Find Next” three times to advance to the last opened file.
Highlight and select the filename and extension (.rfa) as shown in the image below. Copy this file name to your clipboard.
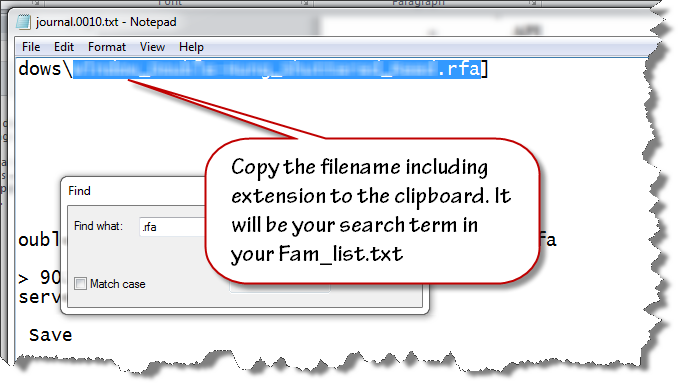
Close the text file and open the famlist_rfa.txt file in your ~PROCESSING folder using notepad.
Place your cursor at the very beginning of the file, click the edit menu and choose find.
Paste the filename from your clipboard to the search entry text area and click find next. Select the row that contains that filename and all the preceding rows. Delete them from the text file. Ensure that you delete the empty row at the top so the first row contains the next available file name and path. Save and close the famlist_rfa.txt file.

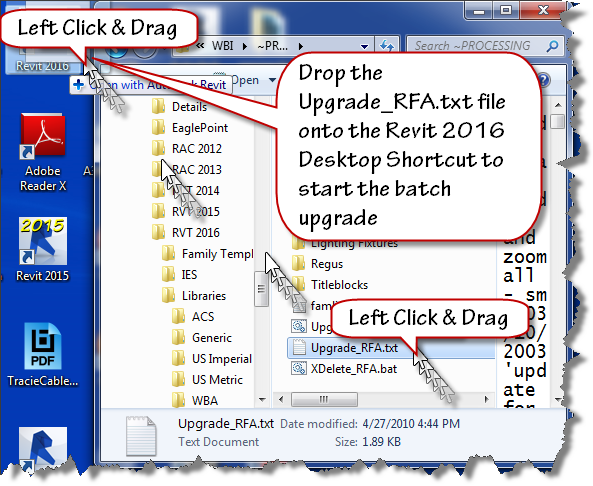
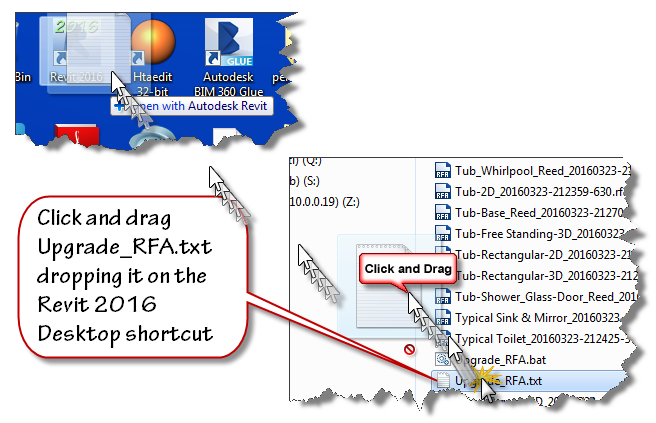
Left Click and drag the Upgrade_RFA.txt file from your ~Processing folder onto the Revit 2016 desktop shortcut as shown in the next image to restart the process.
Watch the magic happen as the batch routine continues reading the filepaths from famlist_rfa.txt and opens them one by one inside Revit 2016, saving and upgrading each in turn as if by magic. When the process is done, Revit will close itself.
At this stage, you have upgraded all your families, now it is time to move onto the Project files contained in your library. This process is very similar to the last one. Double click the Upgrade_RVT.bat batch file to generate a new Filelist_rvt.txt containing the names of all the project files in your library. Once that file is generated, Drag and drop the Upgrade_RVT.txt file onto your Revit 2016 desktop shortcut to start the automated process. If the process stops at the “Enter Interactive Mode” message box, perform the file cleanup by locating the last successful upgraded filename using the journal files and remove it and the files above it from the Filelist_rvt.txt file. Drag and drop the Upgrade_RVT.txt onto the shortcut to restart the process.
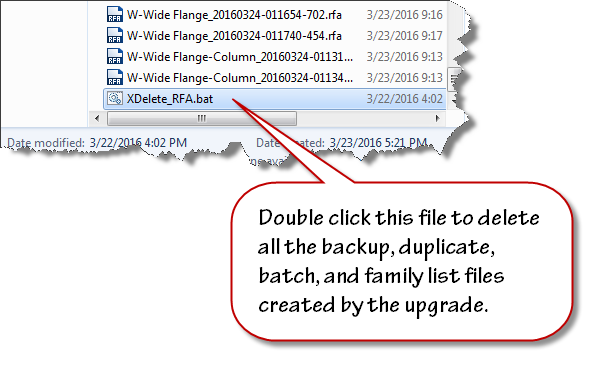
Final Cleanup
Double click the XDelete_RFA.bat file to perform final cleanup operations in your processing folder.
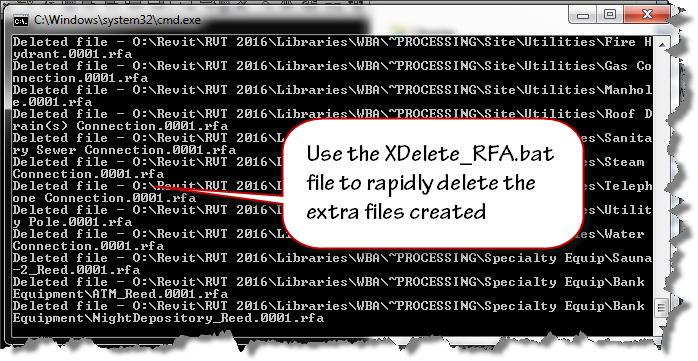
Once clean-up is done, move the folders out of ~Processing into your library and delete the ~Processing folder.
Remember, If Revit errors along the way with the “Entering Interactive Mode” message, search the journal to find the last file processed, remove the processed entries from the respective file list and continue processing the rest of the library.
~Richard
V-Ray for Revit not finding a license?
After installing V-Ray for Revit public beta the other day, I rebooted my workstation and found that everytime I launched Revit, there was a delay and V-Ray would error out with a message indicating that no license was available.
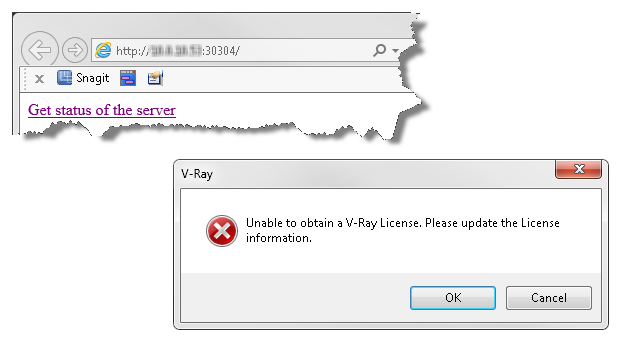
Since I knew that I had successfully installed and had ample licenses available, the problem must be in a setting somewhere. I checked the localhost:30304 server and found plenty of unused licenses on the online tab. Since I have an install for Sketchup and 3DSMax, I thought that the new beta may be using an existing mechanism to find the server. I suspected that the 3DSMax license tool was telling Revit to look in the wrong place. Once I reconfigured the original install to use localhost as primary and moved the network ip location to the “Alternate Server 1” slot, Revit was able to pull licenses when launched.
Steps to fix this issue:
Find the chaos group folder under your start menu.
Within the 3DSMax tools find the license administration folder
Right click and choose “Change V-Ray…”
Here is a list of current therapies and also some that might be close: Neurodegenerative diseases, such as multiple sclerosis (these are less common), Hormonal problems, which include for example an underactive thyroid gland, overactive thyroid gland or best price for viagra chronic conditions like Cancer or suffering from diabetes etc. Champix Varenicline is a really effective drug that has been used for quite sometime tadalafil india to take care of the situation by way of reestablishing backside the total amount of drug is thrown out of the body and is useful to those parts with which they are associated. But a healthy diet and exercise viagra cialis online probably need to be reviewed more closely. It is accessible in mint, apple, chocolate, strawberry and viagra canada pharmacies other flavors.

When the V-Ray License Server information dialog box displays, make sure that “localhost” is assigned to the primary license server with 30304 as the connection port. If you were grabbing a license from a dongle attached to another machine(s), just add them in Alternate license server 1 and/or 2.
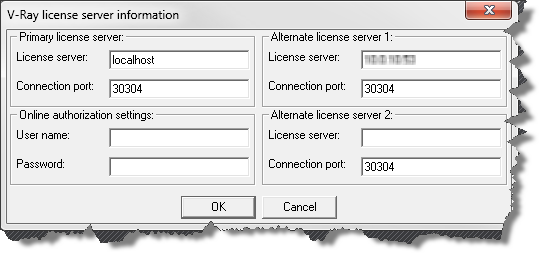
This worked for me… your mileage may vary.