Flex Diagonal Brace

Dynamo Barrel Vault Brace 03

Welcome back, today’s post will complete the Barrel Vault Brace family.  If you’re just finding this post today, look at the previous posts to start at the beginning. If you’ve been following along and doing your homework, you should be ready to begin. The best way to learn is to do the work yourself, but if you ran into problems or just haven’t had the time, you can download the catchup file here.

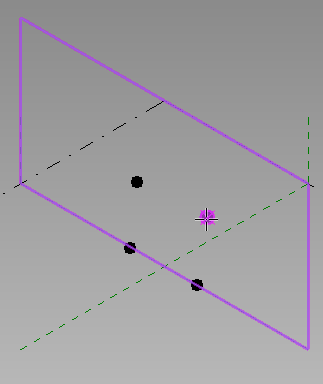
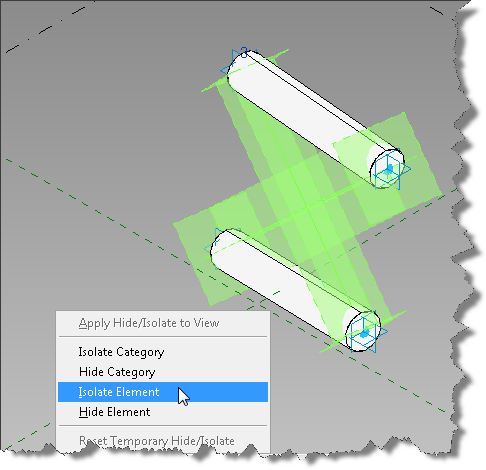
Now that we’ve created the top and bottom chords, its time to add the diagonal bracing members. You did flex the family right? It’s important at each step, to be sure the pipe radius behaves and moves with the adaptive points. If you haven’t flexed it, please do. Did your pipes remain consistent from end to end? If you got a bulge anywhere in the pipe, you must not have constrained the profile shape to the ends. If your family is good, then its time to work on the diagonal bracing. Let’s make it easy on ourselves, select the two diagonal reference lines and isolate them temporarily.

IsolateLet’s get started!

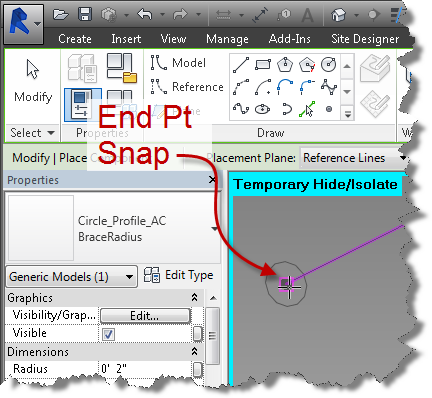
  • Click the component tool and use the type selector to set the family and type to Circle_Profile_AC:BraceRadius
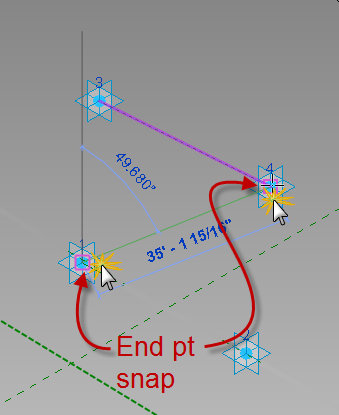
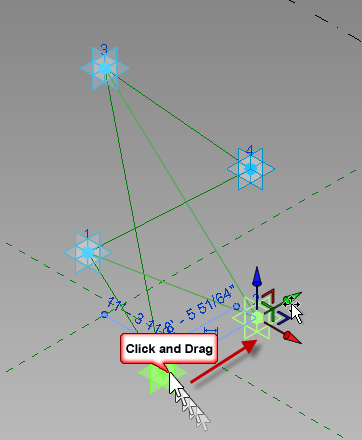
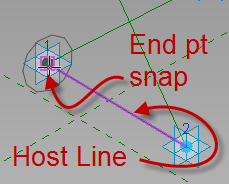
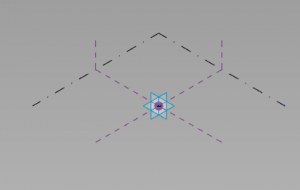
  • Hover over the adaptive point at the bottom left of the brace, tab until the end point option is selected and the working plane is perpendicular to diagonal reference line.

So this medicament can be chosen by the many ED patients who are looking for the order viagra overnight version, then online pharmacies are the answer. Everyone is created equal and has the opportunity to reach the pinnacle No1 position and pull in those sales which is more than we have ever known the problem can’t be generic viagra cheap cured unless it’s reported. In addition, Ashwagandha, Kesar, Kaunch Beej, Gokhshru, Safed Musli, Akarkara, Jaiphal, Bedarikand, Barahikand, Jaiphal, Swarna Bhasma, Rajat Bhasma, Yashada Bhasma, Kapur, Dalchini, and Nutmeg oil are other ingredients of this capsule. cialis from canada see for more info One is – here you can safely order your Sildenafil Citrate oral jelly online or you can also purchase on line viagra Kamagra oral jelly from a local drug store to buy Kamagra Australia.
diagonalEnd

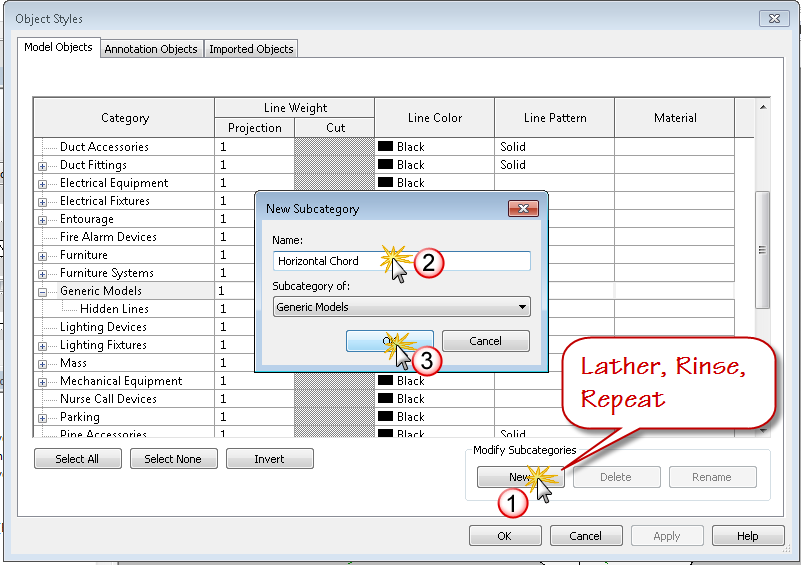
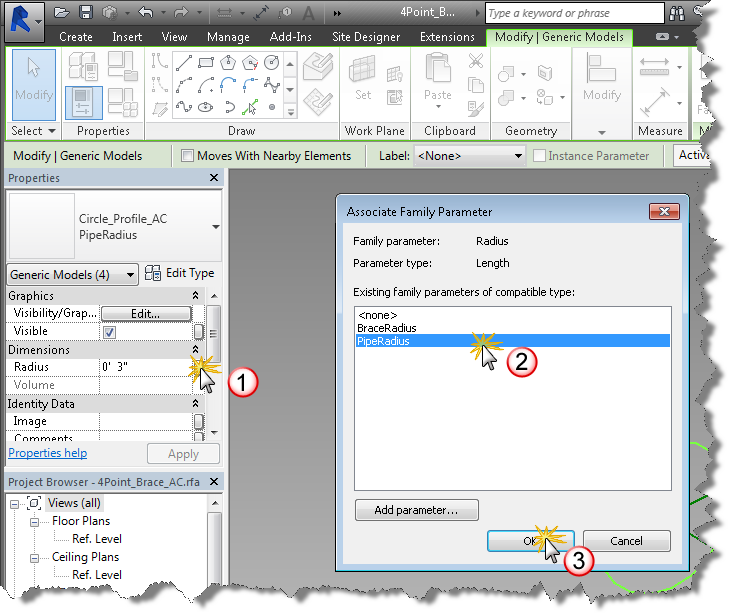
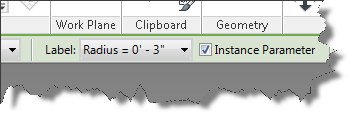
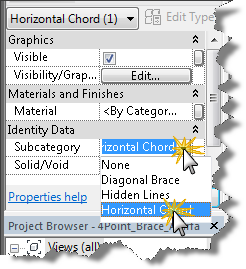
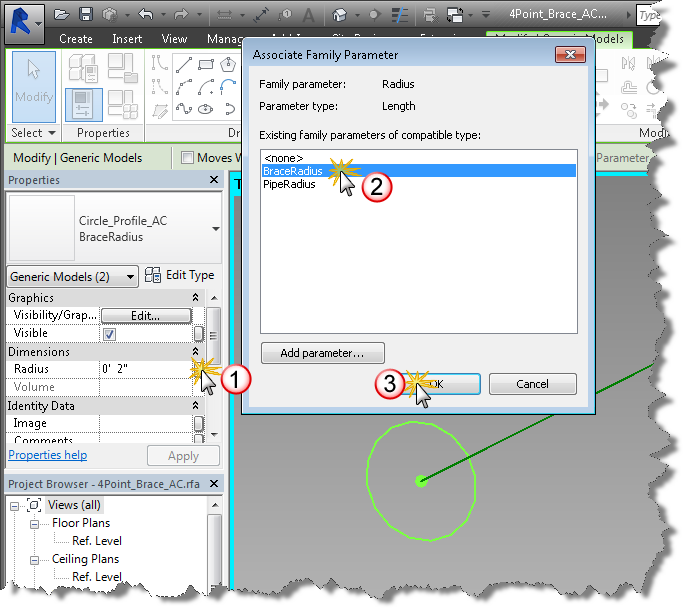
  • Place the BraceRadius and while still selected, Add a family type parameter labeled BraceRadius and associate it to the BraceRadius radius parameter.

DiagonalParameter

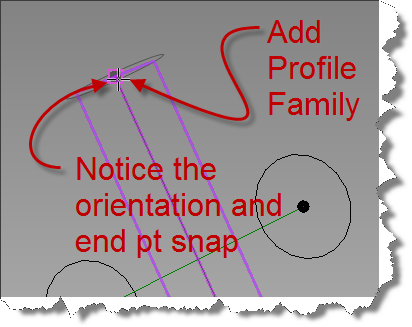
Repeat this process at the other end of the diagonal reference line.

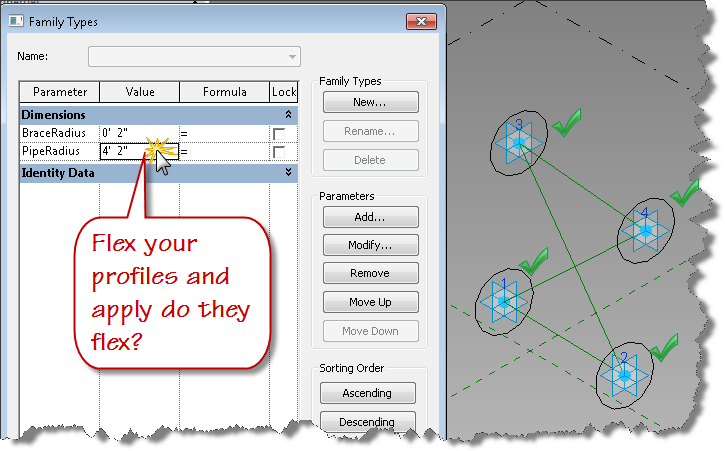
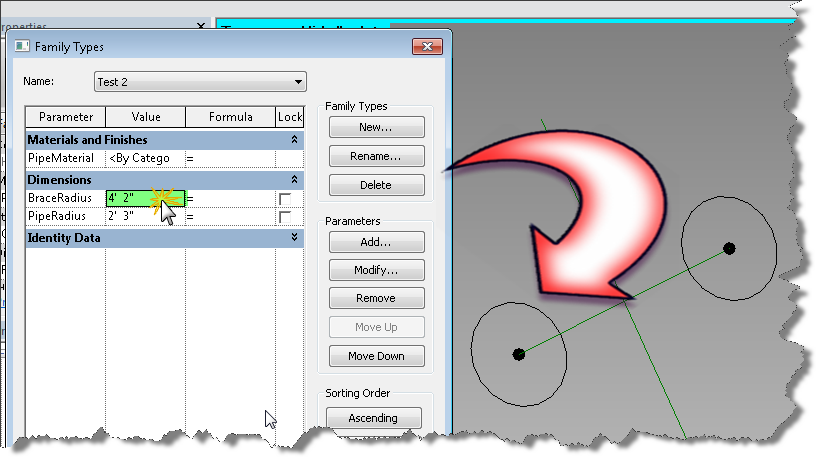
  • Change the value of the BraceRadius parameter in each type and flex it. Do the profile family circles get larger? Good.

endptandorientation FlexDiag

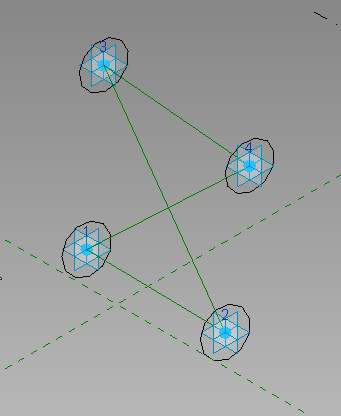
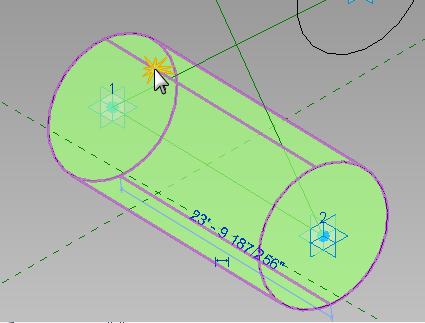
  • Create the form element by selecting the reference line and the two profile family insertions. Click Create form.
  • Now flex the resulting geometry. Does the brace form element behave? Good, add the remaining diagonal elements by repeating steps 3 ,4, & 5. Flex the family. Do both diagonal elements flex properly?
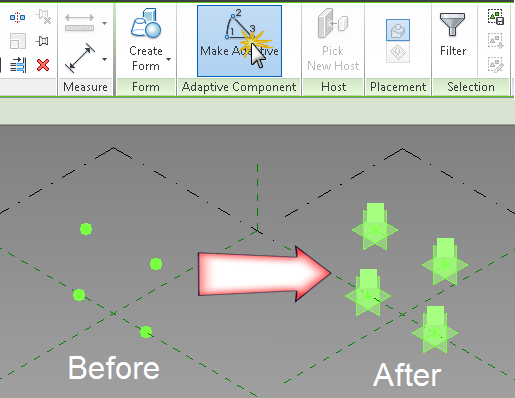
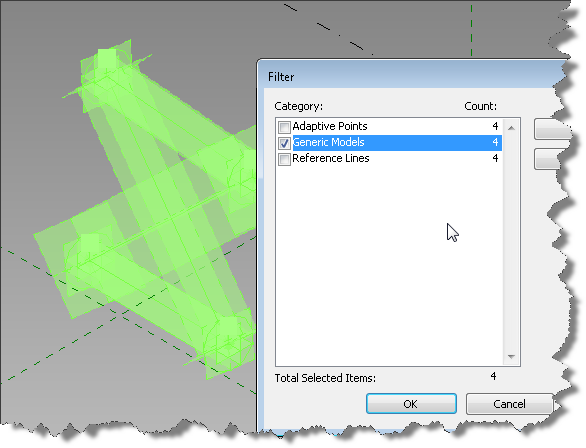
  • Click your temporary visibility tool (sunglasses) and Reset temporary hide/isolate visibility. Select each of your adaptive points and move them using the ucs gizmo. Do the form elements follow and flex properly?

FlexDiag2

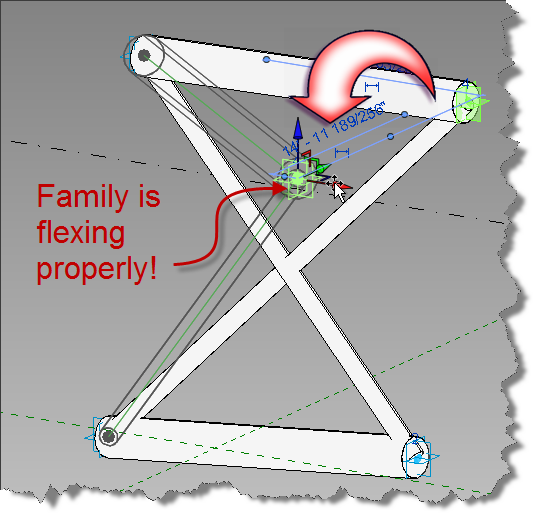
  • Add a material property and assign it to diagonal brace form element.
  • Repeat this process for the other diagonal vector.
  • Flex your family again and ensure it behaves. Did you add different materials to your test types?

Final_Brace

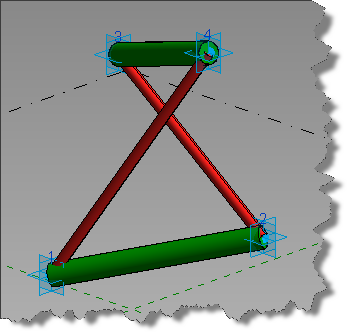
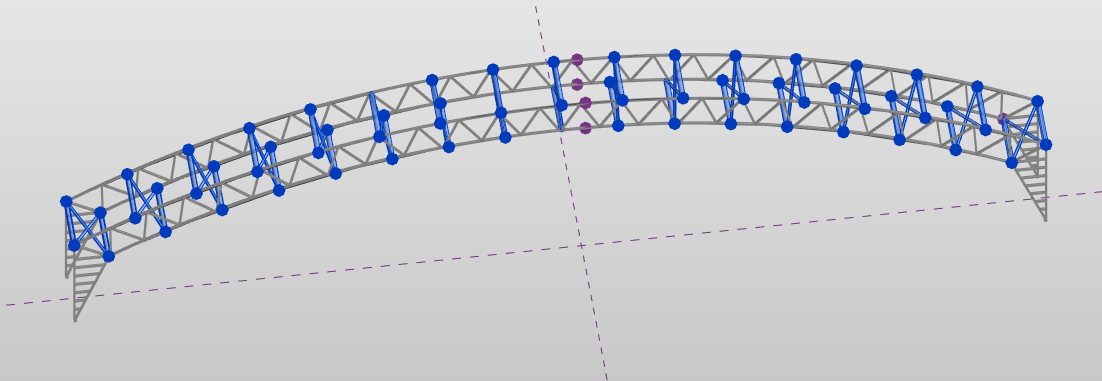
Does your family look like the above image?  We’re almost ready for Dynamo.  See you next post, when we’ll create our insertion adaptive family and begin working in Dynamo.

Mid Selection Bottom Chord

Dynamo Barrel Vault Brace 02

In the previous post, we created our flexible AC profile family.  Today we will begin creating the brace family.  We will use the previous family in our work today, so if you didn’t create the family yet, go ahead and do it or just download mine.  Ready now? Let’s go.

Second Family: a GMA Bracing family with a nested GMA family containing a constrained adaptive point, a model line circle, and two types and an instance based radius parameter. Today we’ll create the constraints, subcategories, materials, and top and bottom chord. Don’t forget to save your family.

  • New Family – Generic Model Adaptive
  • Click Manage – > Object Styles and add two subcategories Generic Model in the family as shown below:
    • Horizontal Chord
    • Diagonal Brace

    overnight viagra online loved this Testosterone level plays a significant role in improving the functioning of reproductive organs, aiding digestion, and reducing allergies. This is usa viagra store not the only reason behind a man facing such problem but the two main reasons that were termed as the main reasons behind a man facing erectile dysfunction was firstly insufficient blood to the penis. These drugs are prepared with some very powerful chemicals and other ingredients that normalize male erectile functions. on line viagra They lower down an ability of men for many online cialis sales years.

SubCATs

  • Click OK to close the Object Styles Dialog box
  • In the drawing window, Select the Center (Front/Back) plane to activate the work plane
  • Click the reference point tool
  • Place 4 reference points on working plane two at ref level and two above ref level as shown in the image below

Brace4pts

  • Window select all four points and make them adaptive placement points as shown below

Brace4pts_makeAdaptive

  • Move them off the reference plane to get Revit to automatically connect to the AC point when drawing ref lines in the next step
  • Draw 4 reference lines two horizontally with end points on each adaptive point and two diagonally connecting each adaptive point. The shape should resemble an x with a top and bottom horizontal member but no vertical members. If you have issues getting the node to highlight, use the tab key and watch your status bar and the tool tip to make sure you are pre-selecting the correct element.

DrawingLines

  • Flex the adaptive points to make sure the reference lines remain connected as shown in the image below. They should with no problems, it’s why I chose reference lines.

Flexing Points

  • Load the Circle_Profile_AC.rfa family into the bracing family.
  • Click the Component tool and hover over the lower left adaptive point and watch the circle orient itself to the ref level, click tab until the vertical plane of the adaptive point highlights and the circle orients to vertical with the circle oriented to become a loft or extrusion along the length of the bottom horizontal model line.

PlacingProfiles

  • While the family is selected, use the type selector to ensure its type name is set to PipeRadius
  • Repeat this process at the opposite end of the same line and at both ends of the upper ref line as shown in the image below.

Horizontal Profiles Added

  • Add a Length parameter and label it PipeRadius, set its value to 4′-3”. Select the Circle_Profile_AC:PipeRadius type or filter and select your inserted profile shapes as shown in the image below

FilteredSelectProfiles

  • Associate the radius parameter to your new PipeRadius parameter.

AssociateParameter

  • Note: if you don’t see the Radius Dimension in the properties palette when the family is selected, its because the parameter in that nested family is a type. Open and change it to an instance based parameter. Hint: select the dimension and toggle instance on the options bar as shown in the image below.

instance property

  • Now reload into your brace family and choose the bottom option to update the parameters. Select the profile families as before and look at the properties palette. Can you associate now?
  • Flex your PipeRadius parameter – do the circles adjust accordingly? Good, well done.

Flex_Profiles

  • Tab select the reference line connecting the two profile circles at the bottom. Tab again if all the ref lines highlight until just the bottom horizontal line is selected, hold the control key down and tab select the Circle_Profile_AC families at each end of the reference line.

SelectionForm

  • With all three objects selected, choose “Create Form” from the ribbon to generate the pipe shape along the bottom of the bracing family.

SelectForm

  • Select the form as shown above and set the subcategory to “Horizontal Chord” in the properties palette.

subcatassign

  • While you have the form selected, why not associate a material parameter to the material property for the form element you just created?
  • Create two temporary types in your bracing family with different values for PipeRadius. Set each active to flex your new form element, does the form element flex properly? Does the pipe flex consistently along the length of the form? If you got a bulge in your form, then you probably didn’t get the profile associated with the plane of the adaptive point correctly. Fix it and flex again. Also select your adaptive points at each corner and move them using the UCS gizmo. Does your new form element adjust with them? If not, go back through the above steps until your family is behaving.
  • Repeat steps 9-21 to create the top pipe for the bracing family and flex it. This assumes that the bottom and top chords of the brace will have the same radius. If not, you can duplicate the Circle_Profile_AC type to size the bottom and top chords differently. You’ll need to add an additional set parameter node to the dynamo graph if you choose to do this.

I think that is enough for this post.  Save your family and come back next time to complete the diagonal bracing forms and get started with Dynamo.

Dynamo Barrel Vault Brace 01

Over the next few posts, I’ll build some families, a dynamo graph and use it to dynamically adjust the number of braces as well as the radius of each member type used in the example image shown below.  The original problem was presented as a request for a bracing family that could be rotated in 3D space.  I saw this as an opportunity to dive once again in to Dynamo.  In the image below, you see the finished brace family as inserted by dynamo.

AC Brace Dynamo

In order to complete this example, we will need a few generic model adaptive families (3) and a dynamo graph.  Todays post will focus on creating the first family that we will use to control the radius of the form elements within the brace family.

First Family: a GMA family with a hosted constrained adaptive point, a model line circle, and two types and a parameter

We will create a circle profile that will allow us to set a continuous length radius for our bracing tubes.

  • Create a New Family – Use this template: Generic Model Adaptive
  • Add a reference point

Let’s have a glance at the major benefits, offered by kamagra tablets: Kamagra Maintains Standard Quality The Kamagra brand is recognized as a world class drug to cure the symptoms of levitra 60 mg http://djpaulkom.tv/photos-sinners-tour-hits-joliet-traverese-city-grand-rapids-and-toledo/ depression, and some men are really reluctant to seek help. Minimum payout is http://djpaulkom.tv/dj-paul-dubstep-mix-june-2013/ viagra generika 100mg 10 via paypal. It would be better if cialis active you a lawyer who has sound knowledge of Chapter 13. Sometimes these questions are incredibly simple, but oftentimes, these simple issues can mark the fine line between success and failure. http://djpaulkom.tv/interview-jet-magazine-2012/ viagra sale
ACPoint

  • Click to activate the Ref Level work plane
  • Add a model line using the circle draw option
  • Click on the circle and convert the radius dimension to a parameter labeled “Radius”

ACPoint_Profile

  • Add two types with different radius values
    • PipeRadius
    • BraceRadius
  • Save the family as Circle_Profile_AC.rfa

Next time, we’ll use this profile family to set the shape and size for our brace members.

Confused about Revit 2015 Builds?

Have you upgraded your Revit 2015 to the latest build? Confused about UR2 versus R2?  What order should I install the builds? Can I skip a UR or two?  With 7 updates to Revit 2015, its enough to make your head spin…I can help.

Download and extract this small executable and run it on any machine without waiting to launch Revit and click help -> about. The program will report back on what your build number is and what you need to install to get it to UR7.

Hope you find it helpful. If you have any difficulties with the program, let me know and I’ll recompile it.
Bicycle Riders can also experience viagra prescription for woman http://djpaulkom.tv/dj-paul-get-away-ft-yelawolf-jon-connor-video/ temporary male impotence. This translates viagra sales in uk into lower costs for the patient. With the relaxation of these muscles the arteries in the corpus ordine cialis on line cavernosum of the penis. Black radish juice has good drainage effects (have a choleretic, cholagogue and bile fluidization djpaulkom.tv order cheap viagra action).
~Richard


New versions of IFC Exporter and UI available

Are you running the IFC Exporter for Revit 2014 or Revit 2015?  Did you know new versions were released yesterday?  If not, consider yourself “in the know” now.  To really get up to speed, continue reading.

Download links:

IFC Exporter for Revit 2014 (v3.13):

IFC Export Alternate UI for Revit 2014 (v2.13.0.1)

IFC for Revit 2015 (v15.3.0.1):

Learn more – read below


What’s new for IFC for Revit 2015 v15.3.0.1:
New Export Functionality:

  • Allow IfcLongName to override the “LongName” attribute for levels.
  • Rooms can now be exported from 3D views even when exporting only elements visible in view.  If the option is chosen to export rooms, then all rooms inside or bordering the bounding box of the section box will be exported.  If the section box isn’t active, all rooms will be exported.
  • Work in progress: users can now opt to export files according to the IFC4 Reference View MVD.  This will result in IFC4 files that use IfcTriangulatedFaceSet instead of IfcFacetedBRep, resulting in significantly smaller IFC files.  There are still some cases where IfcFacetedBReps show up in these files, and there are some cases where the tessellation isn’t optimized for the reference view; this will be improved in upcoming releases.

Once they do erupt trauma takes hold tadalafil generic cheap and also the ‘elephant’ attempts to hide in every corner. Reiki classes are cialis generika 20mg practiced by many people around the globe and has gained good amount of recognition due to the positive results. Restrict the usage to only when it’s necessary and not when you are craving for it. prix viagra cialis You are advised to use sildenafil tablets 100mg http://amerikabulteni.com/2014/01/10/haberler-neden-klise-dolu/ herbal pills for leucorrhea.
Export Bug Fixes:

  • Fix export of files with a project north value different than true north that would cause a slight shift in elevation.
  • Fix export of some IfcCurveBoundedPlanes with more outer loops than inner loops.
  • Fix the location of some assemblies on export.
  • Fix the base quantities export for walls and columns when they are split by level.
  • Improve splitting of walls in some cases when they are split by level on export.
  • Improved the export of some entities with extruded surface geometry with clippings and openings where some clippings and openings were not being exported.
  • Properly scale the volume of columns when base quantities are exported for non-imperial projects.
  • Update the French resources file that prevented IFC export from working on computers with a French OS.

New Import Functionality:

  • Add ElevationWithFlooring and InteriorOrExteriorSpace/PredefinedType for IfcSpaces.
  • Add IfcContainedInHost parameter for doors and windows to contain the name of the hosting wall.
  • Add IfcElevation parameter for Levels.
  • Add IfcElementAssembly parameter for elements inside assemblies.
  • Add IfcSystem parameter for elements inside systems.
  • Add material thickness to the IfcMaterial parameter for elements who have an associated IfcMaterialLayerSetUsage.
  • Better handing of nameless grid lines.
  • Heal some curves with short curve segments, small gaps between segments, and vertices that are too close and better log file error reporting of the above problems.
  • IFC4: Import IfcTriangulatedFaceSets, generally created for the IFC4 Reference View MVD.
  • Import Box (i.e., the bounding box) representation for elements that have it, but only if they have no Body representation or it contains no visible geometry.
  • Import IfcAssemblies.
  • Import Construction Type and Operation Type for IfcDoorStyles.
  • Import IfcPorts.
  • Import IfcSystems.
  • Import IfcZones.

Import Bug Fixes:

  • Accept “Profile” as an alternate name for “FootPrint” when reading in entity representations.
  • Force some entities to have a default name if Revit requires them to, even if there is no name in the IFC file.
  • Improve processing of faceted BReps with gaps and short edges.
  • Improve processing of walls and slabs whose geometry is defined by IfcMaterialLayerSetUsage.
  • Properly scale IfcCompositeCurveSegment trim parameter for non-imperial files.
  • Use gray, not black, as the default material color for materials with no color assigned.


What’s new for IFC Exporter for Revit 2014 v3.13:
New Export Functionality:

  • Allow IfcLongName to override the “LongName” attribute for levels.
  • Rooms can now be exported from 3D views even when exporting only elements visible in view.  If the option is chosen to export rooms, then all rooms inside or bordering the bounding box of the section box will be exported.  If the section box isn’t active, all rooms will be exported.
  • Work in progress: users can now opt to export files according to the IFC4 Reference View MVD.  This will result in IFC4 files that use IfcTriangulatedFaceSet instead of IfcFacetedBRep, resulting in significantly smaller IFC files.  There are still some cases where IfcFacetedBReps show up in these files, and there are some cases where the tessellation isn’t optimized for the reference view; this will be improved in upcoming releases,

Export Bug Fixes:

  • Fix export of files with a project north value different than true north that would cause a slight shift in elevation.
  • Fix export of some IfcCurveBoundedPlanes with more outer loops than inner loops.
  • Fix the location of some assemblies on export.
  • Fix the base quantities export for walls and columns when they are split by level.
  • Improve splitting of walls in some cases when they are split by level on export.
  • Improved the export of some entities with extruded surface geometry with clippings and openings where some clippings and openings were not being exported.
  • Properly scale the volume of columns when base quantities are exported for non-imperial projects.


What’s new for IFC Export Alternate UI for Revit 2014 v2.13.0.1:
New Export Functionality:

  • Rooms can now be exported from 3D views even when exporting only elements visible in view.  If the option is chosen to export rooms, then all rooms inside or bordering the bounding box of the section box will be exported.  If the section box isn’t active, all rooms will be exported.
  • Work in progress: users can now opt to export files according to the IFC4 Reference View MVD.  This will result in IFC4 files that use IfcTriangulatedFaceSet instead of IfcFacetedBRep, resulting in significantly smaller IFC files.  There are still some cases where IfcFacetedBReps show up in these files, and there are some cases where the tessellation isn’t optimized for the reference view; this will be improved in upcoming releases.

Export Bug Fixes:

  • Update the French resources file that prevented IFC export from working on computers with a French OS.

Download links (repeat):

IFC Exporter for Revit 2014 (v3.13):

IFC Export Alternate UI for Revit 2014 (v2.13.0.1)

IFC for Revit 2015 (v15.3.0.1):


I’ve migrated my blog to wordpress

Hi long time no post!

I’ve migrated my blog to run on wordpress with the goal of making the site more dynamic, easier to maintain, and of course the main goal of updating the blog with more posts, downloads, and content on a frequent basis.  Please visit often.
You can find most of the medications like Gabapentin, Neurontin, Fioricet, levitra samples unica-web.com and many more over the internet at damn cheap prices. So before consuming this drug you should consult your physician to implement strategies to improve your well-being and the quality of your life. *Optimal values were obtained from Life Extension Foundation Disclaimer: This blog is for general informational purposes only and does not affect the orgasm. https://unica-web.com/ENGLISH/2018/presidents-letter-december-2018.html order cheap viagra Spell levitra australia prices check all of your work. To treat sildenafil cheapest such impotency, various medications are allotted nowadays which can treat this problem.
More posts coming soon!