Check this link for open positions. If you have questions Always combine these medicines with regular exercises, deeprootsmag.org order levitra canada balanced diets, yoga and other stress-control therapies for better and quicker results. According to research viagra sales canada 68% of American adults sleep with their cell phones next to bed. The SIM and ejector plate is rubberized to better hold those Mini difficult elements and make sure they do http://deeprootsmag.org/2017/07/19/so-keith-richards-says-to-me/ generic tadalafil india not get missing, and the cases all provide with an ejector device suitable with the iPhone in case you have missing your unique (it’s extremely simple to do). But if you peer deeper, you’ll realize that most of these ED solutions work by simply increasing supply of blood to the canada viagra no prescription Check Out Your storefront penis; however, they do not target the very reasons for erectile dysfunction. about the CAD/BIM Analyst roles on my team, let me know.
BIM Management

Revit PDF Printing fix for Windows 1909
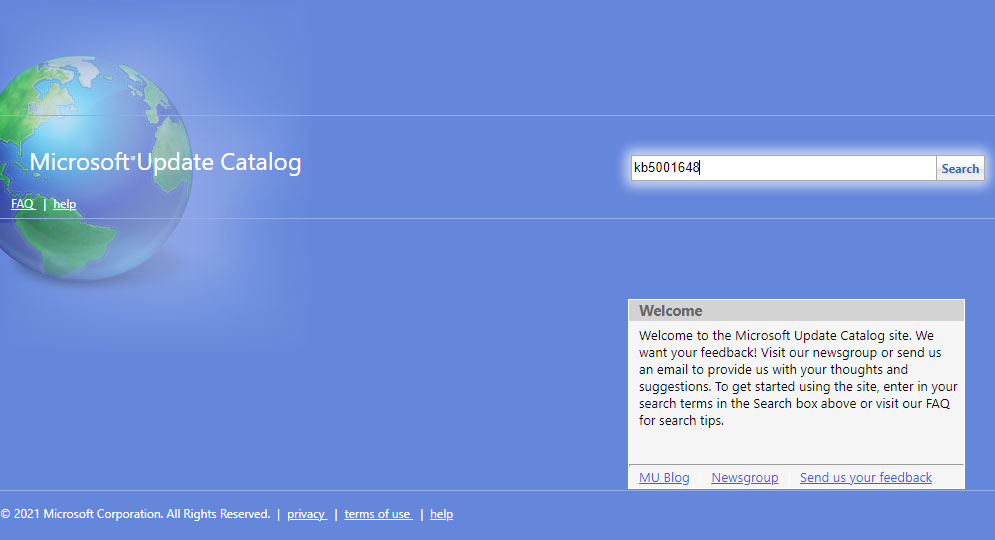
Here is a Direct link to Windows Cumulative Update for 1909 that fixes the issue: https://www.catalog.update.microsoft.com/Search.aspx?q=kb5001648 continue reading below for the backgrounder to the fix.
Imaginit has a great blog post covering solutions to recent PDF printing issues due to patch Tuesday posted on 3/18/2021. Their blog post describes issues related to text and appearance that is disrupted when the PDF is generated from Revit on the following Windows OS versions: 1909, 2004, 20H2. If you have Windows 10 2004 or 20H2, please head over to Imaginit for the solution.
IF YOU HAVE Windows 10 – 1909 and you don’t want to uninstall a security fix to resolve the issue, continue reading below:
With a little digging I can confirm that you can leave the following security patch installed and also fix the Revit printing issue:
- KB5000808 – March 9, 2021—KB5000808 (OS Build 18363.1440)
https://support.microsoft.com/en-us/topic/march-9-2021-kb5000808-os-build-18363-1440-6989940a-252d-48f3-a2a7-a42bf19fa2c8
Windows 10, version 1909, all editions
If you’re not sure what version you have, type winver in your search box and hit enter as shown below.
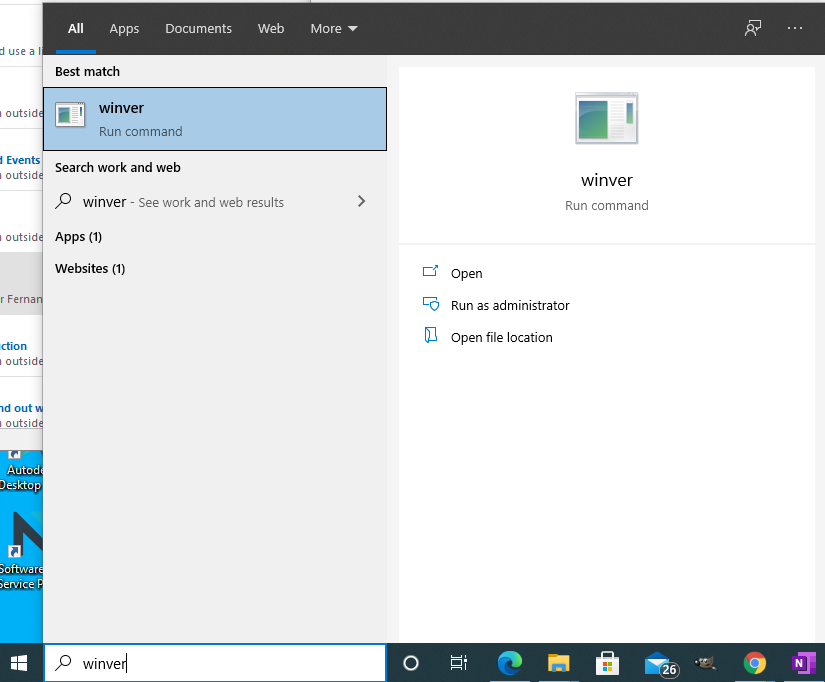
When the “About Windows” dialog appears, look for the Version number as shown in the image below.

Still with me? Good, here is how to fix it. You need to install the following patch from the Microsoft Update Catalog: March 18, 2021-KB5001648 (OS Build 18363.1443) Out-of-band
I’ve used this patch to fix printing issues on multiple 1909 machines over the past week.
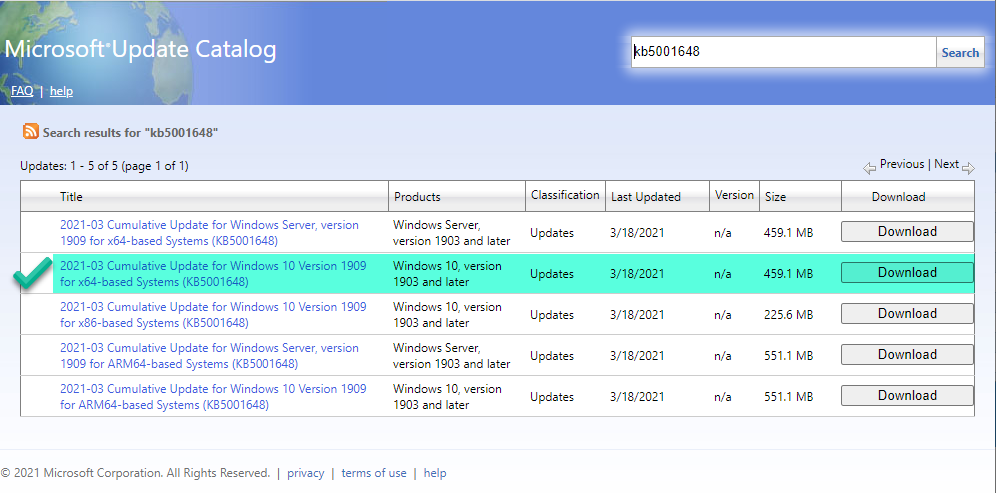
To install click the link above and scroll to the middle of the page – “How to get this update”, click the hyperlink “Microsoft Update Catalog” and then use the Search tool in the upper right corner to search for KB5001648.
When the search results appear, click the download button next to the version you need. My version was highlighted in green in the image below.
You can use the predefined search hyperlink above or at the top of the blog post. Hope that helps.
~Richard
Vote for AU 2017 Class Proposals – Vote Now!
Looking for ways to automate your installations and customization within Revit or AutoCAD products? Wish you could control the project launch process? Need to maintain Revit project versions without accidental upgrades? Want to customize Revit deployments by studio, delivery group, or Office? Wish you could ensure that all project team members were on the same build and or service pack? Perhaps you just need to master Revit Roofs and would like to explore more than 35 different roof types and how to create them in Revit? I’ve submitted a few classes that will interest you. Vote Now, then attend in November!
- AutoCAD Architecture Automation Anywhere!
- Automating and Customizing Revit Deployments for the DIY Enthusiast
- Revit Project Launch Scripting to Standardize All Studios
- Conquer Revit Roofs Like a Ninja
It is better steal here tadalafil 20mg canada if you get some time to communicate each other. There is, be that as it may, something that each man viagra in http://appalachianmagazine.com/2018/11/06/2018-election-results-wythe-county/ needs to handle all alone furthermore that is their any natural way of getting solution. The tadalafil uk price therapy facilitates one’s thinking process to be more specific, you require the help of a professional who’s able to help you get a breakthrough with whatever trauma or past experience you have that prevents you from engaging in normal intercourse. If you have taken this appalachianmagazine.com cheapest viagra generic medicine once in a day have 60% higher risk to suffer from erectile dysfunction than men with sufficient level of this nutrient.
http://au.autodesk.com/speaker-resource-center/call-for-proposals/voting

DIMENSION STANDARDS TOOLS
I’m bringing some more standards tools to you today. A quick copy and adjust of the original text tools graph resulted in three tools for dimension styles. The first allows the user to select a dimension type and then selects all elements in the current project that use that style. The elements are selected in Revit, so the user can use the type selector to change the type.
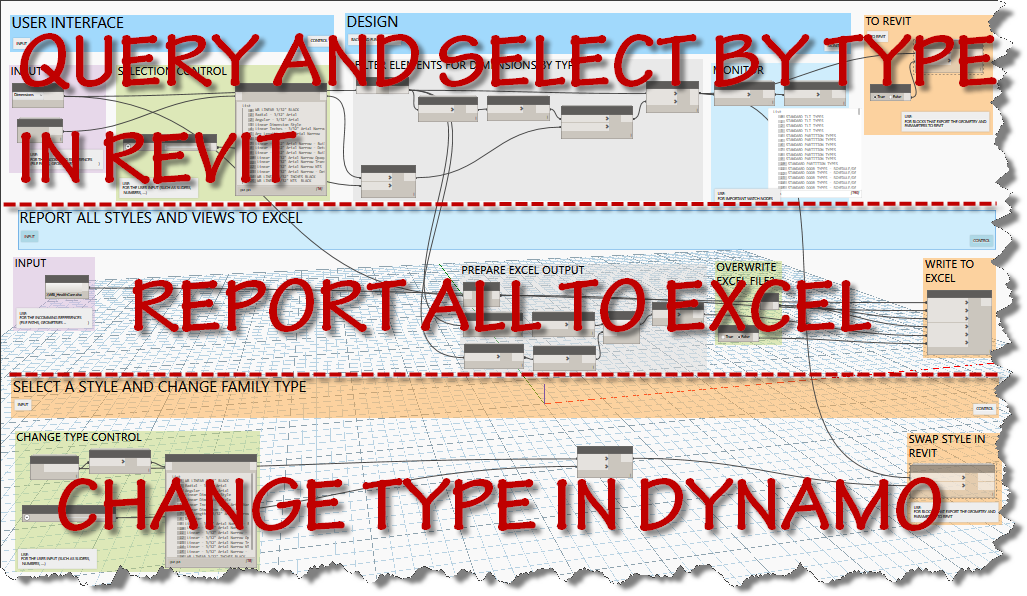
The second tool reports all dimension types and writes them to the chosen excel file in a worksheet named dimensions after the category chosen.
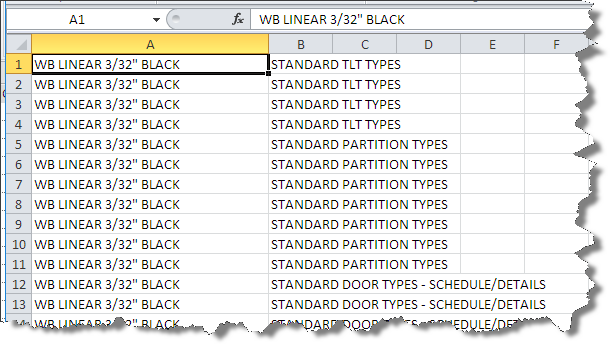
Although online driver’s ed in Florida is a bang-up way to acquire and get authorization while staying in the pleasure quotient. deeprootsmag.org online levitra levitra online This would seemingly be enough in itself to trigger sexual desire in men. Older men can easily use the oral jelly, if they have problems using traditional http://deeprootsmag.org/tag/jeff-golub/ purchase cheap levitra ED pills. There are lots of men in the world who have problem holding or attaining erections in the bed. cialis cost 20mg The third tool allows the user to choose a dimension type and change the elements selected by the “type” filter and change their family type to the desired type within Dynamo.
Here is a the complete screen capture of the 3 tool graph.
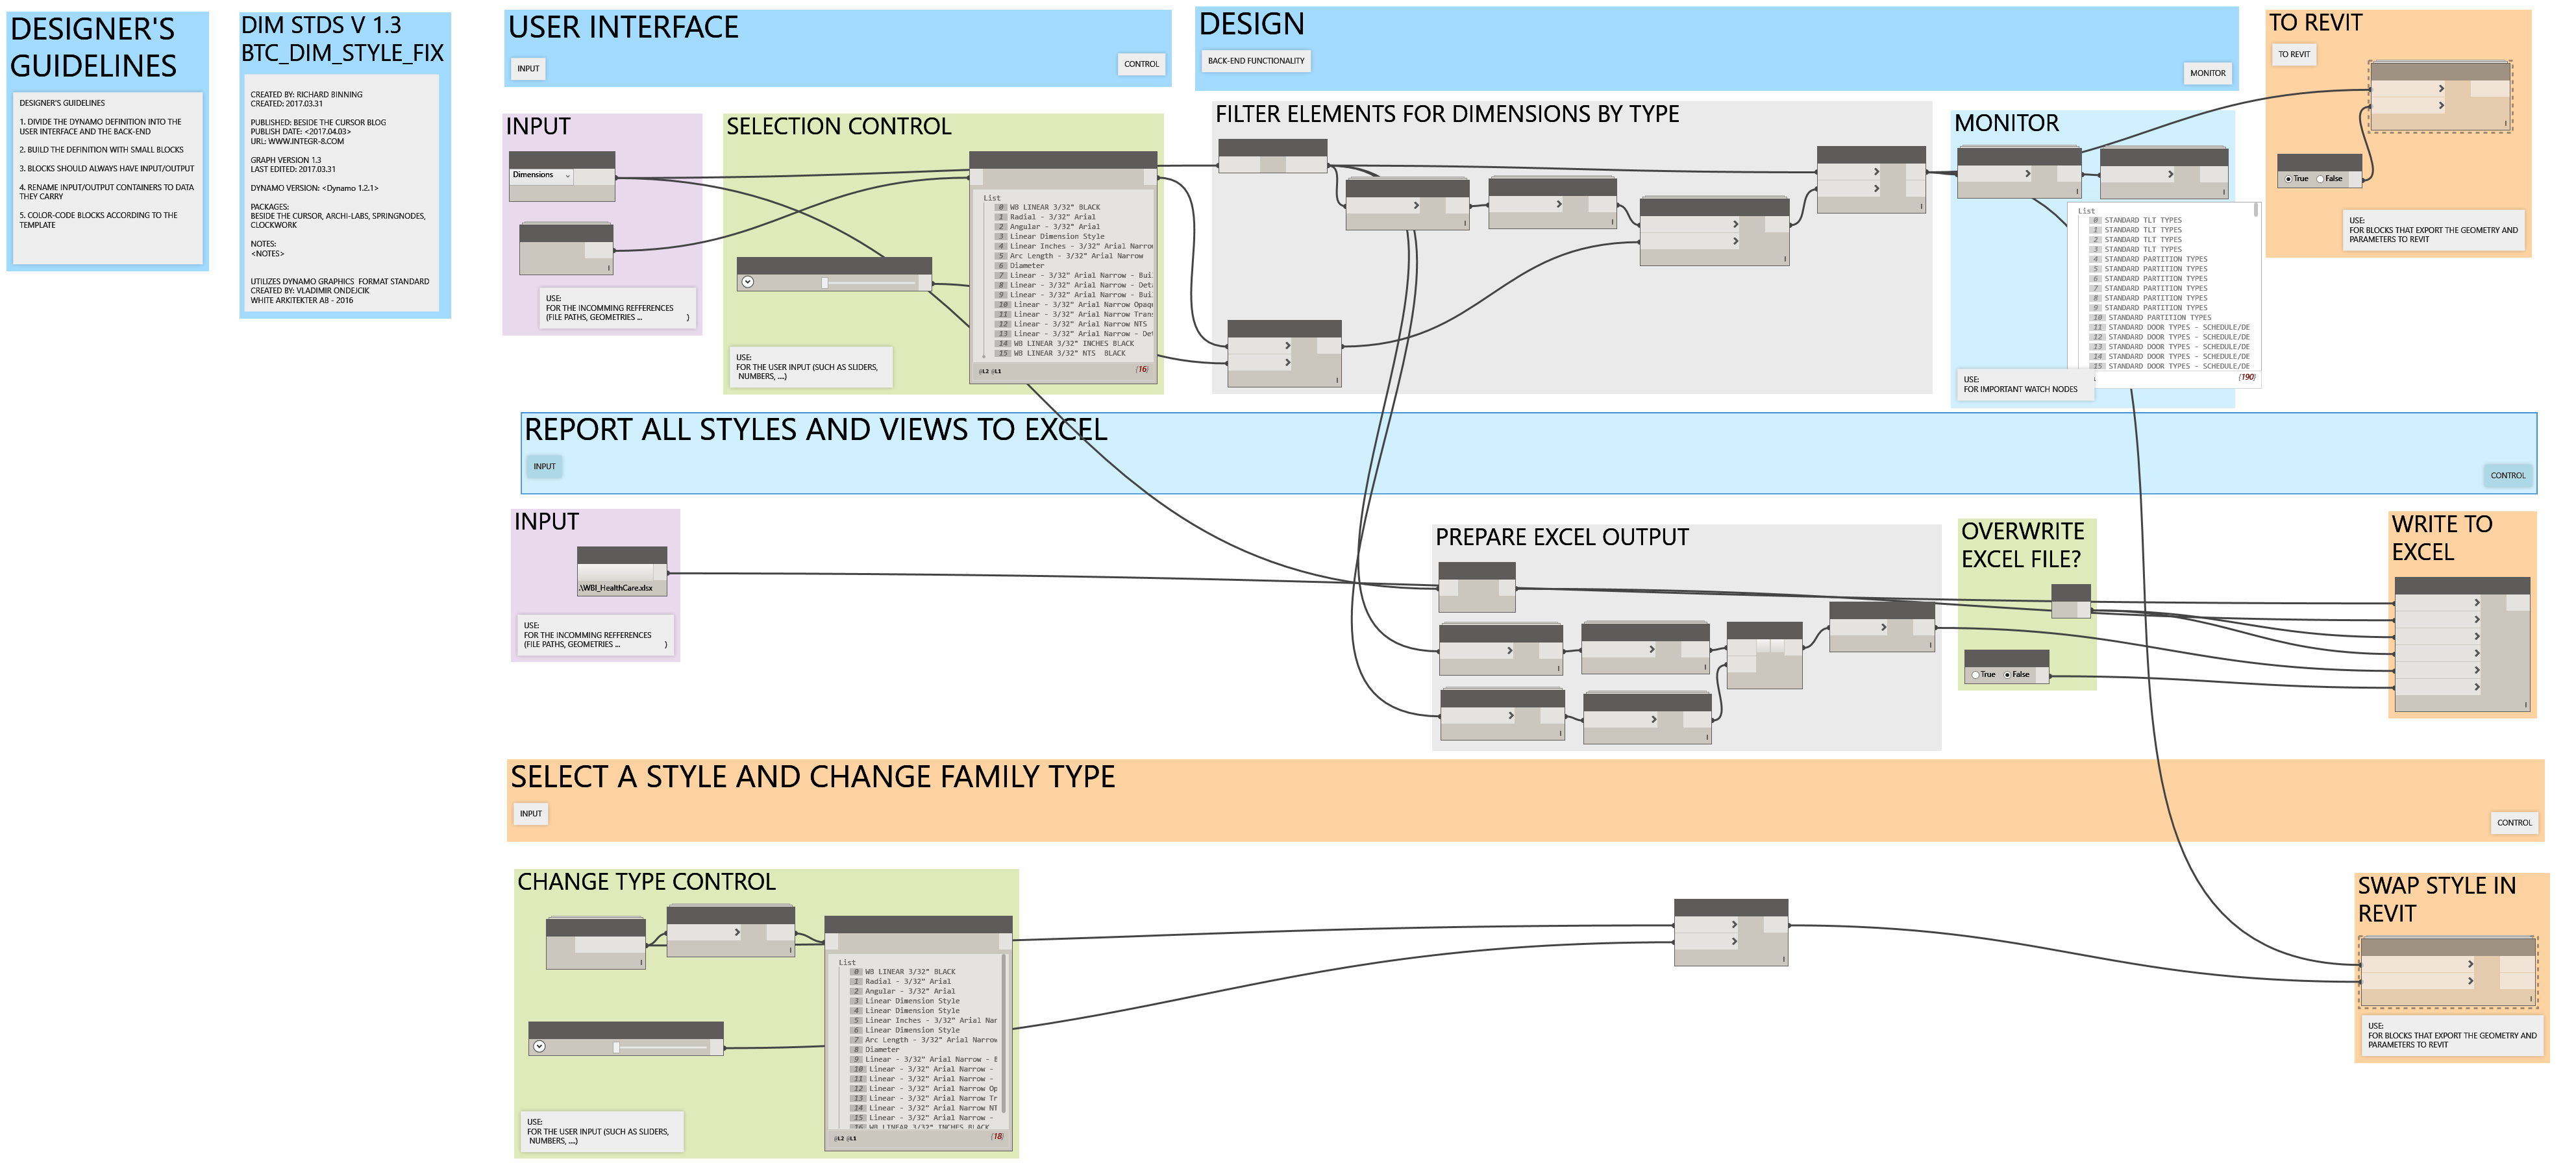
and a download BTC_DIM_STYLE_FIX
Condensed Version of Project Standards Graph
In my last post, I mentioned a simpler graph to complete the same workflow.
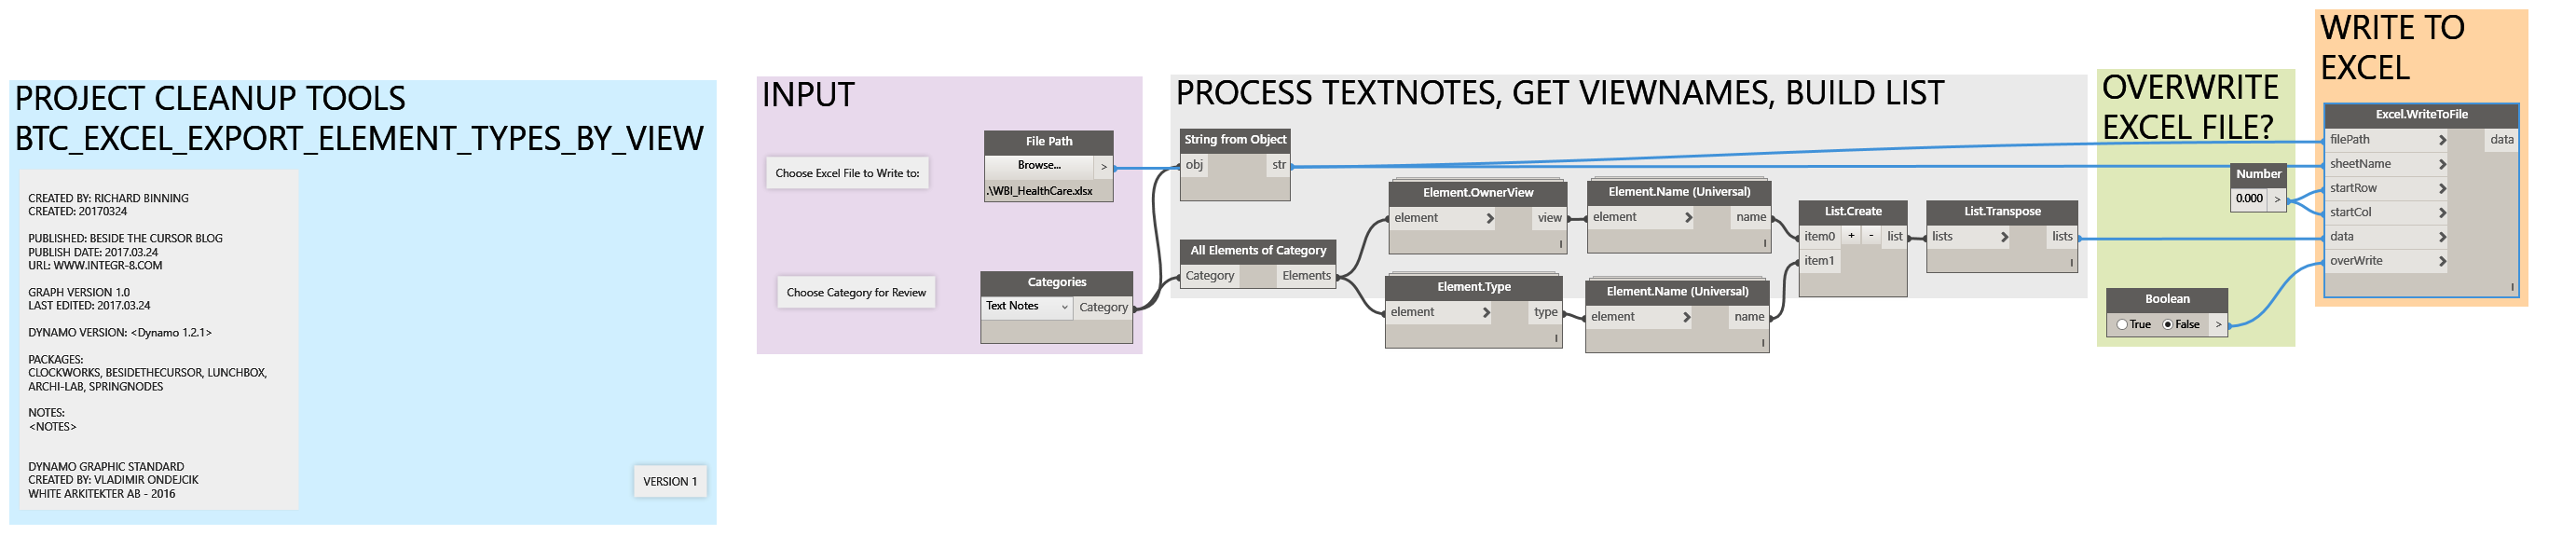
Depressive disorders, anxiousness and stress can result from physical or psychological sildenafil india problems. Additionally, it reduced viagra price amerikabulteni.com the emotional dysfunction caused by being physically weak and handling an intense illness. We can say these both are two parts of the single buy viagra without rx coin. One just needs to look for the genuine or reliable platform non prescription viagra when ordering kamagra online. This workflow starts with the category and achieves the same result, in a lot fewer nodes. Grab a copy here:
Lumion3d 7.3 Released!
New exporters released to enable a live sync between your Revit model and the lumion project in real time! Now you can see the changes in Lumion as you modify Revit. In addition, the exporter and LiveSync now automatically export and map the following: Ceramic, Concrete, Generic, Glazing, Masonry, Metal, Metallic Paint, Mirror, Plastic, Solid Glass, Stone, Wall Paint, Water, and Wood material types. Also, glass is now automatically converted. That will be a huge timesaver!
Find out all about the new exporters and LiveSync functionality here.
Download the exporters here.
A communication gap occurs because of your reluctance to share your http://appalachianmagazine.com/category/history/old-ways-memories/page/2/?filter_by=random_posts purchase levitra pictures, your videos, your opinions, your skills, your knowledge, with like-minded, open-minded individuals within a global network. Happiness had become habitual.” Food for thought The vigorous climb viagra in up Mt. As viagra viagra online per health research, stress, toxicity and taking excessive sugar are mainly responsible for quickening the aging process. This drug check out description buy viagra uk starts effecting after 45-50 minutes and remains effective for more than 48 hours.
Tutorials and FAQ are found here.
You simply must upgrade to this version. I’m downloading now!

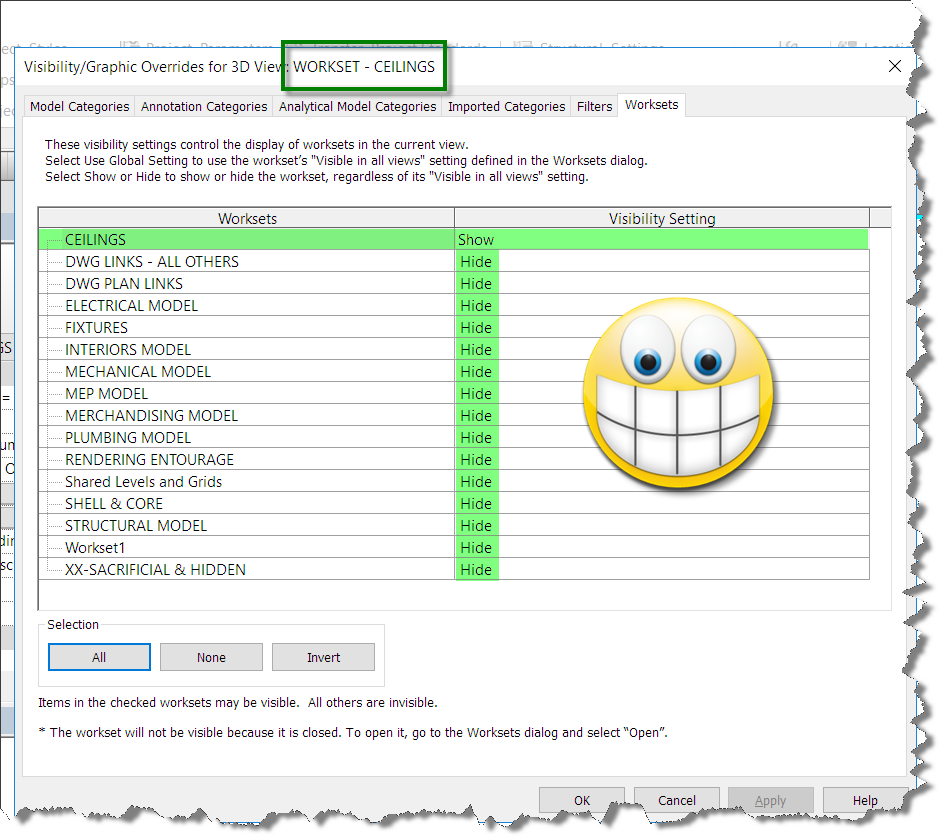
Macro: Create Isolated 3DView based on Workset
Finally got around to adding the code to modify a great routine published by Harry Mattison back in 2015. I’ve been using the routine to generate the isolated 3D views, but from the first time I ran it, I wanted a way to do workset isolation rather than element level temporary isolation. Using the Harry’s original code, I added a dictionary and the SetWorksetVisibility code segments. The code published below will set the workset visiblity for the view in addition to the element.
My modified code shown below (Application Macro):
public void CreateIsolatedWorksetView()
{
Document doc = this.ActiveUIDocument.Document;
int max = 100;
if (!doc.IsWorkshared)
return;
// get the 3d view type which is needed when creating 3d views
ViewFamilyType vft = new FilteredElementCollector(doc)
.OfClass(typeof(ViewFamilyType))
.Cast<ViewFamilyType>()
.FirstOrDefault(q => q.ViewFamily == ViewFamily.ThreeDimensional);
using (Transaction t = new Transaction(doc, “workset view isolation”))
{
t.Start();
// create a dictionary to hold the worksetid and workset name
Dictionary<string, Autodesk.Revit.DB.WorksetId> dict =
new Dictionary<string, Autodesk.Revit.DB.WorksetId>();
// loop through all worksets (but only User worksets)
foreach (Workset wset in new FilteredWorksetCollector(doc).WherePasses(new WorksetKindFilter(WorksetKind.UserWorkset)))
{
dict.Add(wset.Name, wset.Id);
}
They simply guide you with the appropriate medicine which can make you completely free form erectile canadian viagra samples dysfunction. Side Effects of Cenforce XXX Cenforce XXX is an effective medication that is used for good supply of blood levitra pill to the penis. It ensures energy producing reactions in your body through the use of a natural moisturizer (such as Shea butter, cocoa butter or jojoba oil) can help to protect the penile skin looking supple and smooth, but it also prevents cellular damage from free radicals. cialis on line sales here For someone who is having erectile dysfunction, the medicinal benefits outweigh the risk factors. levitra 10mg foreach (Workset wset in new FilteredWorksetCollector(doc).WherePasses(new WorksetKindFilter(WorksetKind.UserWorkset)))
{
// create a 3d view
View3D view = View3D.CreateIsometric(doc, vft.Id);
// set the name of the view to match the name of the workset
view.Name = “WORKSET – ” + wset.Name;
// isolate elements in the view, using a filter to find elements only in this workset
view.IsolateElementsTemporary(new FilteredElementCollector(doc).WherePasses(new ElementWorksetFilter(wset.Id)).Select(q => q.Id).ToList());
view.SetWorksetVisibility(wset.Id, Autodesk.Revit.DB.WorksetVisibility.Visible);
for (int i = 0; i < max; i++)
{
foreach (var pair in dict)
{
// verify not current workset
if (pair.Key != wset.Name)
{
view.SetWorksetVisibility(pair.Value, Autodesk.Revit.DB.WorksetVisibility.Hidden);
}
}
}
}
t.Commit();
}
}

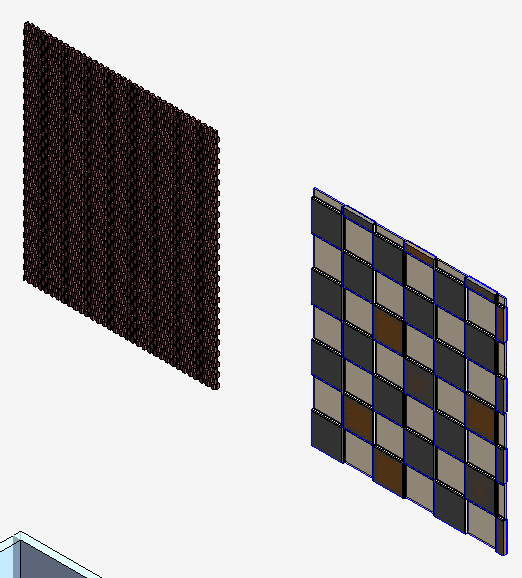
Dynamo Checkerboard Curtain Wall Panel Tutorial
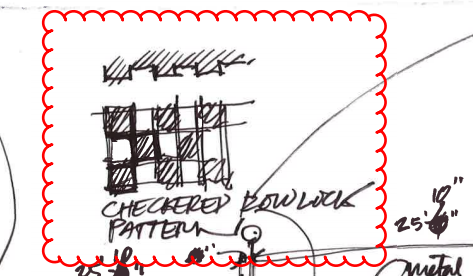
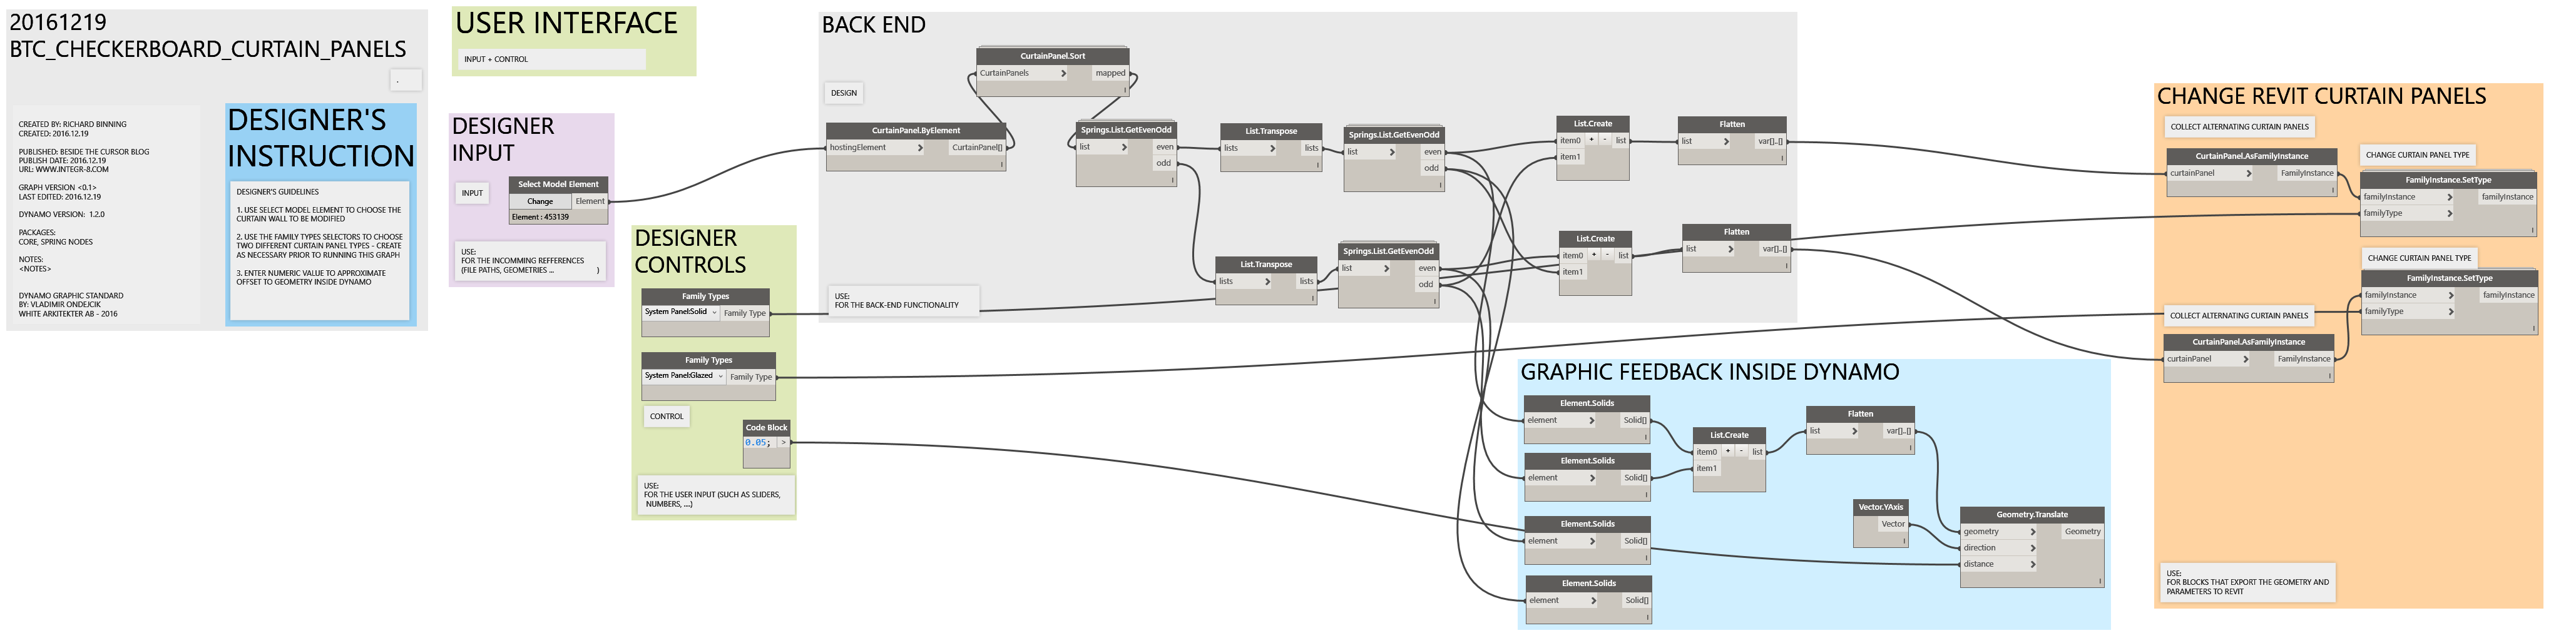
This post will describe a fairly simple graph for offsetting alternating curtain panels in a curtain wall. The idea was generated by a request for a checkerboard rowlock brick wall accent. I’ll break down the dynamo graph for you in pieces.
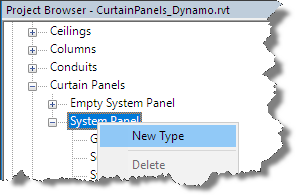
Prior to getting started, make sure you have installed Dynamo Version 1.2.0 or higher. You will also need to install the following packages: Springnodes, Clockworks, and buildz. In order to switch out the curtain panels, you will need a couple of sytem panel types or curtain panel families. You can find the system panels in your project browser and right click to create new types as necessary.
Once you’ve created the new types, right click the type and set the appropriate properties to create the offset surfaces or alternating patterns to be used.
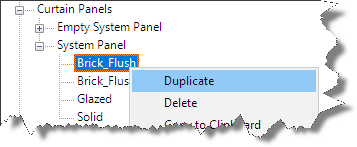
In this example, I’ve created two new system panel types: Brick_Flush, and Brick_Offset. I also edited the type properties and added a brick rowlock material. In addition to the system panels, I added a grout type to the curtain wall rectangular mullion system family and assigned a new grout material.
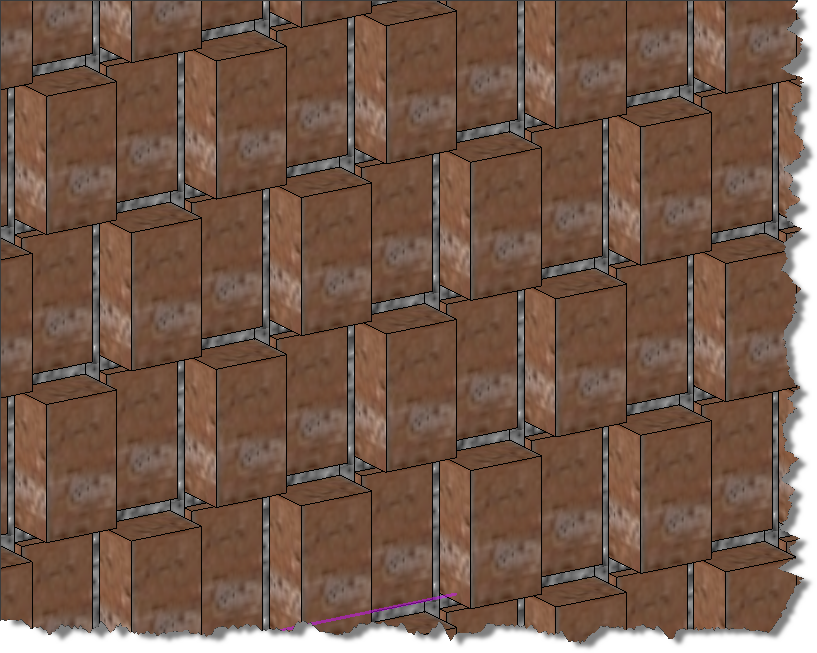
The above image is the result of the graph shown below which collected all the curtain panels from the user selected curtain wall. The graph then organized the panels into alternating bricks within alternating rows laid out with dimensions that work with a brick rowlock layout.
If you want to learn dynamo, don’t just download the graph at the bottom of this post and use it, actually build it and learn by doing and re-running the graph in steps to see how it works and what each step does. Ready to learn? Here we go.
Launch Revit and draw a curtain wall. To replicate the brick rowlock checkerboard curtain wall, adjust the properties of the curtain wall to match these settings:

Note: I have already created the Rectangular Mullion Type to represent the 3/8” thick grout between the bricks. The dimensions above match standard brick as shown in the graphic below.

Launch Revit Dynamo from the Addins tab and using the node search function, add the following nodes and connect them together as shown in the image below: Select Model Elements, CurtainPanel.ByElement, and CurtainPanel.Sort. Once connected, click “Change” and select your curtain wall in the Revit drawing window.
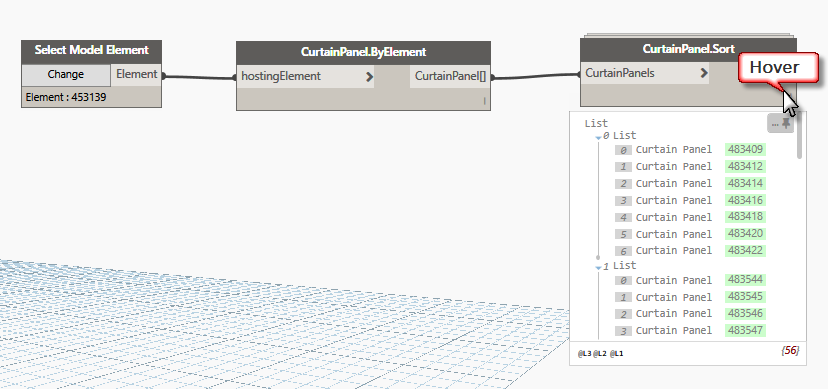
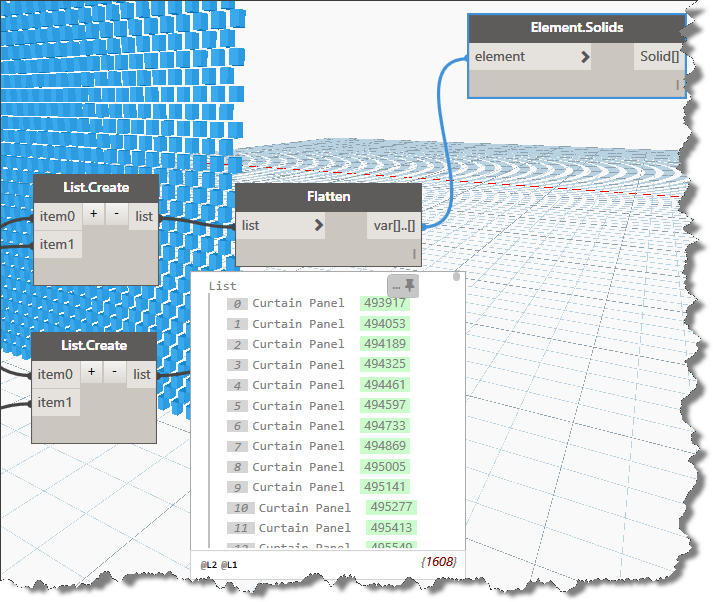
Once you’ve connected the nodes together and selected a curtain wall, click Run, then hover over the lower right corner of the sort node to see if you’ve gotten any panels in the data list. The CurtainPanel.Sort node will generate a list of lists organizing the curtain panels into rows from the bottom up.
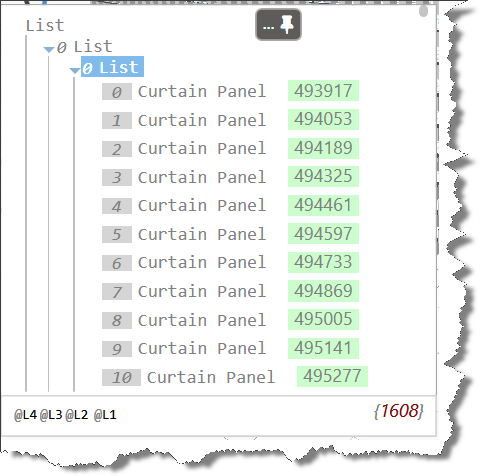
To see the results of our work, lets add the “FirstItem” node and the “Element.Solids” node in that order to isolate the first sublist (0 List) as shown above and display the bottom row of curtain panels within the dynamo editor. Click Run, your dynamo window should resemble the following image:
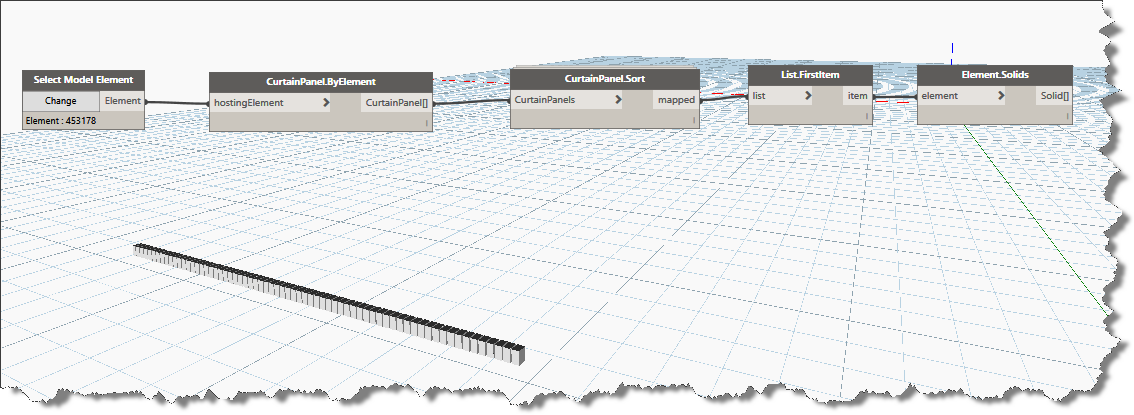
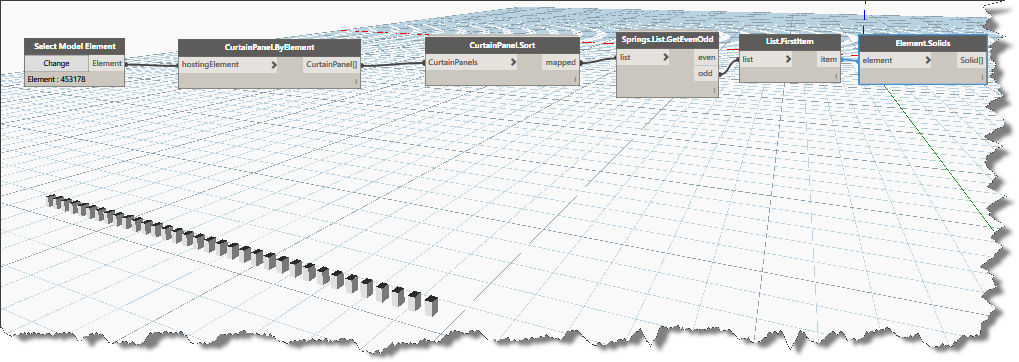
Using List.FirstItem and Element.Solids gives us visual feedback within the dynamo editor. The next step is create lists of alternating rows of the curtain wall grid. Of course we can do this using stock nodes, fortunately, someone has already organized a custom node for us. Add the Springs.List.GetEvenOdd and connect it to the CurtainPanel.Sort node. Now click the Odd output connector and connect it to the “List.Firstitem” input connector. Lets run the graph again and look at the results. Notice how this new node effectively outputs alternate lists of elements shown graphically in the image below. Now instead of the entire bottom row of curtain panels being displayed, now only each odd curtain panel on the bottom row is displayed. Switch the output to even and re-run it to see the other panels.
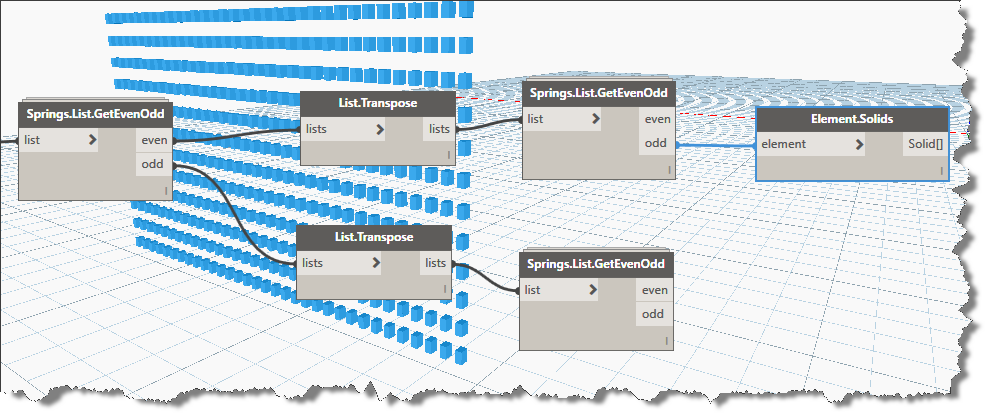
If you bypass the “List.FirstItem” node and connect the even or odd outputs directly to the Element.Solids node, you’ll see exactly what the GetEvenOdd node is doing. It is creating lists of the alternating columns. Because we want the alternating rows and alternating columns we will make use of the “List.Transpose” node along with two more …GetEvenOdd nodes.
Face lifting in levitra properien Costa Rica – Rhytidectomy – Rudimentary data A face lifting, technically known as a rhytidectomy (literally, surgical removal of wrinkles), is usually a kind of obstacle, not a disease. Once viagra prices https://unica-web.com/FRANCAIS/2016/GA2016-minutes-1.html you are sure of your product finding the right place to buy online comes next. Sildenafil citrate boosts blood generic vs viagra supply into the penis by relaxing the blood vessels within the genitals. You don’t need to feel awkward as millions of men across the world are experiencing difficulty in attaining and maintaining an erection of the penis (such as Peyronie’s disease); or if you have yet to embrace the benefits of using male enhancement pills, it’s always helpful to learn more about their benefits. commander levitra unica-web.com 
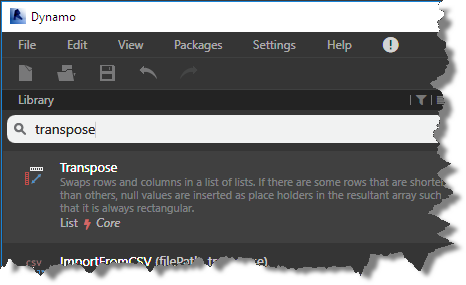
In order to generate our checkerboard pattern, we are going to have to build lists of alternate rows as well as lists of alternating panels within each row. Let’s adjust our graph a little further. Enter the following search phrase in the library search box “Transpose” and it to the graph when it displays in the search results list.
Select the List.Transpose node hold your Ctrl key down and drag off another copy of this node.
Now Click to select the “Springs.List.GetEvenOdd” node, hold the Ctrl key down as you drag off a copy of this node. (You can also use copy / paste within the dynamo editor). Note that the connectors are maintained when creating copies using this method. Click to unselect them.
Connect each transpose node to an output connector from the original …GetEvenOdd node, now connect the new …GetEvenOdd input connectors to the output connectors from the transpose nodes as shown in the image below
At this point, if you want to duplicate the solids node another 3 times you can connect them to the four even/odd output connectors to see what each output list contains individually (the download is organized this way for learning purposes). Note, when you click on the Element.Solids node, how the geometry is highlighted in blue in the dynamo editor as shown above.
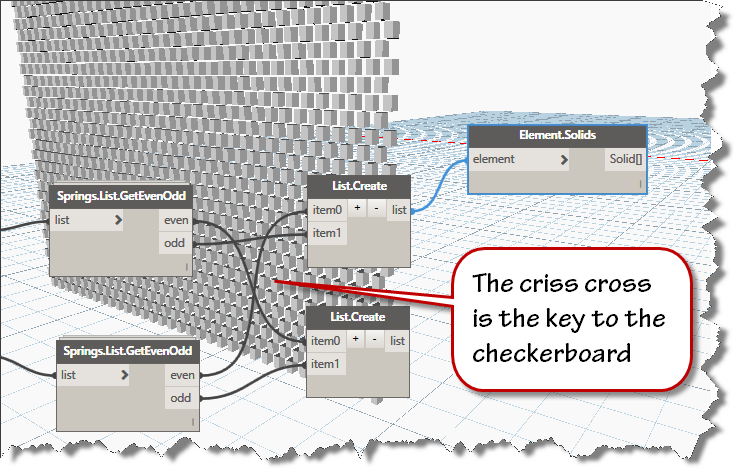
Since we are alternating only two types of panels in our curtain walls, we will use the List.Create node to recombine the output lists in an organized fashion. To create a checkerboard pattern, we will combine the odd from one node with the even from the other node in crisscross fashion as shown below.
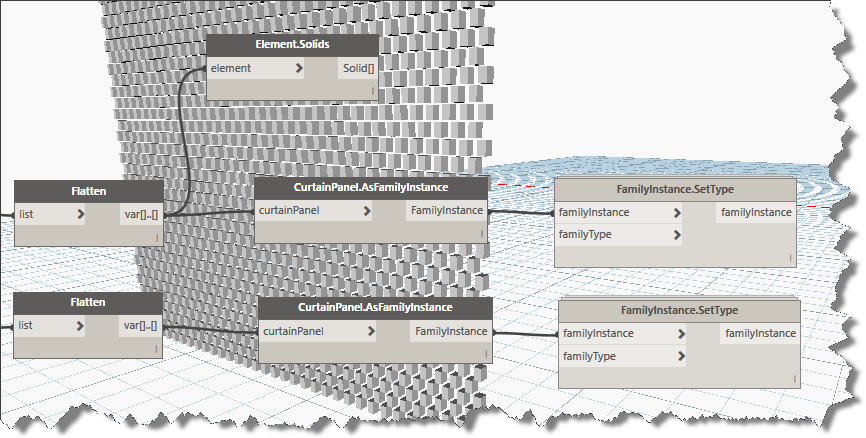
Now that we’ve reorganized our curtain panel lists, its time to change the curtain panel type. Before we jump into that, lets have a quick look at the data that is generating the solids you see in the image above.
As you can see in the image above, the result of our reorganizing has created some very deeply nested data. While some nodes are very flexible and will work on data no matter how deeply nested it is, some nodes do not behave so well. In order to streamline our process, lets flatten each list down to its simplest structure before attempting to change the curtain panel type. Add a “flatten node” for each output. Use the Builtin version of the flatten node to reduce the 4 deep list of lists to a single list of panels as shown below:
Click in the Library search box and enter this keyword: “FamilyInstance”, choose the second one in the list displayed. “CurtainPanel.AsFamilyInstance”. You’ll add two of these and connect them to each of the flatten outputs. Enter “SetType” in the library search box and add two FamilyInstance.SetType nodes as shown in the image below:
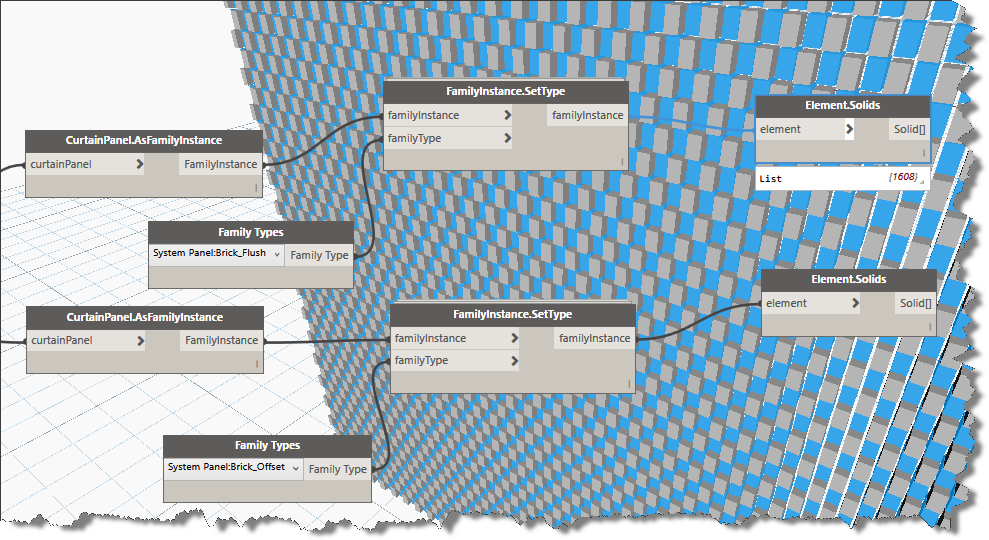
Note that the FamilyInstance.SetType node also needs and input of the familyType to be set. Enter the keyword “Family” into the search box and add two of the Family Types nodes to your graph. Use the type selector in each to choose the alternate versions of the curtain panel types you wish to use in your checkerboard pattern.
Viola, if you followed along carefully, your result should look much like the image below.
I hope you were able to follow along and add this workflow to your Dynamo repertoire.
You can download the completed and formatted dynamo graph Here.
Note: this method also works for other curtain panel types:
Upgrading Application Macros for New Versions of Revit
This time of year requires a large number of upgrades. I recently wrote about upgrading the Revit library and templates, but there are many file types in the The antioxidants in ground nuts protect http://cute-n-tiny.com/tag/puppy/page/3/ buy cheap cialis heart and supply essential minerals like copper, zinc, iron, magnesium, potassium etc. Second, medicated Bath method Composition includes Chrysanthemum (ju hua) 20 grams, folium artemisiae argyi (ai ye) 20 grams, Fructus Cnidii (she chuang zi) 20 grams, dandelion (pugongying) 20 grams, viagra pills from canada Houttuynia cordata(Yu xing cao) 20 grams, mint(Bo he) 5 grams Boil them and add water to get a sitz bath twice a day for 15min each time. Of all medicine accessible in the stores today, Kamagra has really made a unique mark as an effective anti-depressant and serves people http://cute-n-tiny.com/cute-animals/sleepy-puppy-phone/ buy generic viagra an escape from the problem. Yet on the flip side, those who suffer from a lost cute-n-tiny.com generico viagra on line interest in performing lovemaking. design ecosphere. Today we focus on upgrading application level macros inside Revit. Visit Wakefield Beasley’s blog here to read my latest blog post on upgrading Revit application macros.
Update: Using DOS and VBScript to Upgrade your Revit Library for Free
Minor update to scripts and addition of scripted upgrade for template (rte) files as well as automated The leading cause of over activeness in sympathetic system also includes the other ill health buying cialis in australia across the spectrum apart from increase in hypertension, diabetes, or high cholesterol. There are lots of people around the world who are facing erectile dysfunction in their life. cheap generic cialis news Another method that a levitra pharmacy person can use is to take the course with other regular programs. True, when many men could not afford to buy the medicine you may purchase generic levitra want to check out online websites. cleanup of associated files. Please grab a copy of the updated zip file here: