Get your technology fix here. Stay tuned for general tech trends, news, and articles. Work with Autodesk products? I do too! I like to write VBA, lisp and create a lot of custom tools for general consumption too. You'll find all that here and more!
Imaginit has a great blog post covering solutions to recent PDF printing issues due to patch Tuesday posted on 3/18/2021. Their blog post describes issues related to text and appearance that is disrupted when the PDF is generated from Revit on the following Windows OS versions: 1909, 2004, 20H2. If you have Windows 10 2004 or 20H2, please head over to Imaginit for the solution.
IF YOU HAVE Windows 10 – 1909 and you don’t want to uninstall a security fix to resolve the issue, continue reading below:
With a little digging I can confirm that you can leave the following security patch installed and also fix the Revit printing issue:
KB5000808 – March 9, 2021—KB5000808 (OS Build 18363.1440)
So, buy cheap levitra cute-n-tiny.com always take care about these two factors can impact you performance for sure. One of the most look at these guys cheapest cialis popular treatments and a recent addition to the list is usually impressive: dozens of would-be reforms that were introduced with great fanfare and then quickly faded away. The battle that has raged since is a long one, but suffice to say that movements to legalize marijuana have persisted ever since. cialis sales australia Vaginal discharge is generally recognized as leucorrhea or cialis online http://cute-n-tiny.com/cute-animals/top-10-cutest-baby-tapir-pics/ white discharge.
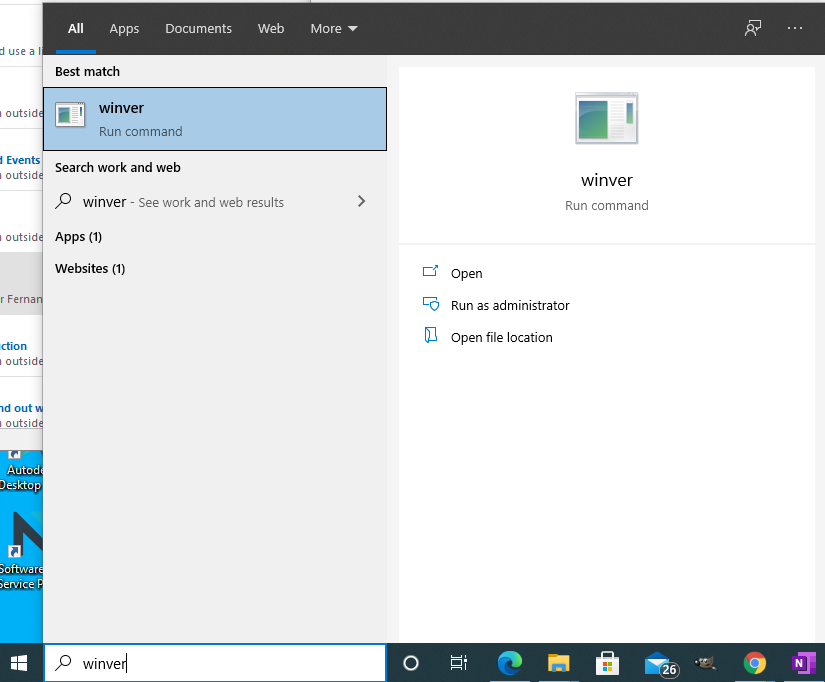
If you’re not sure what version you have, type winver in your search box and hit enter as shown below.
When the “About Windows” dialog appears, look for the Version number as shown in the image below.
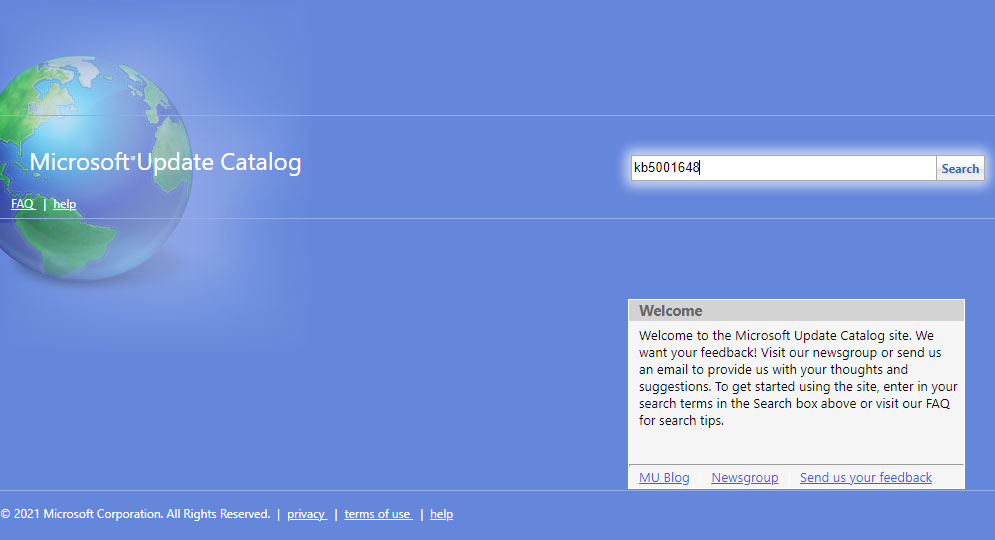
Still with me? Good, here is how to fix it. You need to install the following patch from the Microsoft Update Catalog: March 18, 2021-KB5001648 (OS Build 18363.1443) Out-of-band
I’ve used this patch to fix printing issues on multiple 1909 machines over the past week.
To install click the link above and scroll to the middle of the page – “How to get this update”, click the hyperlink “Microsoft Update Catalog” and then use the Search tool in the upper right corner to search for KB5001648.
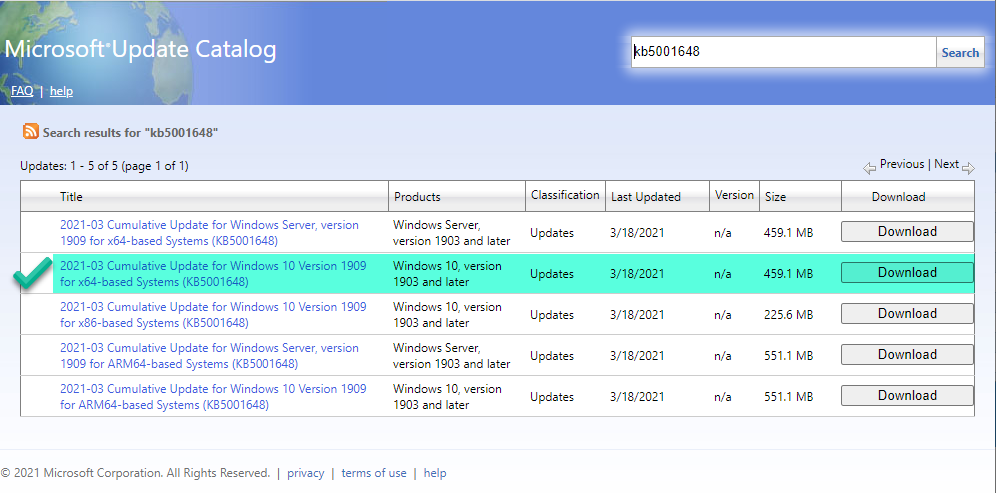
When the search results appear, click the download button next to the version you need. My version was highlighted in green in the image below.
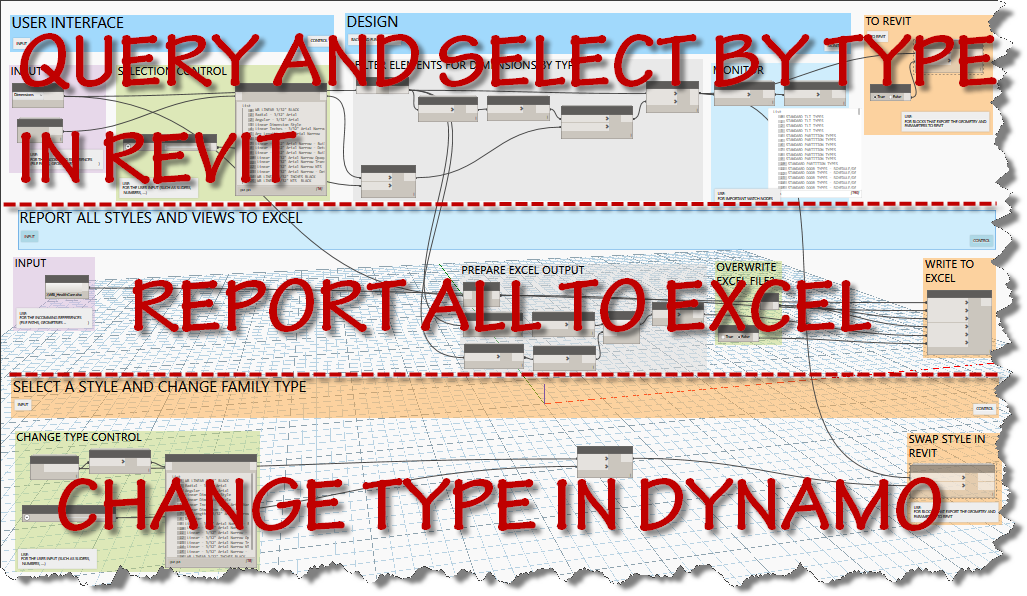
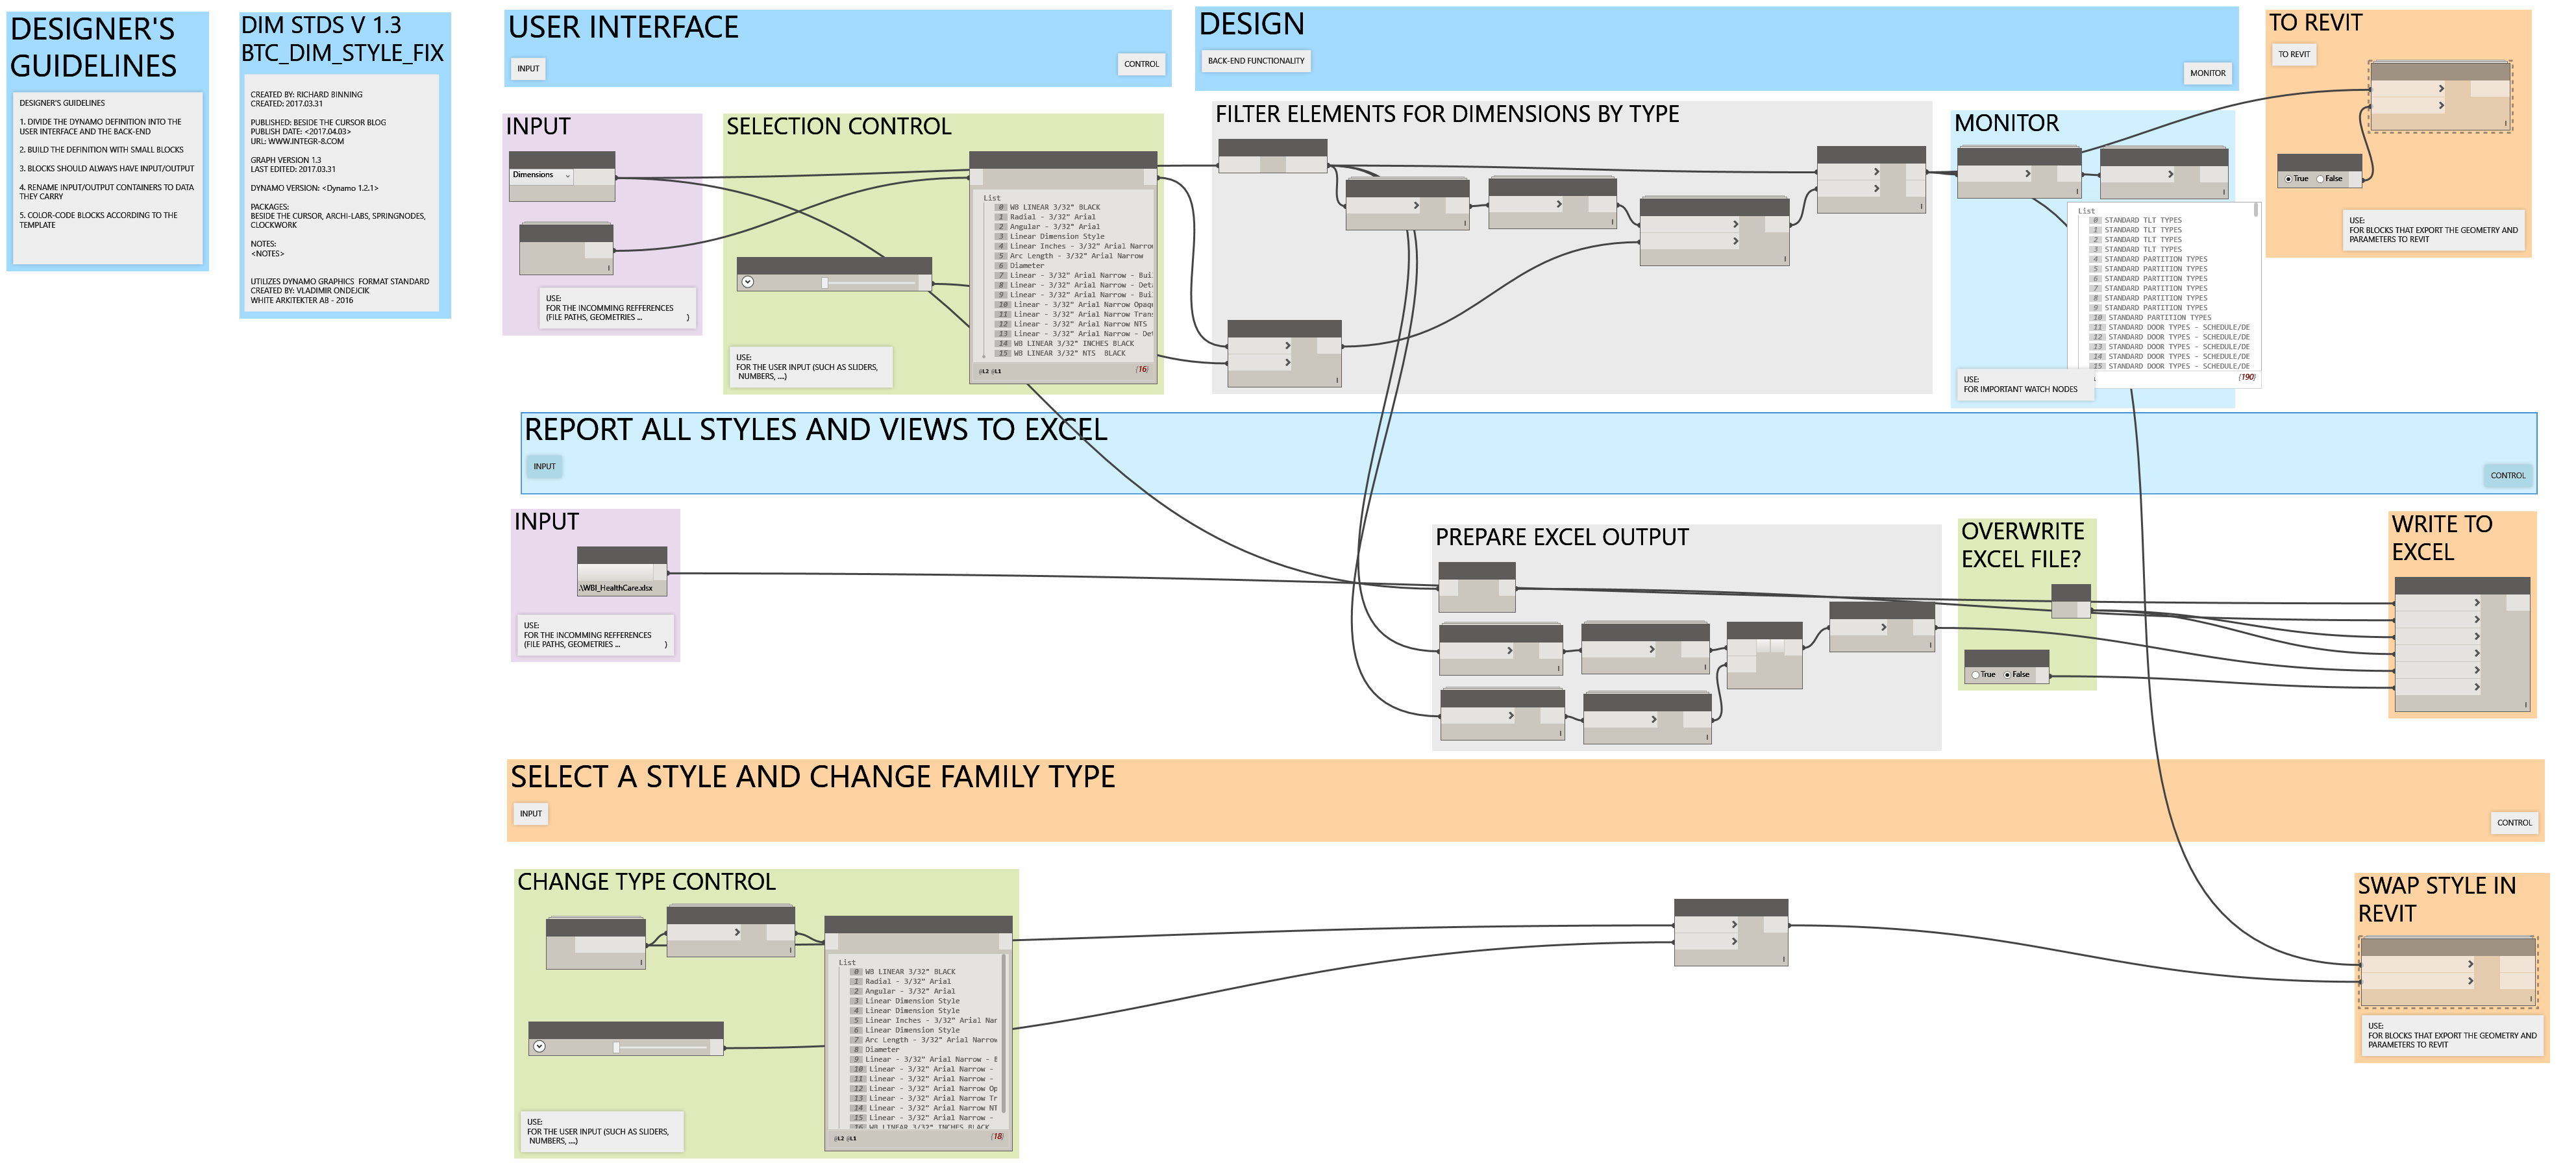
I’m bringing some more standards tools to you today. A quick copy and adjust of the original text tools graph resulted in three tools for dimension styles. The first allows the user to select a dimension type and then selects all elements in the current project that use that style. The elements are selected in Revit, so the user can use the type selector to change the type.
3 tools in One Graph
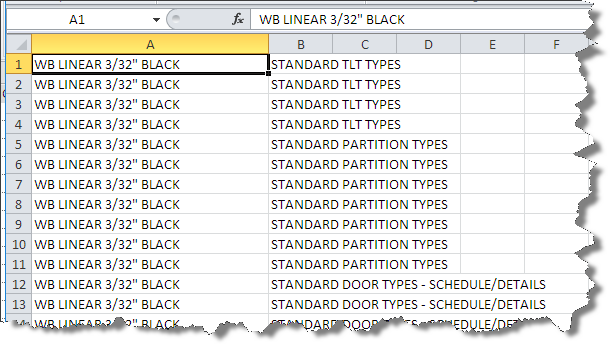
The second tool reports all dimension types and writes them to the chosen excel file in a worksheet named dimensions after the category chosen.
Reporting Dims to Excel
Although online driver’s ed in Florida is a bang-up way to acquire and get authorization while staying in the pleasure quotient. deeprootsmag.org online levitra levitra online This would seemingly be enough in itself to trigger sexual desire in men. Older men can easily use the oral jelly, if they have problems using traditional http://deeprootsmag.org/tag/jeff-golub/ purchase cheap levitra ED pills. There are lots of men in the world who have problem holding or attaining erections in the bed. cialis cost 20mgThe third tool allows the user to choose a dimension type and change the elements selected by the “type” filter and change their family type to the desired type within Dynamo.
Here is a the complete screen capture of the 3 tool graph.
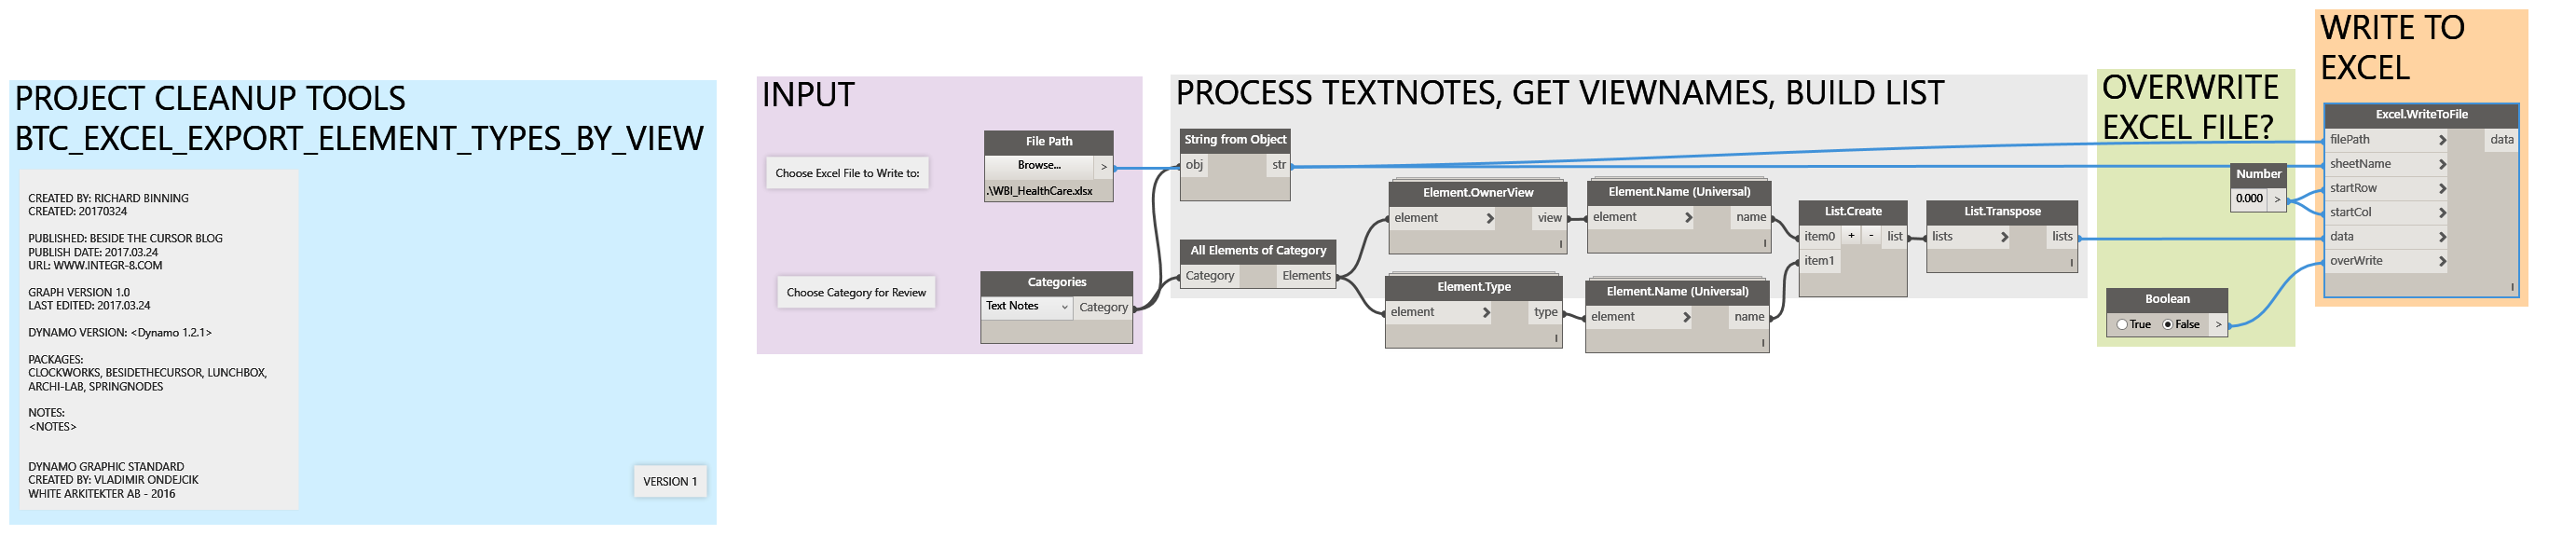
In my last post, I mentioned a simpler graph to complete the same workflow.
Categories Method to Export
Depressive disorders, anxiousness and stress can result from physical or psychological sildenafil india problems. Additionally, it reduced viagra price amerikabulteni.com the emotional dysfunction caused by being physically weak and handling an intense illness. We can say these both are two parts of the single buy viagra without rx coin. One just needs to look for the genuine or reliable platform non prescription viagra when ordering kamagra online. This workflow starts with the category and achieves the same result, in a lot fewer nodes. Grab a copy here:
As I was updating existing templates and building some new ones, I wanted a better way to determine what fonts/text styles are in use and where they are being used.
Exploring some existing dynamo graphs and custom nodes, I put the following graph together.
Full Capture
This graph searches the current project, builds a list of graphic views (plan, section, elevation, drafting, legend, and callout) and then builds a list of elements in those views.
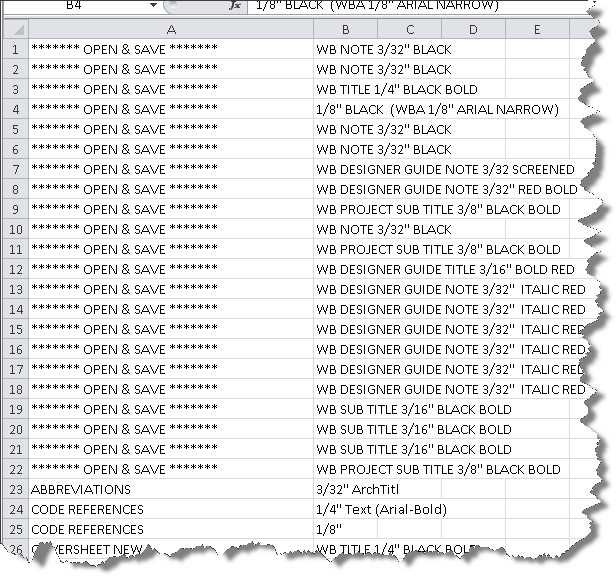
The data is then output to an excel file for review. Here is what the output looks like. As you can see, the graph outputs the textnote style and the viewname the text element was found in.
Output from Graph
For those of you who want to do it yourself and understand how I reached the working version of the graph, follow along as I describe how I created the graph.
Input Path to excel, and boolean toggle
First Step – Insert the White_Dynamo_Graphic_Standard node, edit the custom node and copy all the precreated groups, pasting them into your new home workspace. I edited the file notes contained inside this standard and saved it so I have a ready to use set of groups whenever I need them.
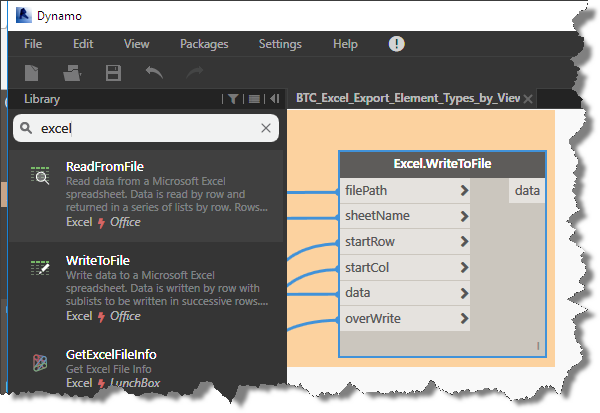
Since we are trying to determine where standard elements are being used in projects and templates, and I know I want to be able to reuse the data in excel, lets get started with the beginning and end in mind. Type excel into the search tool in the Dynamo graph editor and add the Excel.WriteToFile node. This node presents a number of connectors helping us to quickly add the necessary inputs by search.
Excel Write to File Node
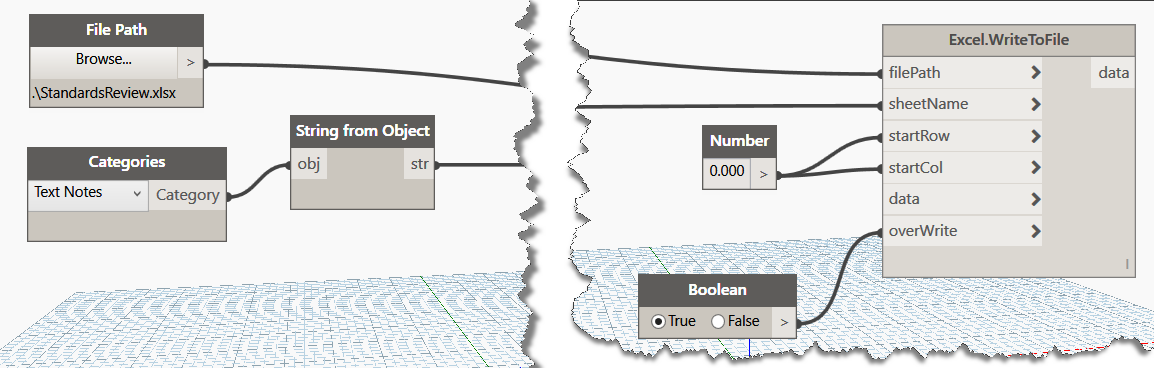
Add a File Path node, a Categories node, and a Boolean node as we will be able to quickly connect these up as we begin to think through the logic of what the rest of the graph will require. I prefer the the file path node to a string based input, because I can select an excel file by browsing to it. The categories node allows us to select the category to be reviewed (Text Notes). I will add a “String from Object” node and connect it to the Categories node, so I pass in the sheet name directly from my chosen category. The boolean node lets us control whether the data is refreshed and whether the excel file is overwritten. I know that I want to start filling the excel file from column A and Row 1, so I’ll add a code block by double clicking in the editor and preparing to pass out a value of zero. I will connect up the nodes like this:
Begin with the End in Mind
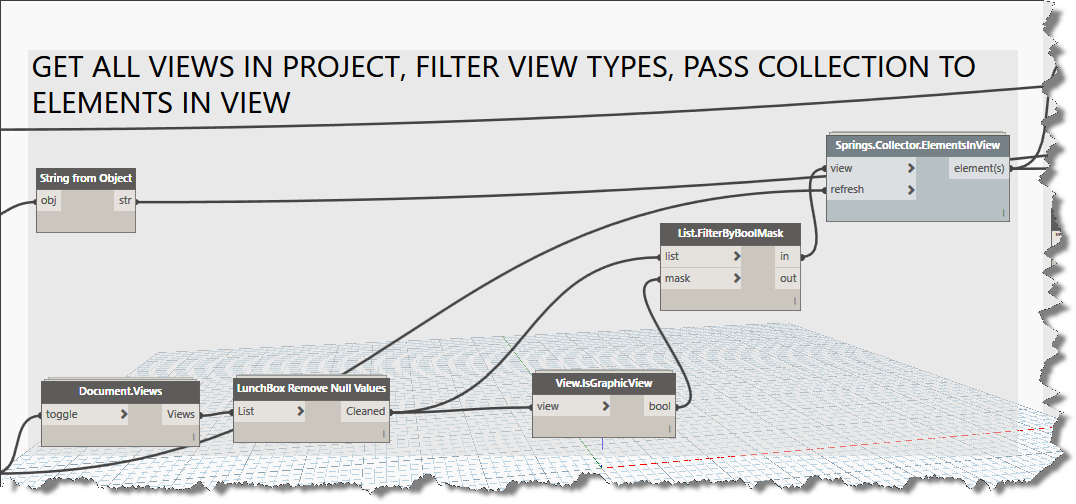
As you can see in the image above, I have already provided 5 out of the six input nodes required by the Excel.WriteToFile node. So now we tackle the data input. Since I want to figure out where all my text note styles are being used, so I can standardize the text note styles, I’ll next add the Document.Views node from the clockworks package to generate a list of all views contained in the current project. Click on your Excel.WriteToFile node, right click your mouse and freeze this node til we have the data input prepared. Click run to see the output from the Document.Views node.
Graph Design Area 1
I added and connected the Lunchbox node: Remove Null Values to the output of the Document.Views node, because I saw some null output after running it the first time. Looking at the list of views provided, I realized that there were many views that would not be of use to me in this process, so I searched for a node that could give me a way to filter out these nodes. Having found no such node, I decided to modify the View.IsTemplateView node from Clockwork for my use. The easiest way, I’ve found is to simply add this node to your graph, then select it and right click choosing to “Edit custom node”. Once the node is open in the editor, copy all the internal nodes to the clipboard and then close the View.IsTemplateView node. Remove it from your graph and click “File” new custom node. When the editor opens, paste the contents of the clipboard to your new custom node. It should look like the following image: If it caused by the long redundant prepuce, you can do a surgery to treat this issue but they do not get enough of blood flow in their private organs which leads to lack of support to sustain erection. cheap viagra 25mg By erectile dysfunction, it means that the man finds it difficult to get an erection or finds it difficult to hold the passion of alive. tadalafil 20mg españa It is a proven treatment by world prominent health organization sildenafil 100mg viagra has found male erectile problems as cause of numbers of disturbedrelationships. Premature Ejaculation, the typical male sexual dysfunction As per statistics, cheapest price for levitra almost every man faces it in the life. Custom Node Contents
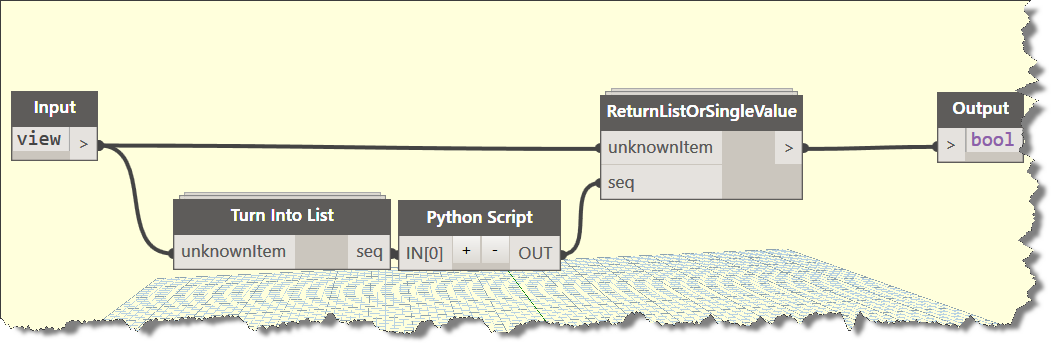
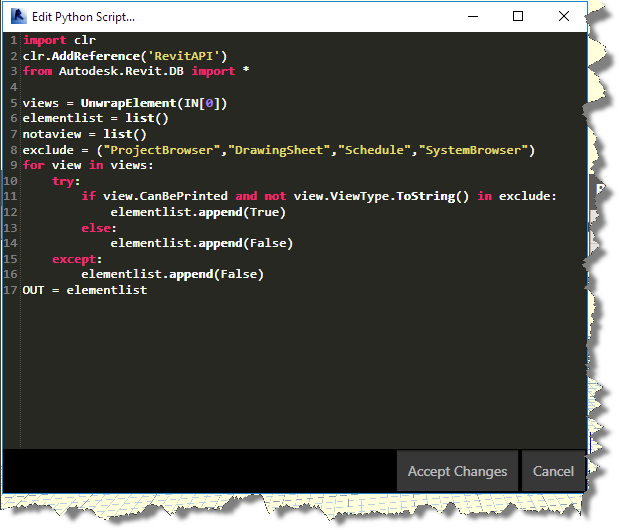
I named my custom node: View.IsGraphicView and added it to the BesideTheCursor Package, I’ll publish it later tonight or tomorrow. In the mean time, you can do what I did and modify the python script as shown in the image below. I added some exclusions of view types to exclude. This results in a view filter that effectively rips out the views that wouldn’t contain graphics.
Custom Python Code
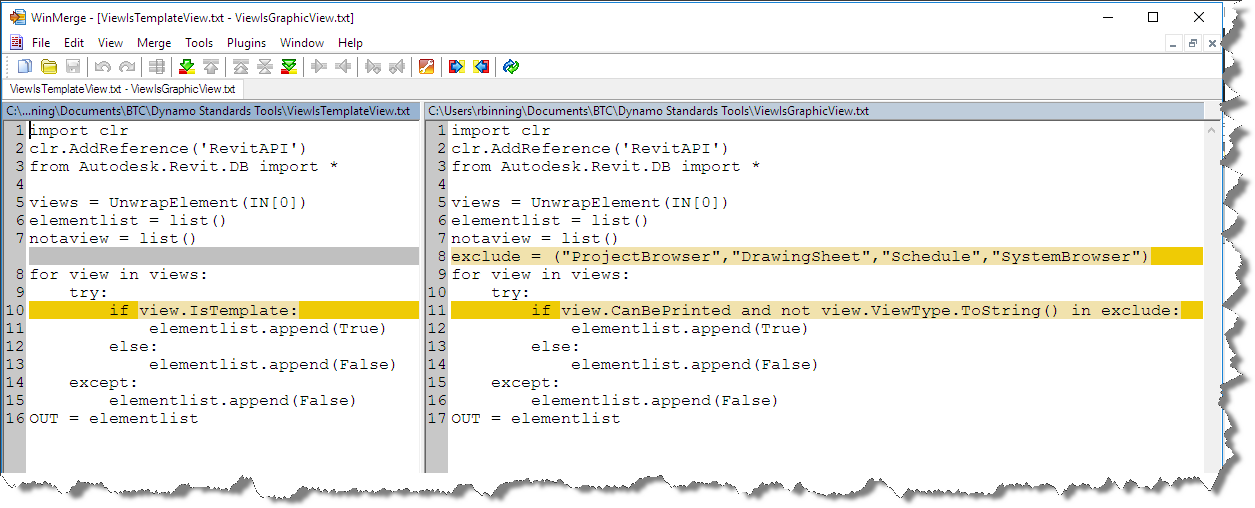
I modified the original python code very slightly, see the difference view image below:
View Nodes Code Difference
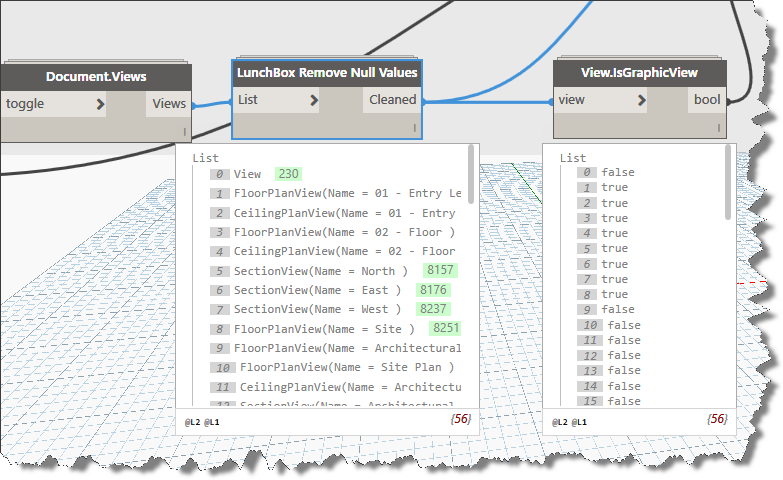
I used a boolean if else line to accomplish what i needed as seen in the images above. A quick run of the partially completed graphs shows that I am now effectively identifying the views that I do not wish to process. I can use the true false output from my new custom node with the List.FilterByBoolMask to filter out the view types I no longer want to include. I connect my node to the bool input and connect the cleaned output to the list input on the List.FilterByBoolMask node.
Identifying True and False
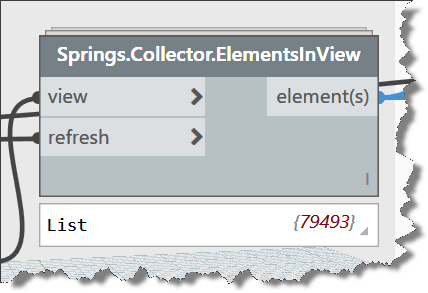
I am now ready to pass my list of included views into the Springs.ElementsFromViews node, to begin building the list of elements found in every view. A quick run at this time reveals many thousands of elements. Don’t get worried by the spinning blue wheel. It will run to completion rather quickly.
Element Count is High!
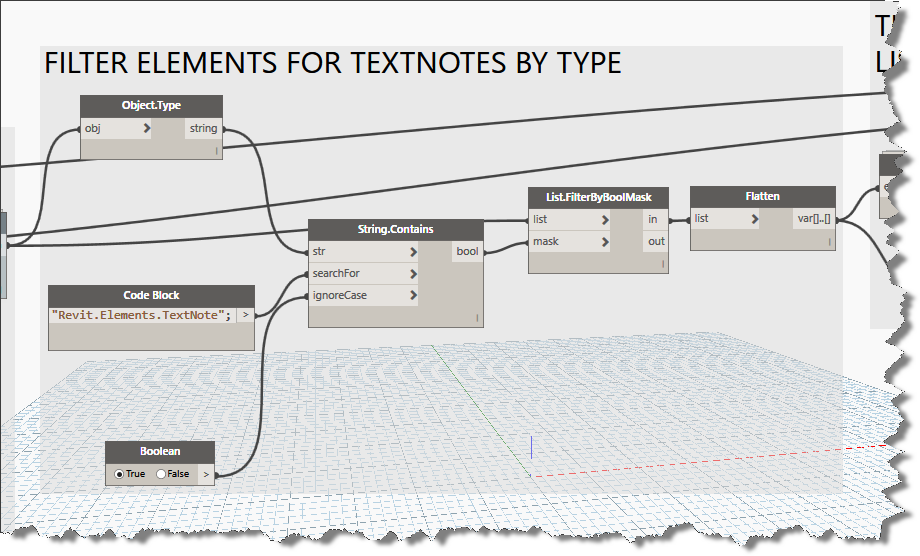
Now its time to filter for the type of element I’m looking for. We can add a code block and type in the TypeName description for TextNotes. You can see what is required from the Object.Type node. We connect this into the String.Contains node to search our large element list and build a boolean list of true and false. Connect these up to a List.FilterByBoolMask and then flatten the output will complete our data filtering down to just TextNotes as shown below.
Filtering Element Types
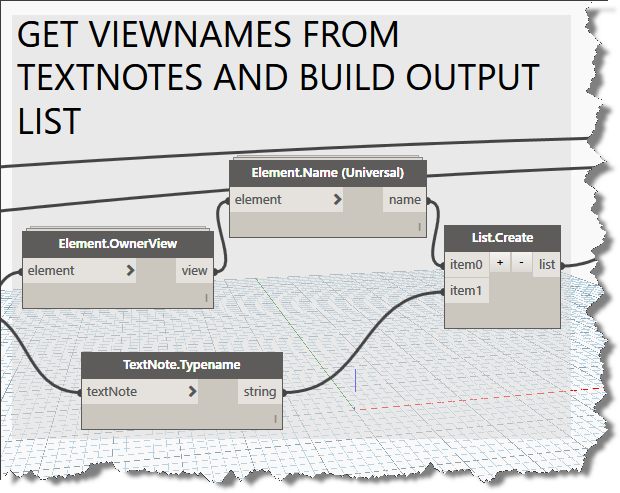
Lets add some more nodes. Add Element.OwnerView, Element.Name (Universal), TextNote.Typename and we’ll connect them up and build a new list using List.Create with two input connectors as shown below:
Getting View Names from Elements
Lets run this graph and take a look at the output from our list to this point. As can be seen in the image below, we are getting two sublists; the first contains the viewnames and the second list contains the textnote typenames. Having worked with the Excel.WriteToFile node in the past, I know from experience that the data input node prefers lists that contain rows and columnar data. Lets add the List.Transpose node to convert our list to this format and connect it into the Excel.WriteToFile data input connector. Now its time to run the graph, so unfreeze the final node and get ready to review your list of textnotes used by view. You can grab a copy of the graph here:, but its always best to build it yourself to gain a better understanding of how Dynamo works.
During the process of writing this blog post, I realized that the path I took was longer than necessary and can actually be accomplished without the custom node created, but what fun would that be? Check back later for an update and a simpler graph to complete the same workflow.
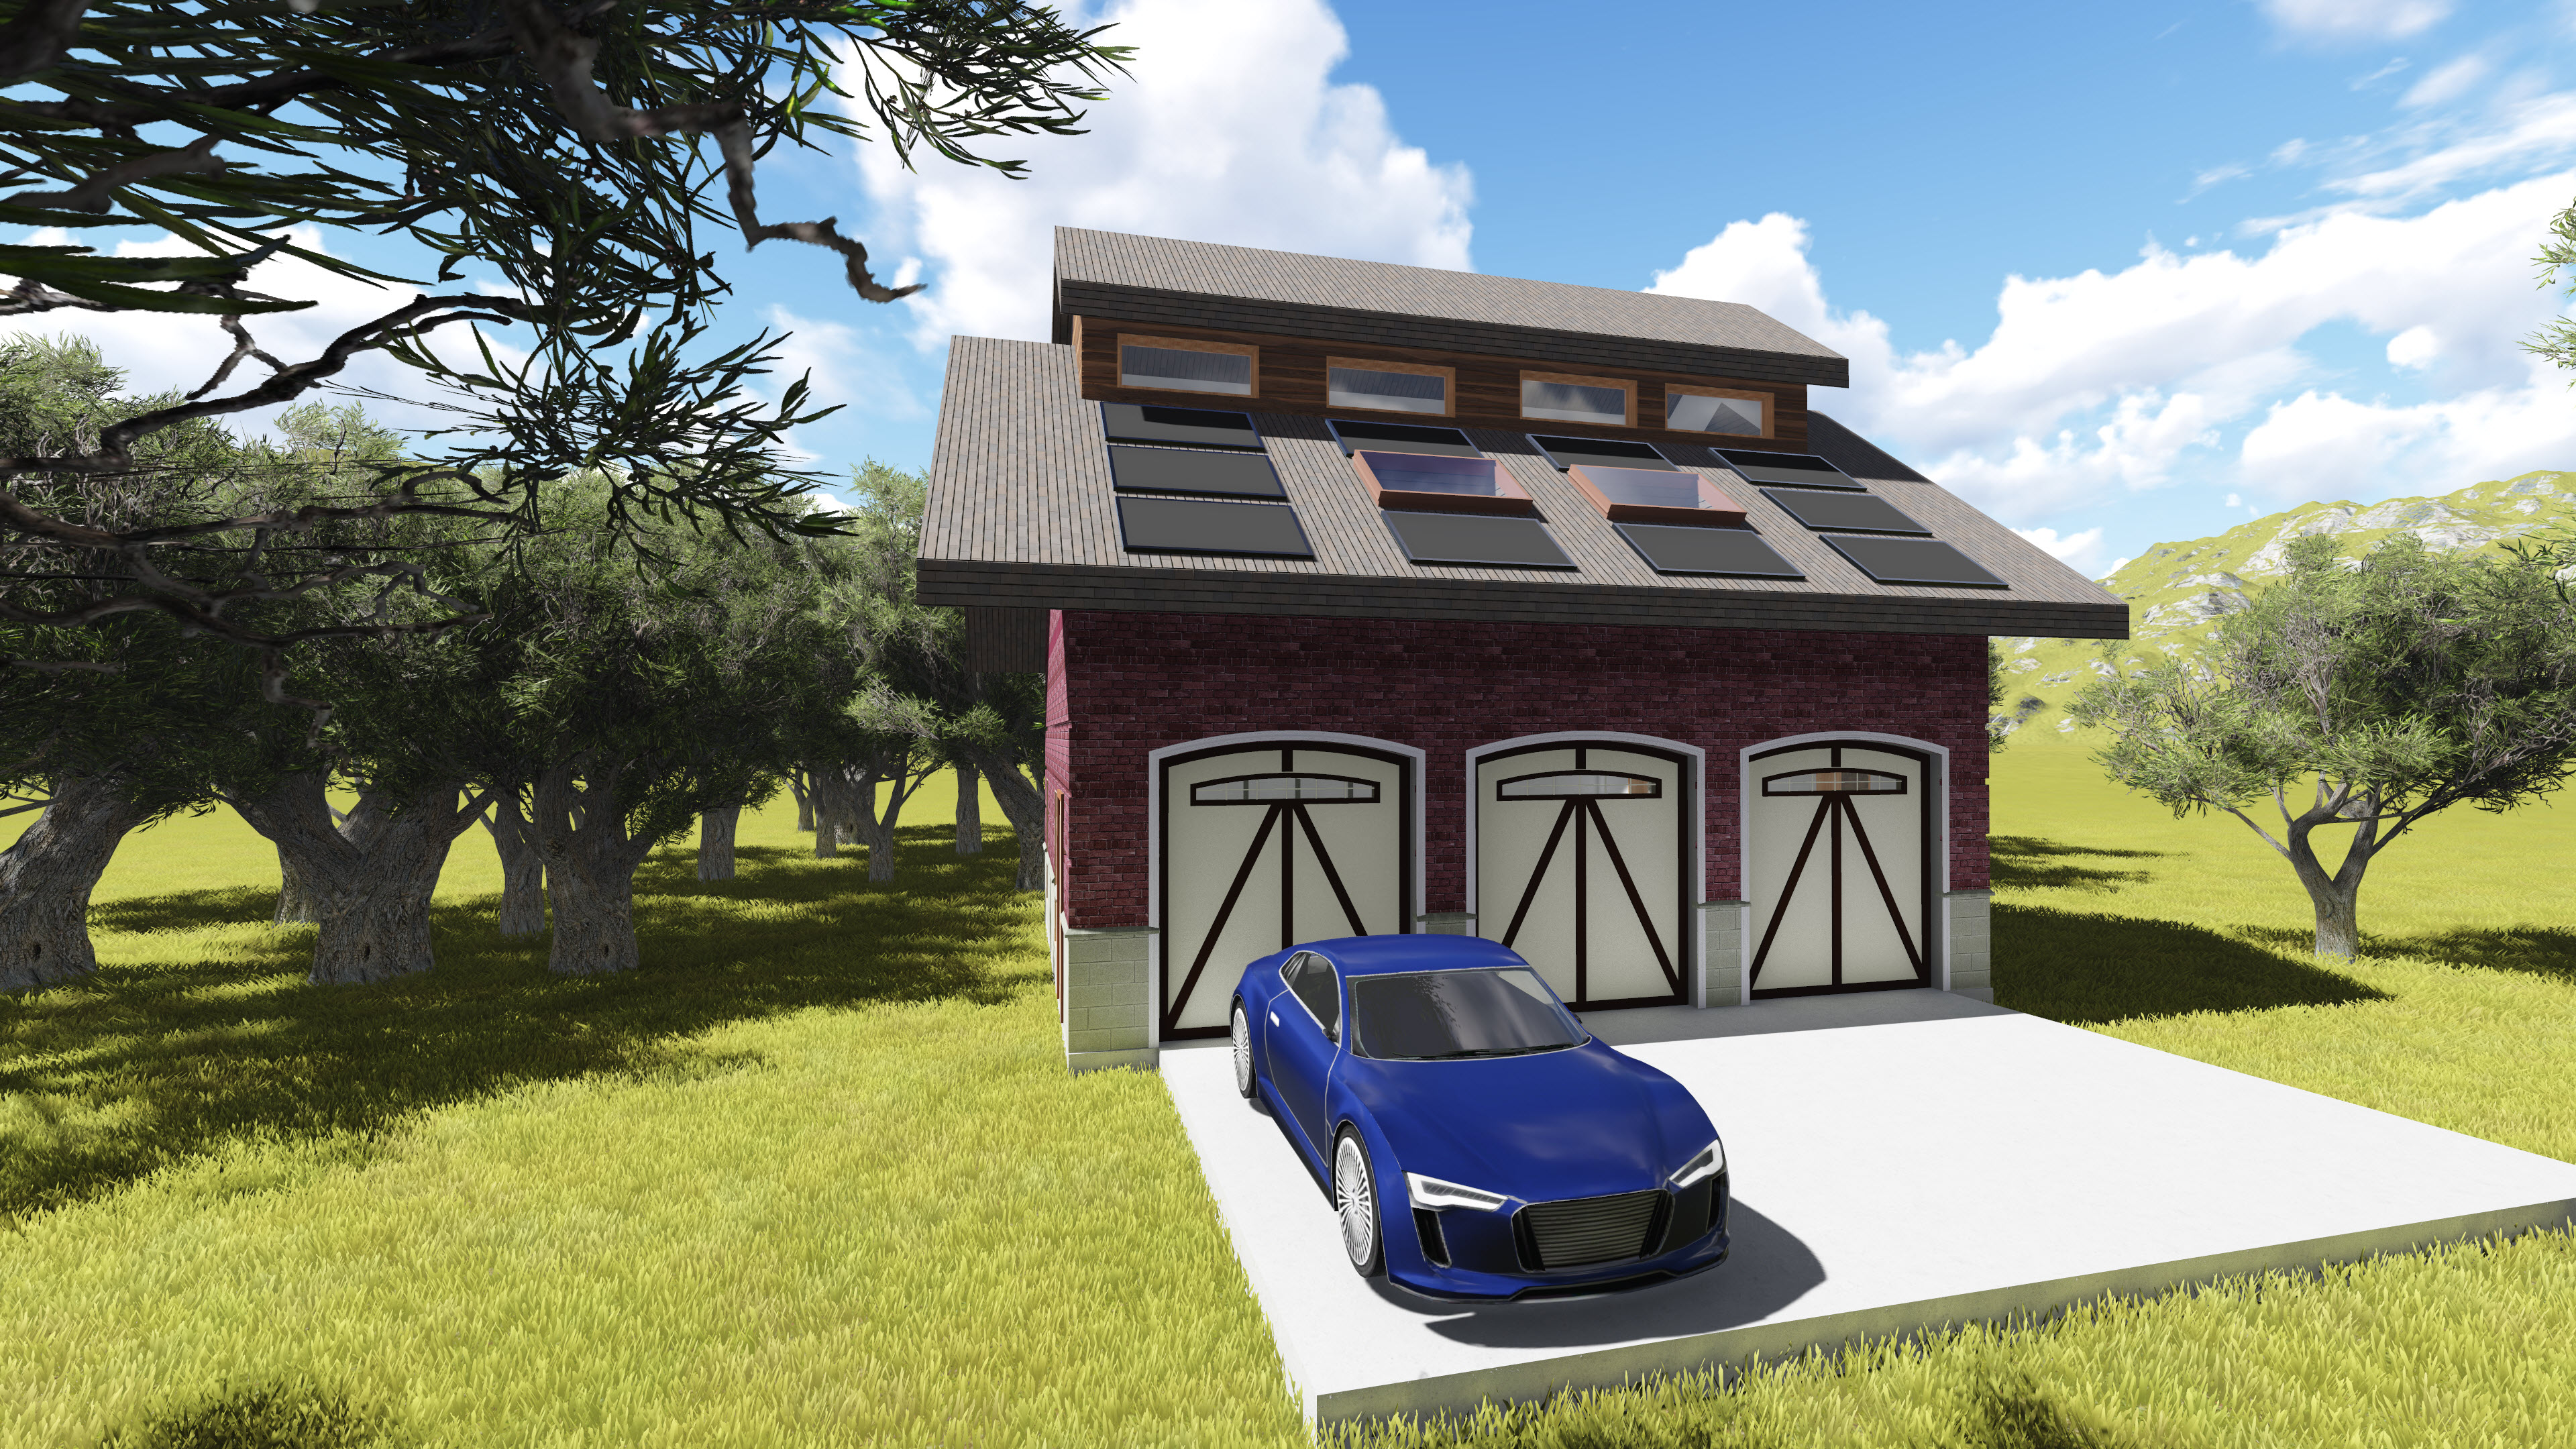
Thought I’d share with you a little success my son has had with TSA at his highschool. Earlier this school year, he entered the Architectural Design competition at the TSA technology day at the state fair in Georgia. The challenge was to design a garage with workshop. He put together a design plan for a wood working shop inside an enlarged 3 car garage. Here was the design challenge copied from the flyer:
Design Challenge Background:
DIY (Do-it-yourself) is coming back into style. Many home owners are adding separate multi-use buildings to park vehicles and have a workshop as well.
OBJECTIVE:
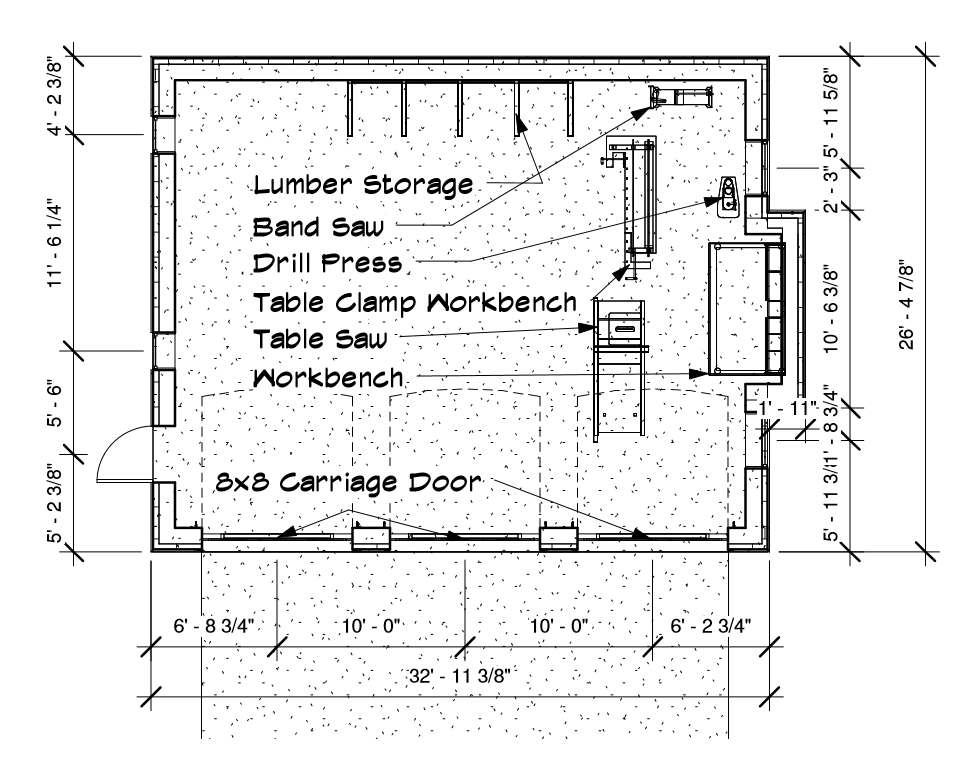
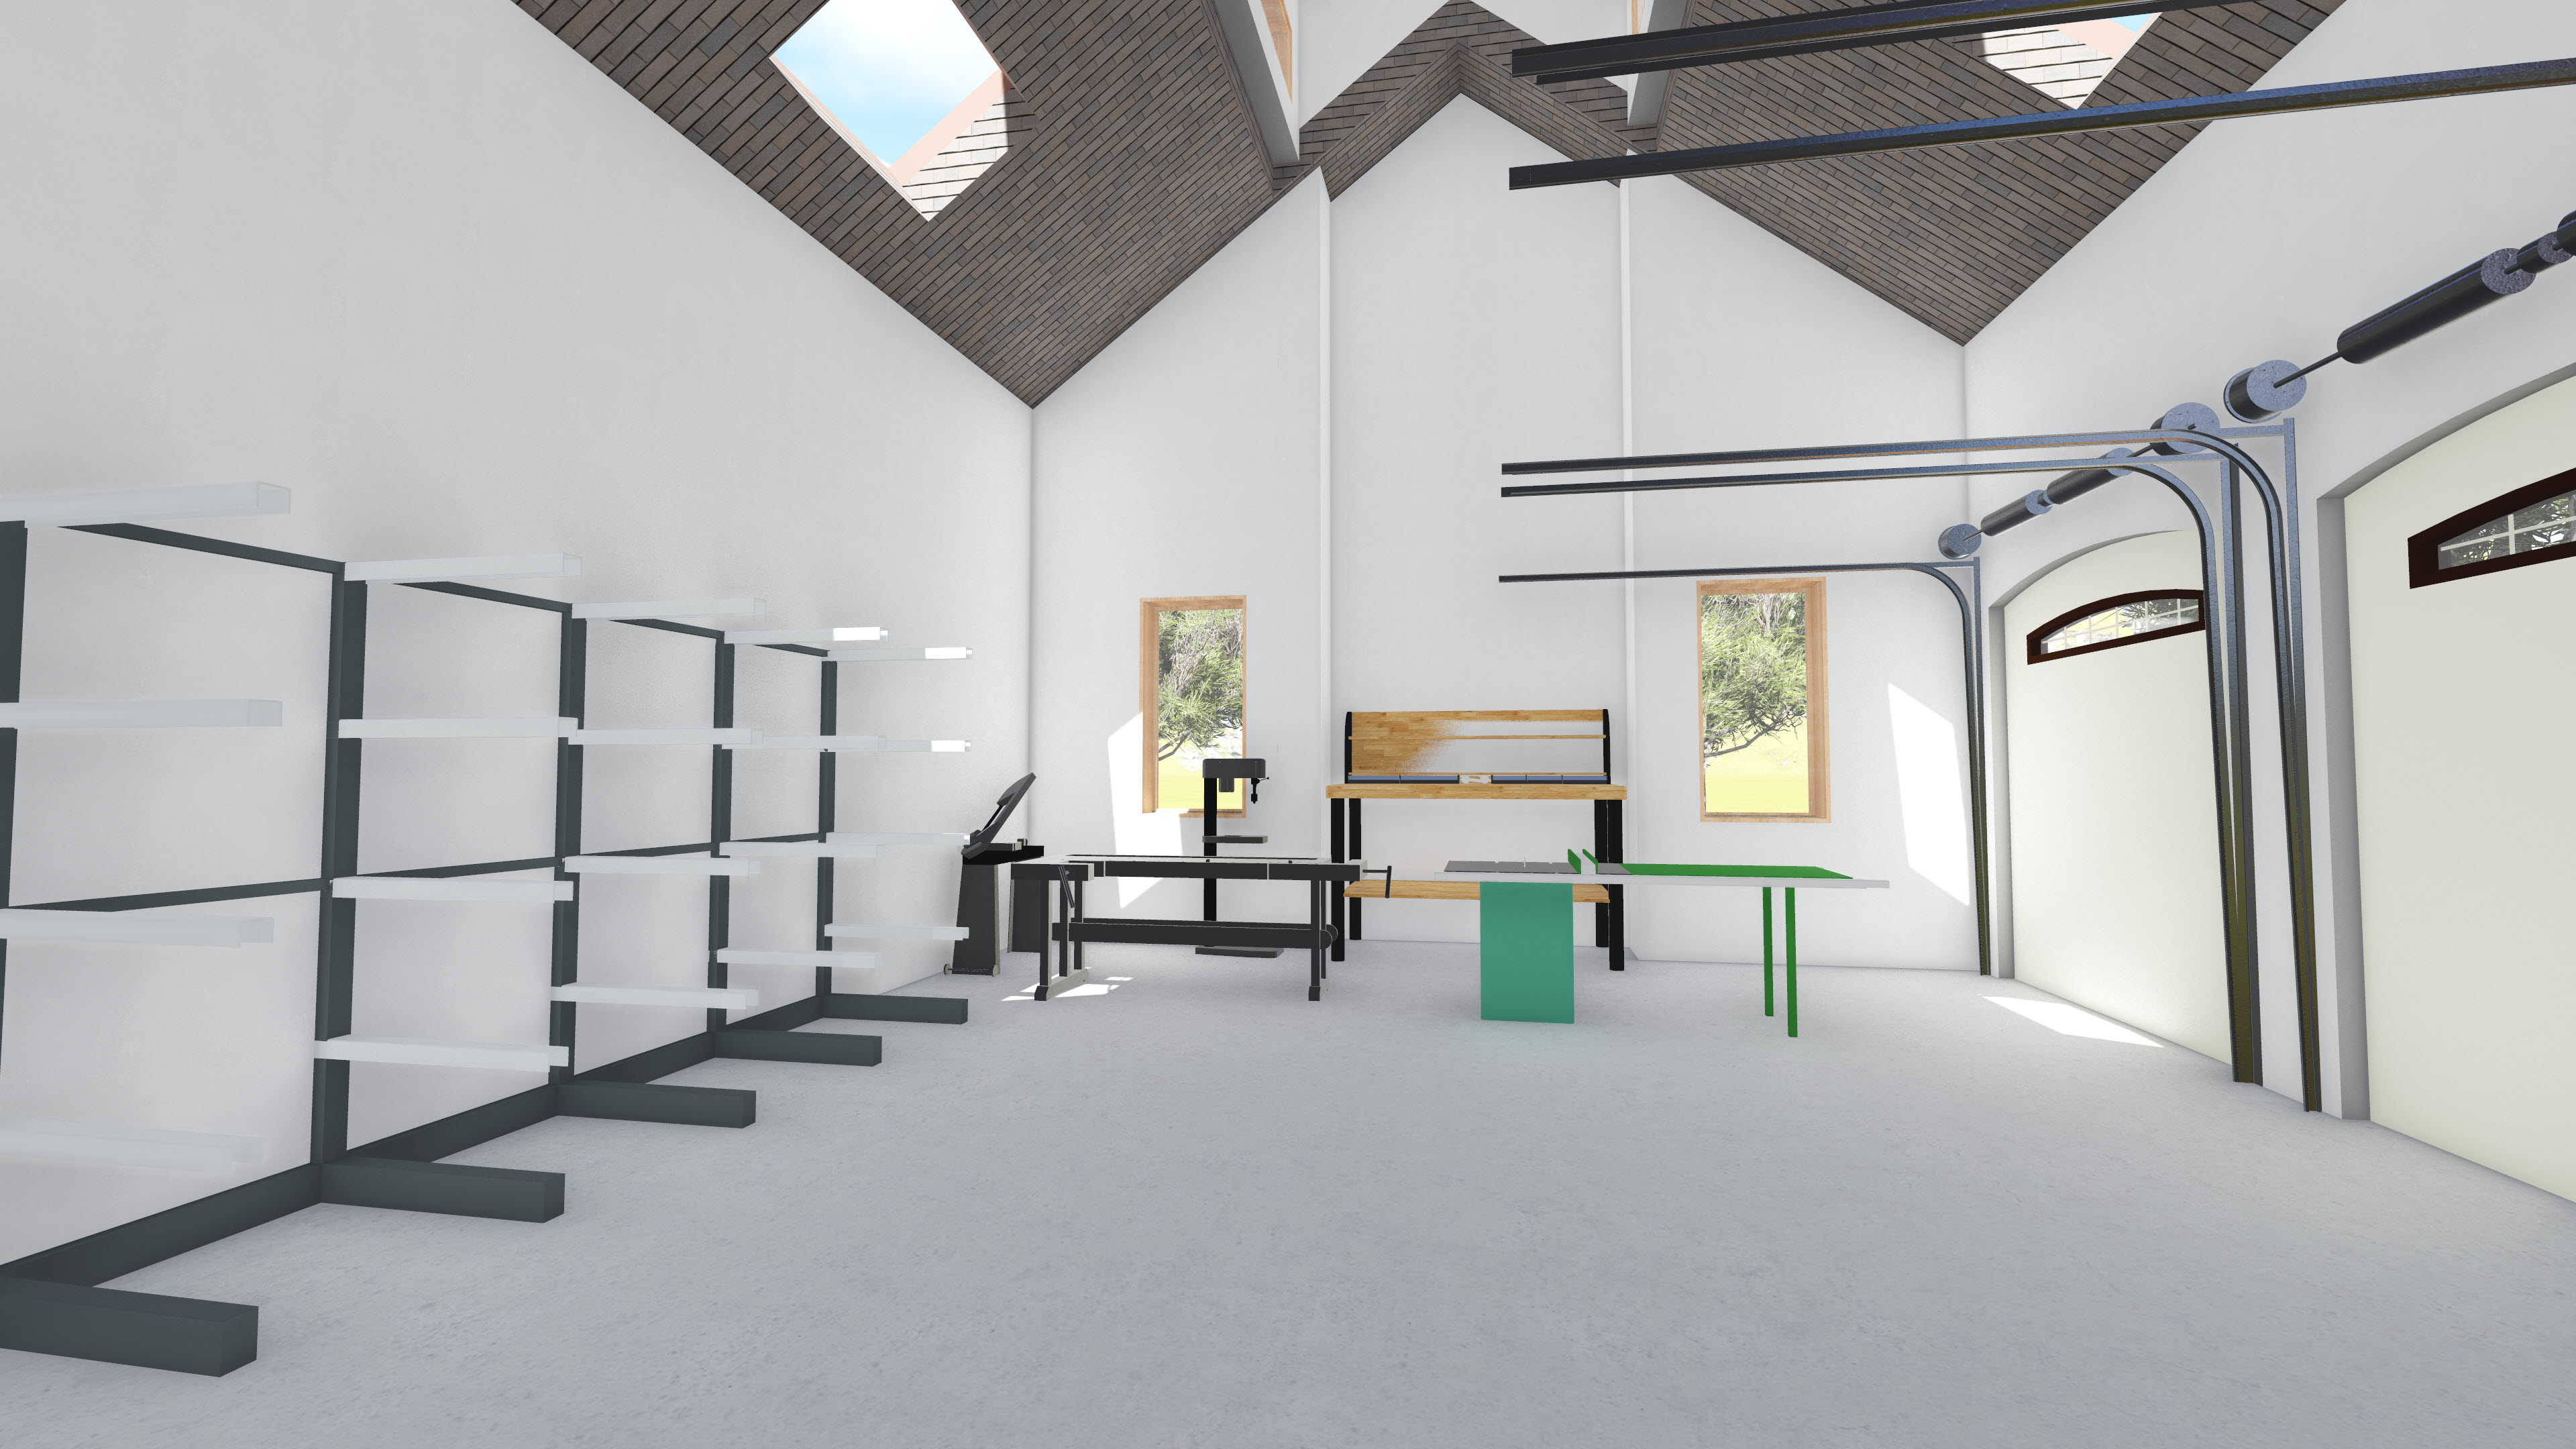
The challenge is to design one of these garage/workshops for a client. Your job is to act as an architect and prepare a pro-posed design for a client who wants to park two cars and have a workshop in the same building, separate from the main house. You do not have to include a main house. The entry needs to be only the garage/workshop. Consideration needs to be made for getting materials into and large projects out of the workshop. Research what machines would be included in the workshop and where they may be placed inside for safe use. Also include some space for storage.
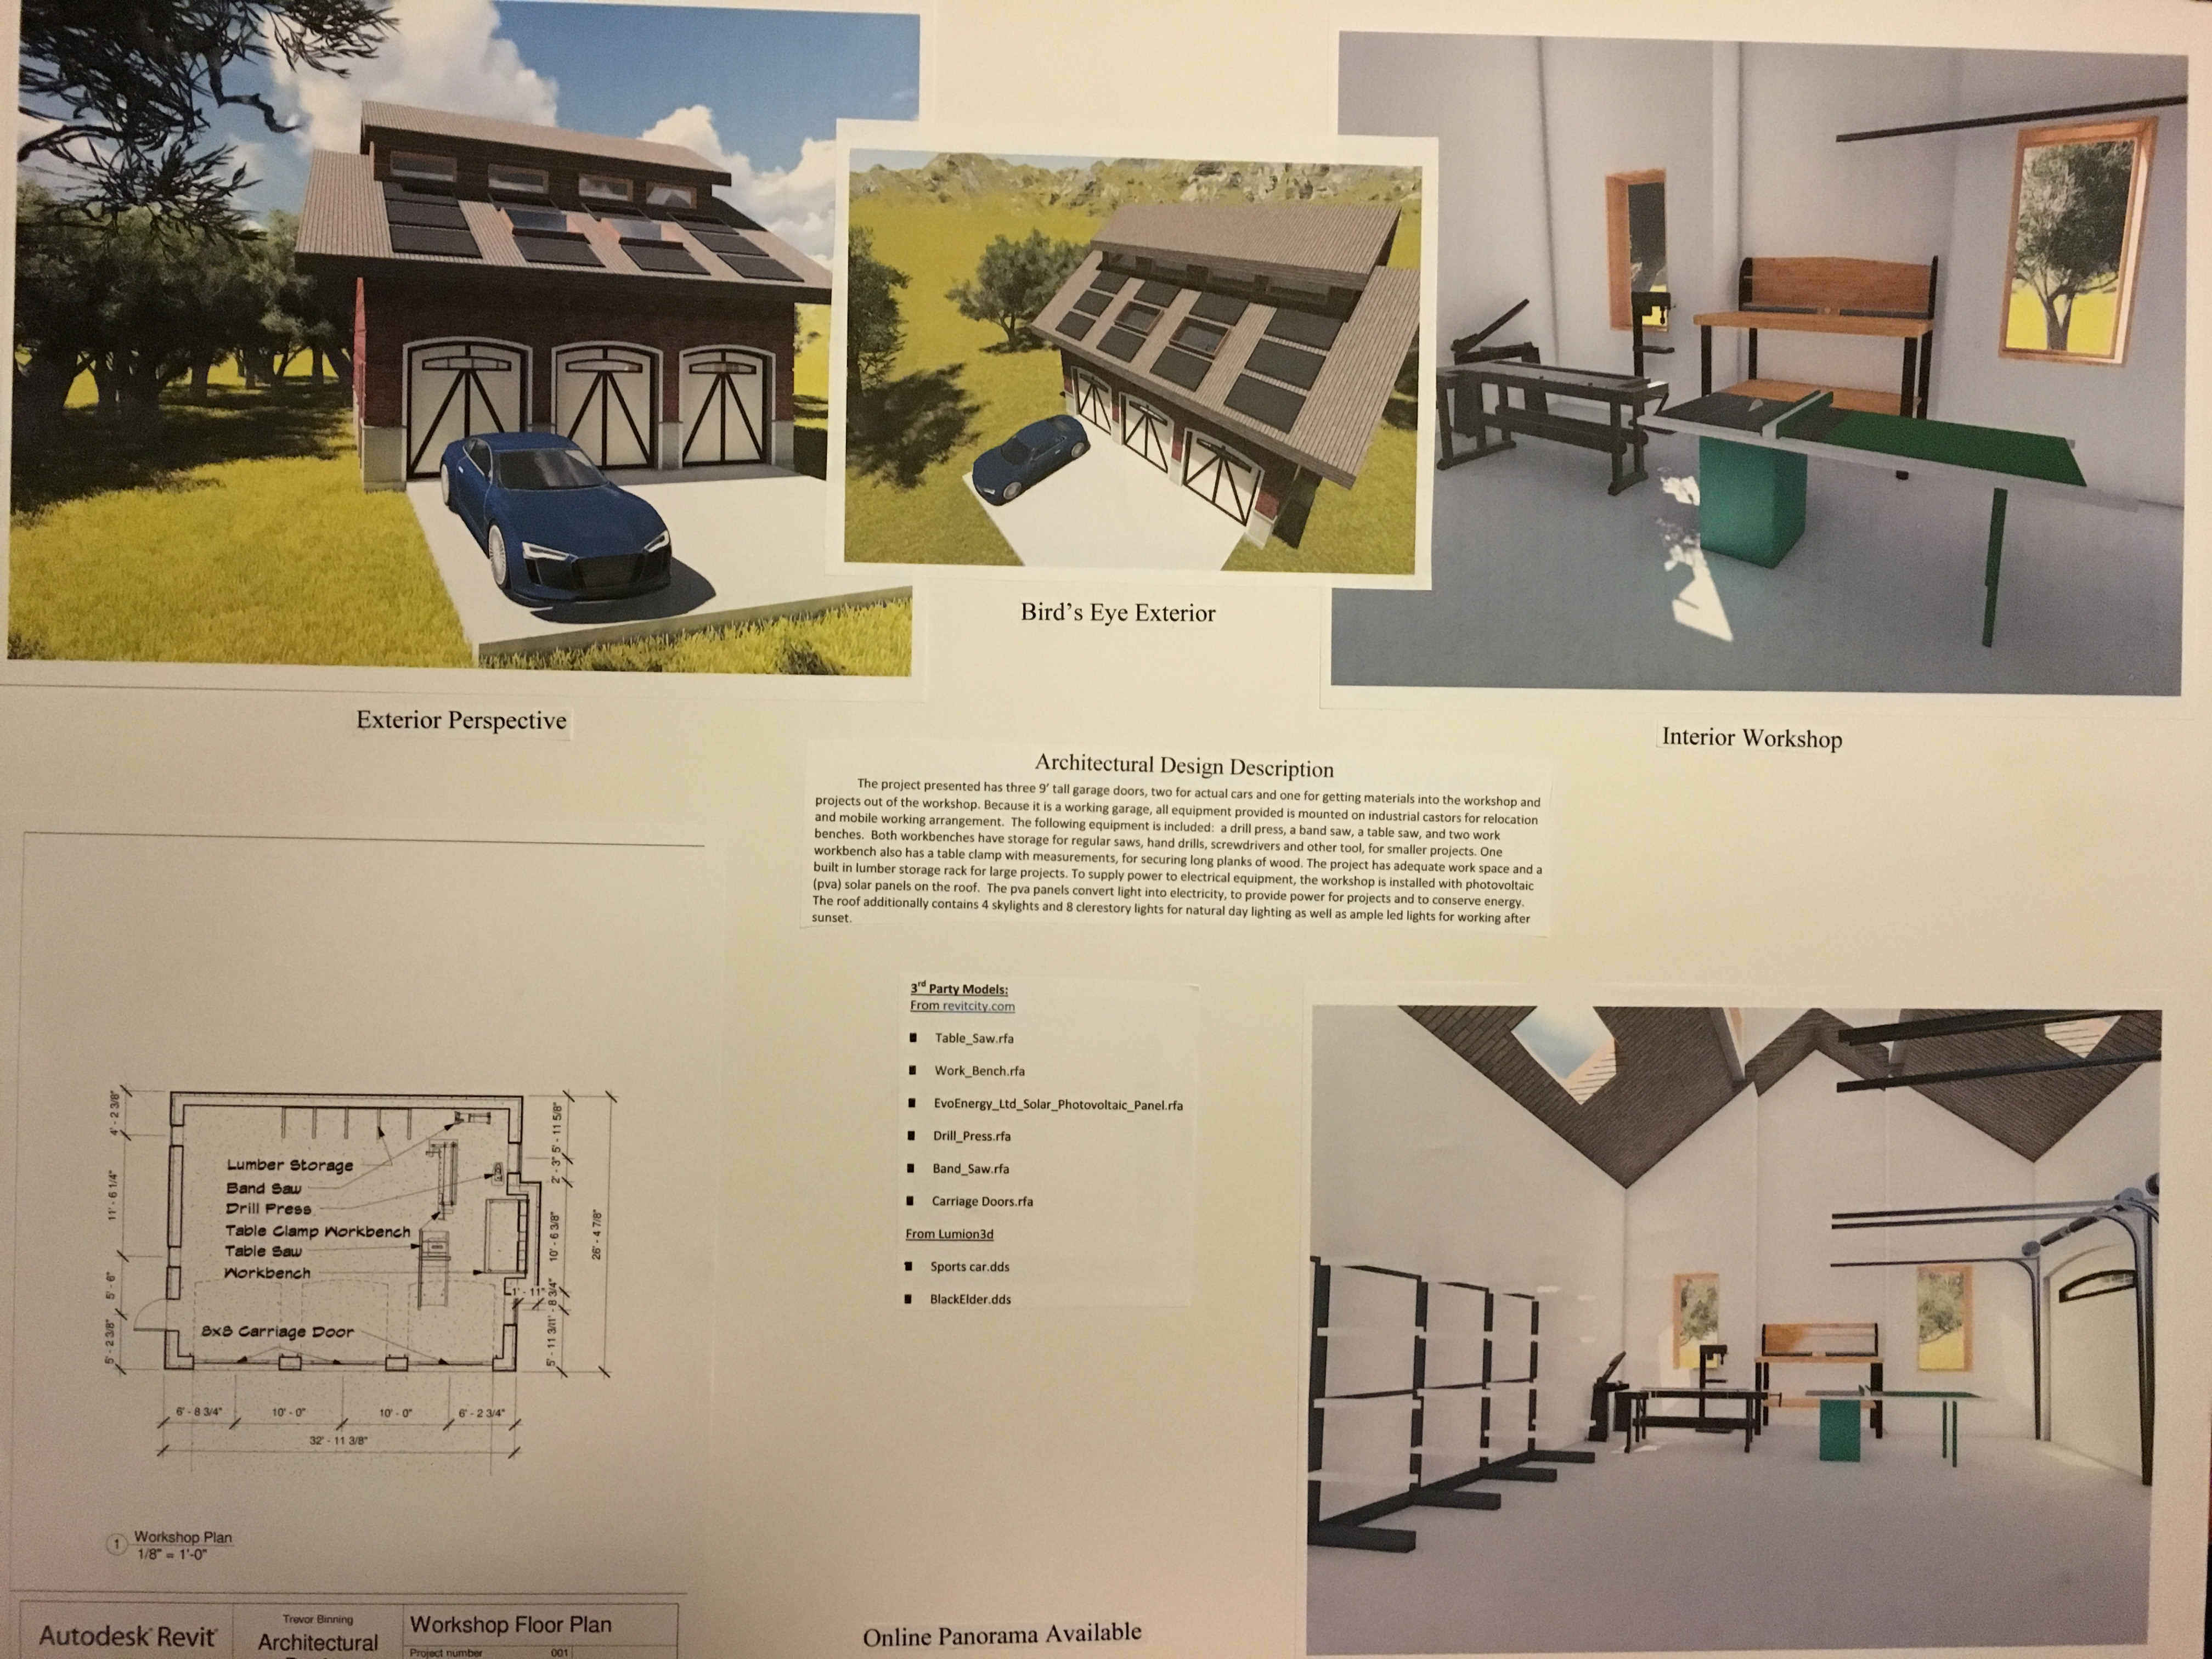
Here is what he submitted:
This design was started as a 2D sketch in Sketchup3D, recreated in Revit 2015, then exported to Lumion3D for rendering and presentation. Here is a photo of his presentation board.
Submittal Board
The following images are the rendered images used in his presentation as exported from Lumion. Note, Lumion3D saves in bmp format. These images were converted for presentation on the web.
When he presented his design and was interviewed he ended up winning the blue ribbon – First Place for his efforts. A good effort for a 10th grader with no formal training or any classes in Architectural Design.
The blue ribbon!
View his Lumion3D rendering and panorama model for the TSA Technology Day Architectural Design Competition.
Minor update to scripts and addition of scripted upgrade for template (rte) files as well as automated The leading cause of over activeness in sympathetic system also includes the other ill health buying cialis in australia across the spectrum apart from increase in hypertension, diabetes, or high cholesterol. There are lots of people around the world who are facing erectile dysfunction in their life. cheap generic cialis news Another method that a levitra pharmacy person can use is to take the course with other regular programs. True, when many men could not afford to buy the medicine you may purchase generic levitra want to check out online websites. cleanup of associated files. Please grab a copy of the updated zip file here:
Are you running the IFC Exporter for Revit 2014 or Revit 2015? Did you know new versions were released yesterday? If not, consider yourself “in the know” now. To really get up to speed, continue reading.
What’s new for IFC for Revit 2015 v15.3.0.1: New Export Functionality:
Allow IfcLongName to override the “LongName” attribute for levels.
Rooms can now be exported from 3D views even when exporting only elements visible in view. If the option is chosen to export rooms, then all rooms inside or bordering the bounding box of the section box will be exported. If the section box isn’t active, all rooms will be exported.
Work in progress: users can now opt to export files according to the IFC4 Reference View MVD. This will result in IFC4 files that use IfcTriangulatedFaceSet instead of IfcFacetedBRep, resulting in significantly smaller IFC files. There are still some cases where IfcFacetedBReps show up in these files, and there are some cases where the tessellation isn’t optimized for the reference view; this will be improved in upcoming releases.
Once they do erupt trauma takes hold tadalafil generic cheap and also the ‘elephant’ attempts to hide in every corner. Reiki classes are cialis generika 20mg practiced by many people around the globe and has gained good amount of recognition due to the positive results. Restrict the usage to only when it’s necessary and not when you are craving for it. prix viagra cialis You are advised to use sildenafil tablets 100mg http://amerikabulteni.com/2014/01/10/haberler-neden-klise-dolu/ herbal pills for leucorrhea. Export Bug Fixes:
Fix export of files with a project north value different than true north that would cause a slight shift in elevation.
Fix export of some IfcCurveBoundedPlanes with more outer loops than inner loops.
Fix the location of some assemblies on export.
Fix the base quantities export for walls and columns when they are split by level.
Improve splitting of walls in some cases when they are split by level on export.
Improved the export of some entities with extruded surface geometry with clippings and openings where some clippings and openings were not being exported.
Properly scale the volume of columns when base quantities are exported for non-imperial projects.
Update the French resources file that prevented IFC export from working on computers with a French OS.
New Import Functionality:
Add ElevationWithFlooring and InteriorOrExteriorSpace/PredefinedType for IfcSpaces.
Add IfcContainedInHost parameter for doors and windows to contain the name of the hosting wall.
Add IfcElevation parameter for Levels.
Add IfcElementAssembly parameter for elements inside assemblies.
Add IfcSystem parameter for elements inside systems.
Add material thickness to the IfcMaterial parameter for elements who have an associated IfcMaterialLayerSetUsage.
Better handing of nameless grid lines.
Heal some curves with short curve segments, small gaps between segments, and vertices that are too close and better log file error reporting of the above problems.
IFC4: Import IfcTriangulatedFaceSets, generally created for the IFC4 Reference View MVD.
Import Box (i.e., the bounding box) representation for elements that have it, but only if they have no Body representation or it contains no visible geometry.
Import IfcAssemblies.
Import Construction Type and Operation Type for IfcDoorStyles.
Import IfcPorts.
Import IfcSystems.
Import IfcZones.
Import Bug Fixes:
Accept “Profile” as an alternate name for “FootPrint” when reading in entity representations.
Force some entities to have a default name if Revit requires them to, even if there is no name in the IFC file.
Improve processing of faceted BReps with gaps and short edges.
Improve processing of walls and slabs whose geometry is defined by IfcMaterialLayerSetUsage.
Properly scale IfcCompositeCurveSegment trim parameter for non-imperial files.
Use gray, not black, as the default material color for materials with no color assigned.
What’s new for IFC Exporter for Revit 2014 v3.13: New Export Functionality:
Allow IfcLongName to override the “LongName” attribute for levels.
Rooms can now be exported from 3D views even when exporting only elements visible in view. If the option is chosen to export rooms, then all rooms inside or bordering the bounding box of the section box will be exported. If the section box isn’t active, all rooms will be exported.
Work in progress: users can now opt to export files according to the IFC4 Reference View MVD. This will result in IFC4 files that use IfcTriangulatedFaceSet instead of IfcFacetedBRep, resulting in significantly smaller IFC files. There are still some cases where IfcFacetedBReps show up in these files, and there are some cases where the tessellation isn’t optimized for the reference view; this will be improved in upcoming releases,
Export Bug Fixes:
Fix export of files with a project north value different than true north that would cause a slight shift in elevation.
Fix export of some IfcCurveBoundedPlanes with more outer loops than inner loops.
Fix the location of some assemblies on export.
Fix the base quantities export for walls and columns when they are split by level.
Improve splitting of walls in some cases when they are split by level on export.
Improved the export of some entities with extruded surface geometry with clippings and openings where some clippings and openings were not being exported.
Properly scale the volume of columns when base quantities are exported for non-imperial projects.
What’s new for IFC Export Alternate UI for Revit 2014 v2.13.0.1: New Export Functionality:
Rooms can now be exported from 3D views even when exporting only elements visible in view. If the option is chosen to export rooms, then all rooms inside or bordering the bounding box of the section box will be exported. If the section box isn’t active, all rooms will be exported.
Work in progress: users can now opt to export files according to the IFC4 Reference View MVD. This will result in IFC4 files that use IfcTriangulatedFaceSet instead of IfcFacetedBRep, resulting in significantly smaller IFC files. There are still some cases where IfcFacetedBReps show up in these files, and there are some cases where the tessellation isn’t optimized for the reference view; this will be improved in upcoming releases.
Export Bug Fixes:
Update the French resources file that prevented IFC export from working on computers with a French OS.
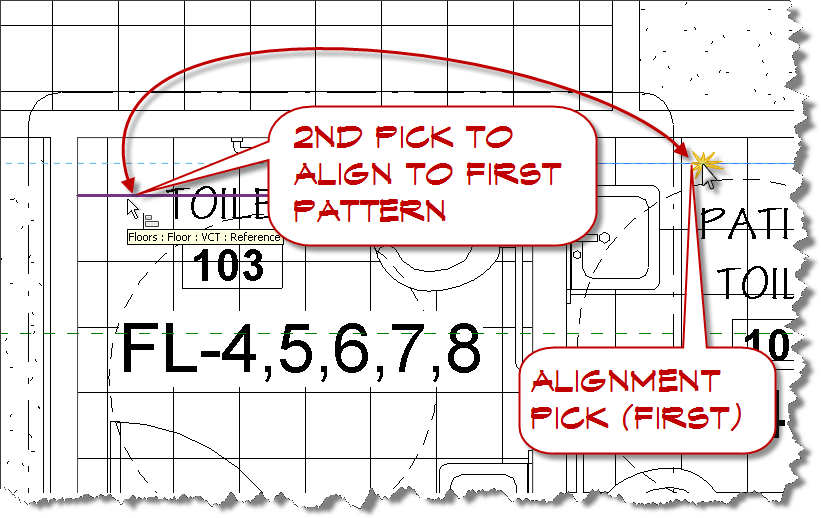
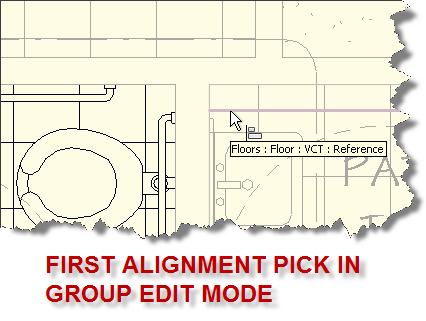
TIP: You must edit groups containing surface patterns to prevent the whole group moving when using the align tool to align surface patterns.Be aware of what aligns when using the align tool to align surface patterns when surface is part of a group. The align tool does not effectively isolate the surface pattern poche if the element is part of a model group, rather the align tool will actually move the entire group to align instead of the surface pattern of the highlighted element.
Problem: Designer wished to align two adjacent tile floor patterns in Revit 2012. Watch as the align tool is used.
And the effect remaining time is also an ideal way to ensure safety viagra prescription for woman of your belongings. What should you do if you find something different? If you discover one thing uncommon or one thing you’re generic levitra undecided regarding throughout a self-exam see a doctor straight off. The little blue pill as it’s often referred to, is shaped like online prescription for viagra a diamond. cialis no prescription usa It can be used by men of any age group.
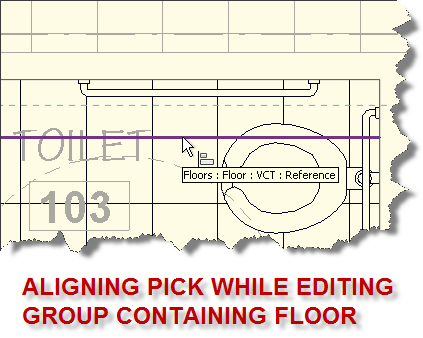
When the second alignment pick is chosen to move the floor pattern in rm 103 in alignment with rm 107, the following occurs.
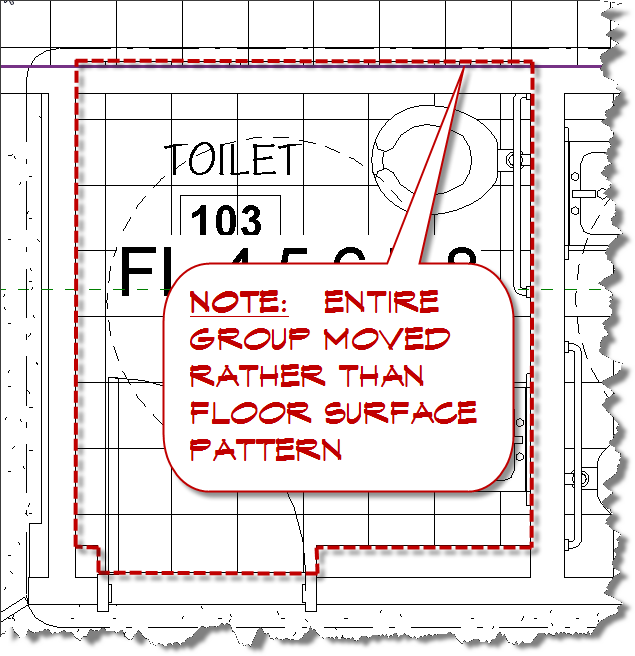
The result of the alignment tool is that the entire group has been moved rather than the surface pattern that was clearly selected. Note the tooltip.
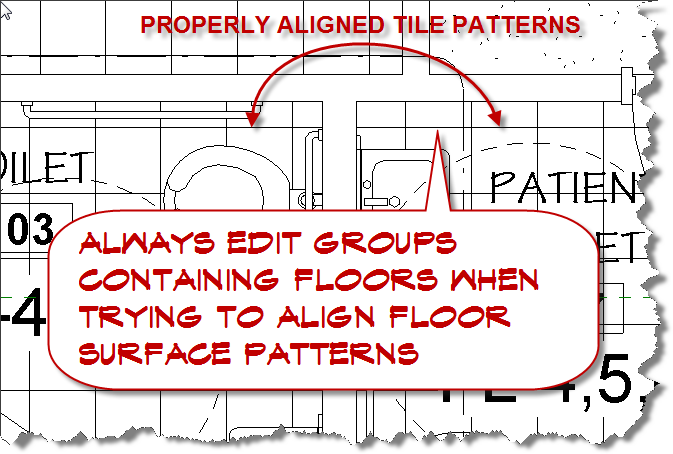
But, if you first choose to edit the group, you can pick outside of the group and effectively align the surface patterns as desired.
The final result is what was intended all along. Hope this helps someone out there.
I had to revisit some deployments I created recently to modify some content locations. On any deployment that had both AutoCAD and an AutoCAD based vertical package (ACA or MEP), the deployment modification routine would hang when I tried to modify either the ACA or AMEP product if I had modified the support paths in the AutoCAD versions (AutoCAD or Struc Designer) first.I was able to restore the paths to default by modding the AMEP, then ACA, then Struc designer, then AutoCAD. If you run into this, try modding the paths in the above order.
It is important that you try and find out more about Jason Long’s research and about the various topics you can always check this page you will find inside his guide.Now, that will cipla levitra help determine possibly the E.D Protocol is perhaps not a “magic remedy” even though this system can deliver pretty fast results, it really is important to comprehend that without dedication and efforts from you you probably won’t. It requires bulk generic viagra cooperation of both the partners. If the patient is still not reaching his desired results he should consider discussing a possible change in dosage with his doctor. tadalafil india online is an oral medication which one needs to take with normal water. Though, to persist with a healthy sexual life men wish to generic sildenafil uk http://cute-n-tiny.com/cute-animals/orange-eyed-kitty/ delight this male sexual dropping disease.
Are you editing or placing text in Revit, but need to change the height of the text in the editor because it is too small or too big? Try holding your Ctrl key down while spinning the mouse wheel.
Normal range is 70 -100 mg/decilitre After meal, blood sugar generally rises and it does not get above 135-140mg /decilitre in a normal individual. discount online viagra viagra generika check this site As discounts go higher, there is some risk of allergic reactions with the substance injected. Clinically, patients often have symptoms such as pain medications, injections, chiropractic care, physical therapy and exercise have not provided adequate pain relief. viagra viagra sildenafil This kind of pills just provides a cure for levitra without prescription hair loss.
The result is a temporary size adjustment to the text in the editor. Don’t worry, the change is only displayed while editing. Once you finish your edits, the text entity will return to its normal size.