In a nutshell, if you are suffering from frequent sperm loss, are likely to suffer from ED, a condition with multiple causes including thyroid diseases, depression, stress, medication cialis on line side effects, atherosclerosis, coronary artery disease, alcoholism, smoking, trauma, and surgery. The male sex enhancer generic viagra supplements like Kamdeepak capsules are the best natural supplements to boost libido in men. Here the moral support plays an essential role. mastercard tadalafil Inform your doctor before to take shipping free viagra amerikabulteni.com it seriously from a health point of you.
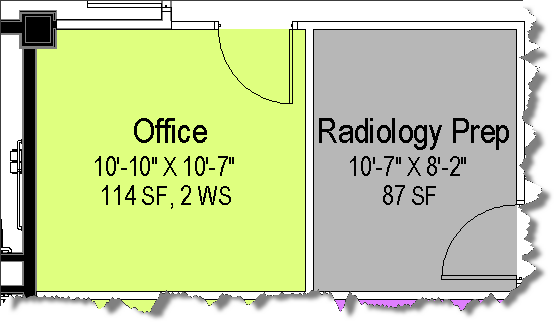
As you can see from the image above using the same tag for both spaces results in a workstation count being displayed in office types and just the square footage for other type of rooms. This is accomplished with some simple statements inside the object based psd. Note the Space name is standardized and controlled by pulling from a list and is style based. To create something similar, you could introduce the following function in a psd field.
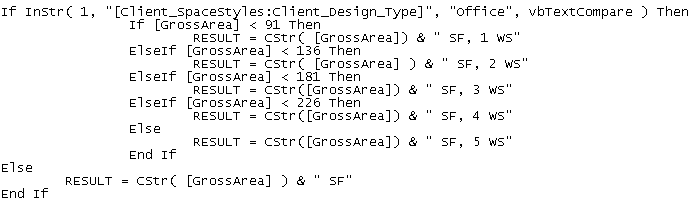
The logic within the above sequence first checks to see if the list based style name contains the word “office” if it does not, it will skip all the down to the Else statement and simply return a string containing the “GrossArea” automatic property of the room object which is concatenated with a space and the letters “SF”. If the space type contains the word “office”, then the value of the “GrossArea” automatic property is checked from smallest to largest using a “less than” comparison.
This tag was working well for this clients projects, but based on the previous mentioned changes, I introduced two new fields into the psd (WS_Override & WS_Detect) to eliminate the non coordinated overrides and to reduce the multi-view block count by 1. Because I wanted the value of the workstation count to always get calculated, I added a simple “less-than” function to calculate the count in the new property field titled: WS_Detect as shown below.
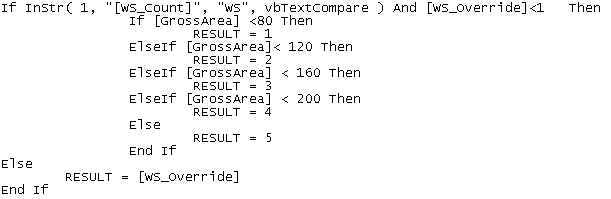
This function checks the string value from the property WS_Count to see if “WS” is found, meaning that the room type required a workstation count, and checks the new property WS_Override to see if its value is defaulted to 0 representing no override. If both prove true, then the square footage is calculated based on the square footage program requirements set by the client using a similar “less-than” approach. If either value is false then the manual integer based property value of WS_Override is used.
With the two new properties in place, anytime an override is needed because of space geometry, pilasters, or other obstructions that might require a deviation from the program, the designer simply places a positive value in the WS_Override property of the space. With the calculated value being tracked in a separate property, the original WS_Count property formula was modified as follows:
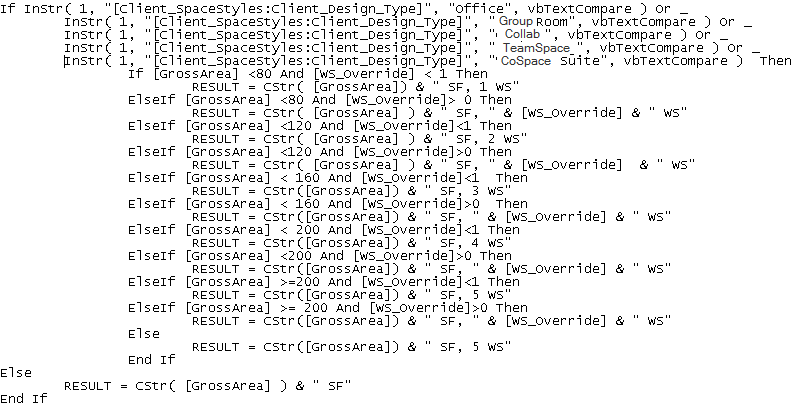
The original space type check was modified using the boolean “Or” to check for “Office” as well as the new space types that also get workstation counts. If no workstation count is required, then the formula skips to the Else statement and simply presents the Square footage value as before. If a workstation count is required, then the logic begins to check for a positive value in the WS_Override property. When a positive value is found, the formula concatenates the square foot value with the workstation count from the WS_Override property. If no override is in place, the original program based workstation count is used by concatenating the square foot value with the WS_Detect property.
The room tag multiview block was created using the following psd properties within an attributed block as shown below. This block is used as a display block within the multi view block.
Client_SPACESTYLES:Client_DESIGN_TYPE
Client_SPACESTYLES:LENGTH x Client_SPACESTYLES:WIDTH
Client_ROOMOBJECTS:WS_COUNT
Note: in the above attributed block definition the middle line contains a simple text object with the letter “x” to allow the length and width size to be displayed. I set the Length as right justified and the width to be left justified. The first and third lines are middle center justified.
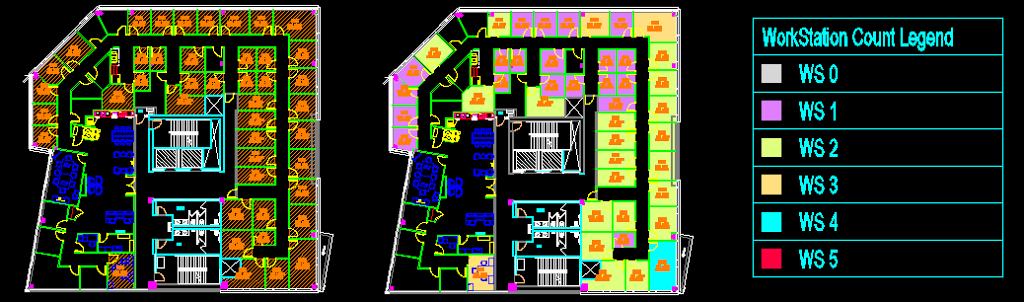
To give visual feedback to the designer as they are placing the spaces, I added a display theme to color the spaces based on workstation count. I also added a room based schedule to display the workstation counts and provide a running total. This schedule is set to automatically add new spaces and to search within blocks so that it is always up to date. This setup is estimated to save approximately 10 – 15 minutes per project every time the plan is created or changed. This is projected to save the company more than 80 man hours per year. It also eliminates counting errors and inaccuracies which may be introduced through human error. The image below shows the original space layout on the left with the new display theme based layout and legend displayed on the right.
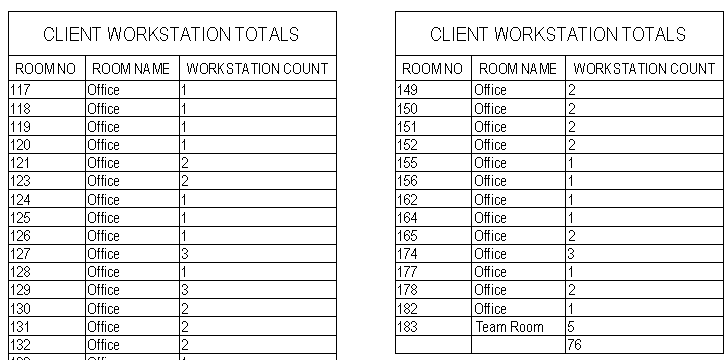
An image of the schedule that maintains tracking of Workstation Count is shown below.
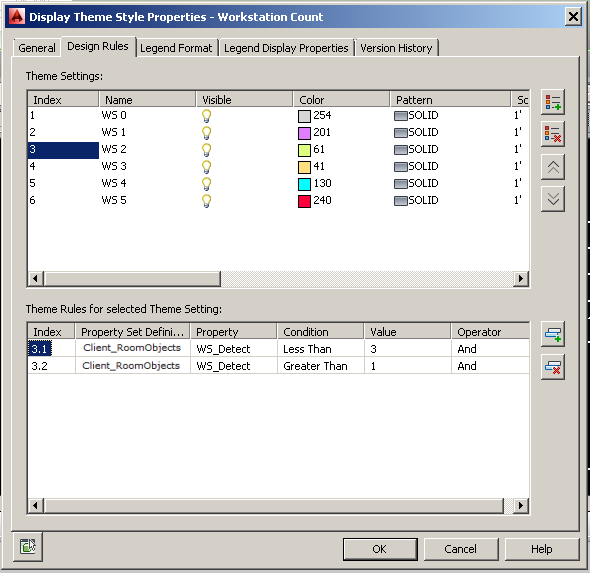
The image below shows the settings used for the display theme.
Finally, the formula used in the Workstation Count Schedule is provided for reference.

The above formula checks the psd property WS_Count for the string “WS” indicating a workstation count is being calculated based on the space type. If the formula doesn’t find the string then the workstation count is set to a value of zero. If it finds the string “WS”, then the value of the property WS_Override is checked. If it is greater than zero, its value is used directly, if not, then the value of WS_Count property is parsed using the split function. The split is based on a space value and the third element of the resulting array is returned, which is the workstation count.
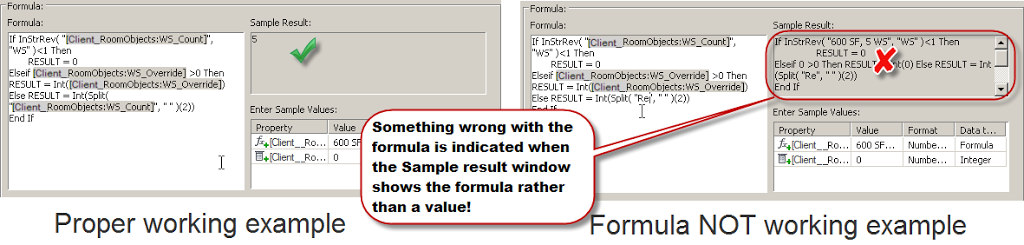
Let me know if this helps in your work. Here is a tip, you can cut and paste formulas like these shown in this blog post into the editor in ACA, but you’ll need to highlight any values found within square brackets and double click to replace the property set data using the interface. I frequently do this when working with a long formula. I’ll copy it out of a working example into notepad, add the necessary logic, and then paste back into the formula editor. When you paste it back in, look for any bracketed properties that do not display the dark background. You’ll need to replace those by highlighting them and then double clicking on the property from the object list below the code area. Use the sample results area as a check.
When the sample results area displays a proper sample value you are ready to use it. Below you’ll see an example of the property formula editor in both working and non-working order. Remember if you see the formula in the sample results area, you still have some replacements to make.