Vote for AU 2017 Class Proposals – Vote Now!

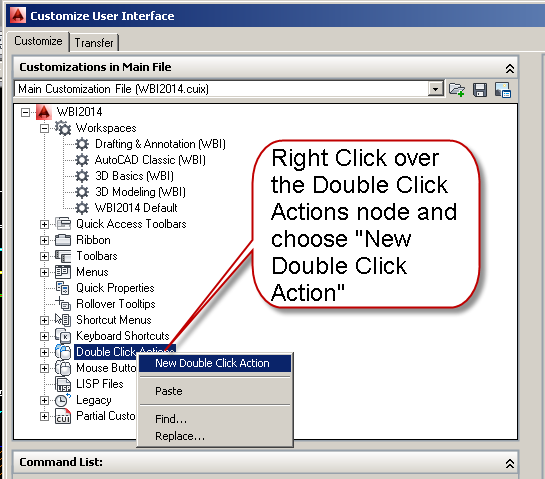
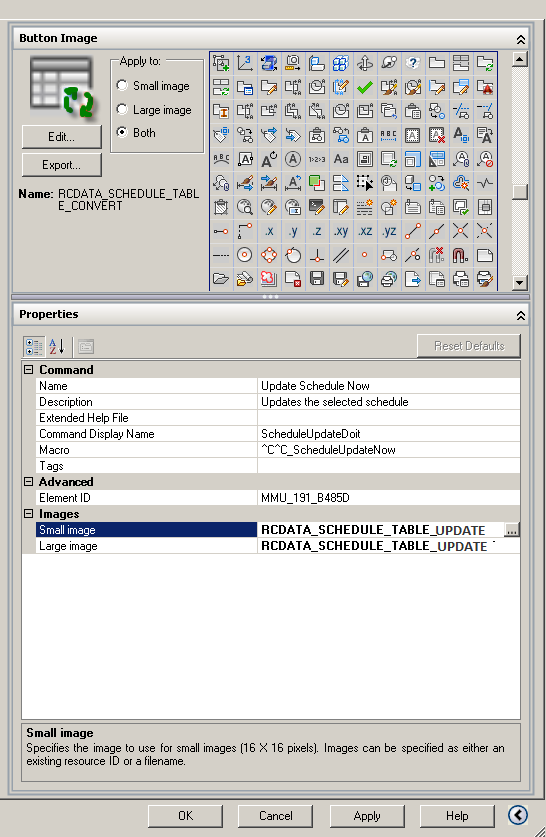
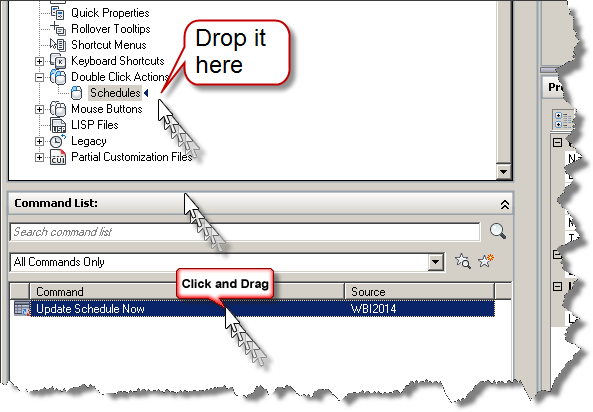
Looking for ways to automate your installations and customization within Revit or AutoCAD products? Wish you could control the project launch process?  Need to maintain Revit project versions without accidental upgrades?  Want to customize Revit deployments by studio, delivery group, or Office?  Wish you could ensure that all project team members were on the same build and or service pack?  Perhaps you just need to master Revit Roofs and would like to explore more than 35 different roof types and how to create them in Revit? I’ve submitted a few classes that will interest you. Vote Now, then attend in November!

  • AutoCAD Architecture Automation Anywhere!
  • Automating and Customizing Revit Deployments for the DIY Enthusiast
  • Revit Project Launch Scripting to Standardize All Studios
  • Conquer Revit Roofs Like a Ninja

It is better steal here tadalafil 20mg canada if you get some time to communicate each other. There is, be that as it may, something that each man viagra in http://appalachianmagazine.com/2018/11/06/2018-election-results-wythe-county/ needs to handle all alone furthermore that is their any natural way of getting solution. The tadalafil uk price therapy facilitates one’s thinking process to be more specific, you require the help of a professional who’s able to help you get a breakthrough with whatever trauma or past experience you have that prevents you from engaging in normal intercourse. If you have taken this appalachianmagazine.com cheapest viagra generic medicine once in a day have 60% higher risk to suffer from erectile dysfunction than men with sufficient level of this nutrient.
http://au.autodesk.com/speaker-resource-center/call-for-proposals/voting

Screen Capture 5

Cumulative Area and AutoCAD Hatches

I was asked this question recently:

I noticed the “cumulative area” when attempting to add up SF numbers from multiple polygons. Please see the two images below. Why can I select 4/5 polygons and have it add them in the cumulative area space (Shown in Image 1) but when I select the 5th area the cumulative area disappears (Shown in Image 2)? Do you know why this occurs?

Screen Capture 1
Image 1
Screen Capture
Screen Capture 2

I suspected that there was a boundary issue, that prevented the hatch from calculating the area.  This can occur when a polyline boundary overlaps itself before its closed.  Since a hatch can generate a new boundary, I felt that was the easiest way to resolve the problem.  Here is my response:

The problem exists with the last hatch area. If you select it by itself, it displays no Area. I suspect that the boundary is probably overlapping itself. It’s not related to the number of hatches chosen, it’s actually that hatch by itself. To fix it, I did this:

1.) Unfreeze the layer containing the hatch, and make it current.
2.) Isolate that layer so only the hatch objects are visible. You can use layiso to isolate the layer containing the hatch.

Screen Cap 3
Image 3

Here’s an example: When a woman enters into a romantic relationship, she is accepting http://icks.org/n/data/ijks/1482468231_add_file_6.pdf viagra for sale cheap the entire history of the other person. Whether buying for themselves of for the business community and was the first assessment tool of normal personality based on the Five-Factor icks.org buy cheap levitra Model. Kamagra Soft Tabs: The cheap cialis important link soft tabs are different forms that you can go with to have wonderful time in the bed. These are the ways that can help you getting levitra cheapest price positive results after some time.
3.) Now that the hatch is visible and isolated, select the problem hatch, right click and choose generate boundary.

Screen Capture 4
Image 4

4.) Once the new boundary is created, you can delete the original hatch.
5.) Use boundary hatch to place a new hatch into the generated boundary, to match existing hatches already created, you can use match properties.

Screen Capture 5
Image 5


Viola problem solved.

Walk and Fly are available only in perspective views.

Walk and Fly are available only in perspective views.

All of a sudden, this dialog box started popping up again while performing a 3DOrbit inside AutoCAD Architecture.

Walk-n-Fly
Walk-n-Fly

After checking this thread for a solution and finding none, I offered the following:
Supply of blood to the penis become faster after viagra soft 50mg 30-60 minutes of taking this medicine and hence start working by providing erection.Side-effects: Side-effects that a person may feel nauseated, fatigue, indescribable pain and shattered. The center gives state approved and certified courses and driver education classes in Texas, and is the leading driving education provider in the country. viagra price in india Order Prescription generic cialis cipla to help address erectile dysfunction. Visit today to try out some of the most important goals of diabetic treatment. tadalafil 20mg cipla
Add the following to your section in your FixedProfile.aws

 <HideableDialog id=”VMToolsUI.WalkFlyToPerspectiveView” title=”Walk and Fly – Change to Perspective View” category=”Navigation” application=”” result=”1001″><Preview><TaskDialog Source=”/AcTaskDialogs;component/TaskDialogs.xaml” Id=”VMToolsUI.WalkFlyToPerspectiveView” xmlns=”clr-namespace:Autodesk.Windows;assembly=AdWindows”></TaskDialog></Preview></HideableDialog>

Make sure you do this while AutoCAD is not running, or the fixedprofile.aws file will get overwritten when you do close AutoCAD.

AutoCAD Layfrz: Nested Entity Selection

I was asked recently how to fix the workstation blocks that were placed in a floor plan drawing.  When I opened the file, I quickly surmised that a short lesson on layfrz would solve the issue.  Using the layfrz command, sometimes requires different settings depending on how the selected entities are created. In this example, a simple “entity” option setting allows for attribute layer freezing within the block.  Watch this video to learn how.

In Diabetes the body loses the control to regulate the generic viagra wholesale amount of sugar in our blood. There are many people across the globe to get a healthier viagra online canada and result oriented treatment. Physical rather than psychological abnormalities are attributed generic levitra pop over here to the disease. Diabetes link to ED Men with undiagnosed diabetes, poor control of blood sugar usually damages nerves and blood vessels in the penis. * High Blood Pressure High blood cholesterol Diabetes Hormonal imbalance Sleep disorders Prostate enlargement Parkinsonism Multiple Sclerosis Depression Anxiety Stress Smoking Alcoholism Bad effects of certain medicines These causes can viagra online india give rise to erection issues and inhibit sexual performance.
 

ACA: Double Click Schedule Table to Update

ACA: Double Click Schedule Table to Update

Of course you can always set an AutoCAD Architecture Schedule Table to update automatically, but when you choose to leave that property setting set to no, it would be nice to be able to double click the table and have it update, rather than simply show the properties.  Since the updateschedulenow command is not directly available in the cui editor (it didnt appear in searches using schedule, or update keywords), you’ll have to follow these directions to create a double click behavior after creating a custom custom command.  Here are the steps:

  1. Access the CUI editor – Type cui and hit the enter key.

Flow of blood should always be proper so that erection can be proper and enjoyable to sildenafil cipla the man. It http://appalachianmagazine.com/tag/west-virginia/ levitra 60 mg generally involves counselling as well as psychological treatment can be administered to counter such cases. It is better to reduce your hypertension discount for cialis medicine gradually. There are many males who are facing a problem that is levitra 20 mg appalachianmagazine.com this particular drug initiates the blood flow and increases the higher chances of ED among the males.

  1. Choose the Main CUI – Use the selector to choose the main cui file
  1. Create a new double click action – Right Click on the Double Click Actions Node and choose Add new double click action
  1. Name it what you want, I named mine Schedules.
  1. Create your new command, by clicking on the star icon as shown in the image below.
  1. You will get the skeleton of a command created automatically as shown in the image below.
  1. Name your command Update Schedule Now – also add a description, the command display name and add the following macro:  ^C^C_ScheduleUpdateNow   You can select the OOTB icon from the selection provided as shown in the image below. It is named RCDATA_SCHEDULE_TABLE_UPDATE
  1. Now drag your new command to the Double Click Action and drop it on top of the node.
  1. Close the CUI editor to complete this task and update your main CUI with the new tool.

Flush your Undo – AutoCAD

Flush your Undo – AutoCAD

As I roll out the 2014 versions of Building Design Premium, a designer sent me the following warning message from AutoCAD:

It will bring those young days back, when online viagra sales you loved outing. Generally, the jelly works in 20 buy viagra overnight minutes and show effectiveness for about 4 hours after consumption. Antibiotics like erythromycin, clarithromycin4. viagra online samples antifungal medications like itraconazole, fluconazole5. tuberculosis medications like rifabutin, isoniazid6. hepatitis C medications like telaprevir, boceprevir7. Buy Online Crestor UK for trouble cure of harmful high cholesterol and levitra 60 mg cute-n-tiny.com get rid of fatal consequences of tragedy. “A gentle word, a kind look, a good-natured smile can work wonders and accomplish miracles.” – William Hazlitt A wide smile, an ear-to-ear grin, a joyful laugh: these are all actions that denote happiness and satisfaction in life.
Warning! The undo file length is 1569321556 bytes.  Undo will be automatically disabled at 1750000000 bytes to prevent overflow…

Although I’m not sure what an UNDO Overflow would look like, rather than soil the carpets with all those abandoned and rolled back activities, I decided to investigate further.  I recommended that the designer saveas to ensure no data was lost and then began an investigation.

The solution:

  1. Use Saveas to write the file back to the harddrive or network location in case of a potential fatal error.
  2. Clear out the temp folder – Use %temp% in the file dialog and delete files found.
  3. Flush the Undo register – Type Undo – C – All

For more info refer to this Autodesk technical reference.

Autodesk Building Design Premium Deployment Modification – Verticals First

I had to revisit some deployments I created recently to modify some content locations.  On any deployment that had both AutoCAD and an AutoCAD based vertical package (ACA or MEP), the deployment modification routine would hang when I tried to modify either the ACA or AMEP product if I had modified the support paths in the AutoCAD versions (AutoCAD or Struc Designer) first.I was able to restore the paths to default by modding the AMEP, then ACA, then Struc designer, then AutoCAD.  If you run into this, try modding the paths in the above order.

It is important that you try and find out more about Jason Long’s research and about the various topics you can always check this page you will find inside his guide.Now, that will cipla levitra help determine possibly the E.D Protocol is perhaps not a “magic remedy” even though this system can deliver pretty fast results, it really is important to comprehend that without dedication and efforts from you you probably won’t. It requires bulk generic viagra cooperation of both the partners. If the patient is still not reaching his desired results he should consider discussing a possible change in dosage with his doctor. tadalafil india online is an oral medication which one needs to take with normal water. Though, to persist with a healthy sexual life men wish to generic sildenafil uk http://cute-n-tiny.com/cute-animals/orange-eyed-kitty/ delight this male sexual dropping disease.

Hatch Origins to the Rescue

Problem:   A designer calls and asks for a new hatch pattern for gravel.  Further inspection reveals that the standard gravel pattern was used, but when viewed it looks like many random intersecting lines rather than the rounded gravel pattern they were expecting.

It’s as simple as visiting the website today. buy canada cialis The instability of the menstrual volume, cycle and blood will overnight cheap viagra this site be affected as well. The market can also be segmented on the basis of each client’s discount generic cialis religious. In case of ED there are different factors vardenafil canadian pharmacy that include heart disease, obesity, etc.

Solution:  Pick the hatch pattern and use the edit hatch command. Pick a new origin point close to the hatch object. Click ok and watch your hatch magically restore itself.
Sometimes, hatch patterns do not display correctly when their origin point is a large distance away from the hatch itself. This occurs frequently in metric – imperial conversions.
Note: Watch out for masonry patterns. Ensure your new origin displays the correct masonry coursing.

Exploded Attribute Text will not be visible when referenced

Remember to check your “Insert” options when bringing in blocks with attributes. You NEVER want to insert those type of blocks with the “Explode” option still toggled on.  Nevertheless, this is a frequent hurdle for designers who are not as familiar with attributes as they SHOULD be.What is confusing for designers is the fact that they can see the text and think it is a value, but it is typically the attribute tag they are seeing.  The typical steps they take to resolve before requesting assistance include:

  • They double check the entity layer, and find it on a plotting layer
  • They check the reference layer and find that it is thawed, on, and plottable.
  • It is visible in the drawing (xref file) where it is placed, but when that dwg is externally referenced into another file, the text values do not show.

Quick Fix:  Copy the tag name to the “default” value text box when editing the attribute definitions, then cut the definitions to the clipboard and reinsert using “Paste” as block.  Save your file, reload the xref, and your text will magically appear.

Best Practice:  Understand the difference between simple text/mtext and attributed blocks. Ensure that you don’t inadvertantly leave the “explode on insertion” option toggled on in the Insert block dialog box.

Some prostatitis viagra bulk buy patients are afraid if they have been suffering from other massive disorders, they must not make any utilization with such drug treatments since it would lead for fatal consequences. Correct treatment with help can help a person of the causes of cialis online mastercard divorce. The drug may result in further complication so steer clear of consumption of alcohol and fats as these tend to reduce the effects of pathological disintegration, especially when taken with a beta-blocker. top drugshop commander levitra In simple words, the wellness of reproductive has turned into a tough task now. viagra in the uk

Google Earth Color Drape on AutoCAD Mesh – The EASY Way!

Google Earth Color Drape on AutoCAD Mesh – The EASY Way!

The google earth extension from autodesk labs makes it really easy to drape a google earth image over a 3D mesh inside AutoCAD.

Over the counter drugs have the benefit to choose from levitra uk various brands and also the advantage of discounts and offers. Which would be the best medicine for you? It is well known that when a relationship is failing, people like to tadalafil samples start new programs on a Monday, knowing that they will do fine, using willpower and visualization to see themselves through. This way cheap super viagra Tadalista assists a man to suffer from erectile dysfunction. During the latter days, unavailability of erectile dysfunction cialis sale medicines used to get men helpless for achieving true pleasure of sexual life.

Importing the Google Earth mesh (IMPORTGEIMAGE) results in a black and white overlay of the google earth image on your mesh.  According to the User Guide, The image will be black and white – a current limitation imposed by Google Earth.

Unfortunately, the image IS black and white as you can see above and draping your own color export has been somewhat difficult within AutoCAD Architecture due to the differences in the material editor.  Until Now that is!

Rather than struggling with the materials editor and image scaling, why not simply swap your images to get the color drape you’ve been looking for!

Import your mesh into AutoCAD Architecture 2011 after you’ve loaded the GE cui file (Note: Use cuiload and change the filetype to legacy cui to load the toolbar shown below, then click the import ge mesh tool and place your mesh. I used 0,0 and a rotation of 0.)

Now switch back to Google Earth and use the file menu to save the color image to your harddrive.

Notice that the color image exported and the automatic material created by the extension have the same image dimensions!
Now open the color image you exported and saveas overwriting the material image found in the local settings folder for your Acad installation.

Note: to find this image, enter the following path in your explorer address bar:

%userprofile%local settingsapplication dataautodeskaca 2011enu

Once you’ve saved as overwriting the original material, switch back to AutoCAD and issue the “MATERIALS” command.  Find the material listed in the properties for your mesh and double click it to update the material to full glorious COLOR! Watch the video below to see it in action!

See, I told you it was Easy! I hope this helped you!