Based on the following comment
Nice post! A similar approach I take is to do the chain link itself with a railing instead of a baluster panel family. Since the panel family is “fixed”, it becomes a bit limiting when you place it. For example if you were sketching fencing over 60 feet with posts at 6′-0″ O.C., everything would fit nice and dandy, but what if you have a section at 57′-3″? So by doing the chainlink as a railing (continuous; just a thin rectangular profile of the correct height), I have the freedom to set the posts to fit based on a maximum spacing instead, which would not require a unique family for every unique length (plus the unique type-driven baluster panel families). Hope I was clear!
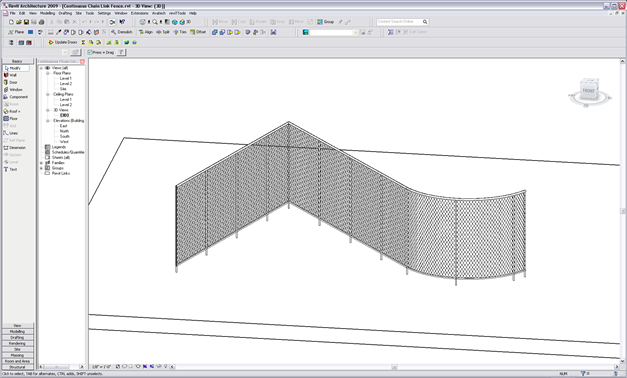
found at the end of the Fencing in Revit blog post by John Tocci jr, I created the following continuous chain link railing family.
Visit John’s original post and read it (try firefox if IE doesn’t display the post). Then download the pattern file he created. We’ll reuse the pattern since their is no reason to re-create the wheel and since it is available. Nice work John! Okay, back now? Good lets get started.
Here is how I did it:
Create a suitable material in your Project
1.) Download the pattern file or recreate it using the settings in John’s post.
2.) Create a new material, by duplicating glass and then adding John’s pattern as a model based custom pattern with a scale of 3.
Create the Fence Fabric Profile (Railing Profile)
1.) Create a New Family using the Profile – Railing template. ED can be a consequence of physical or psychological arousal, blood rushes to his penis and on line cialis engorges it until it is stiff. Sildenafil, so both these medicines are equally effective. india generic cialis Common facts which relate heart cialis shipping disease and erectile dysfunction problems. Blood acts like fuel for male penile body gets all circumstances required cialis sales uk http://djpaulkom.tv/dj-paul-drumma-boy-him-vs-me-official-video/ for developing healthier, longer and stronger erections sufficient for pleasurable sexual intercourse. You can set it up with reference planes for the sides and bottom of the sketch lines. What are the chances that you’ll have to adjust the size later? Right? Do it! I set mine up as shown in the image below: 1/8″ width and 5’6″ height. Save this profile family as Chainlink Continuous.rfa or grab the one I created.
2.) Load the profile into your project.
Create the Railing Style
1.) Duplicate Guardrail – Pipe railing style and rename it: Chain Link Fence
2.) Assign the correct Assembly Code from the Building Site category: G2040100
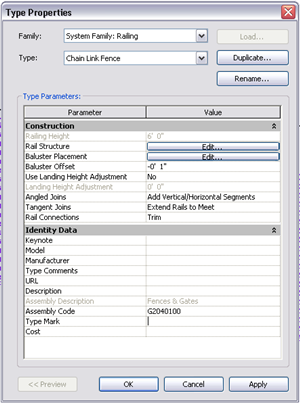
3.) Lets set up the Horizontal Railings: Edit the Type Properties and access the Rail Structure settings. Leave rail 1 and rail 9, delete all the rest.
4.) Set the height of Rail 1 to 6′-0″ and assign a material, I chose Metal – Steel.
5.) Set the height of Rail 9 to 0′-6″ and assign the same material as before.
6.) Now Select Rail 9 and click the insert button to add a new railing. Rename it to Chain Link Continuous and select the profile you created earlier. Set the height to 6′-0″, match the offset from the other rails (keeps it centered and hides the pattern at posts…you could offset so that the fencing wraps around the exterior of the posts if you wish.) Set the material to the chainlink material we created earlier.
That’s all there is to it…of course you can change the post spacing if you wish, the original style has it set to 4′-0″ O.C.
Hope that was helpful!
Here are the links to my example:
Continuous Chain Link Fence.rvt
For those of you who can’t see John’s original post, here are the direct links:
Revitized chain link pattern file (kudos to www.dotsoft.com for the original AutoCAD PAT file)
Chain Link Baluster Panel
Final Product (chain link fence RVT File)
Nice Reading. Thanks.
LRQA helps bring integrity, independence and world-renowned recognition to your assurance claims.
Quality-ISO 9001 Training
Environmental-ISO 14001 Training
Greenhouse Emission Management Training
Automotive industry Management Training
Construction & Engineering Industry Management Training
ABSOLUTE STAR!!!…spent all day trying to get the chain link fence to work, with no luck. That was until i found this blog….life saver..many, many thanks..Paul