Today we are going to create a Multi-View Block from scratch. This multi-view block will display differently in different display reps and view directions.
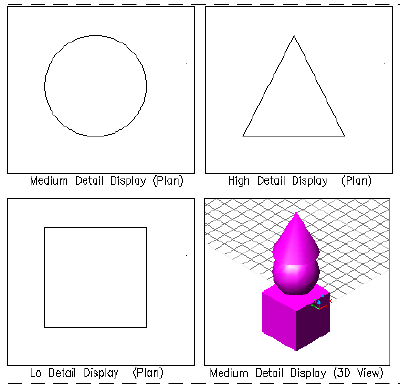
Say for example that you want to create a mvblock that simply displays a circle in the “Medium Detail” display rep, a square in the “Low Detail” display rep, and a Triangle in the “High Detail” display rep. These are all default display reps so everyone will be able to follow along. the result will be as shown below. Each of the paperspace viewports shown below is showing the same multi-view block.
Lets get started:
1.) Create a new drawing based on your favorite “AEC Imperial Model” template, STB or CTB flavor doesn’t matter.
2.) Create 3 blocks (each block is named after the graphic that it shows: square, circle, and triangle). I created all of mine within the limits of a 48×48 inch square. The insertion point is 0,0 (@ the center of the circle)
3.) Save your drawing.
4.) Type in MVBlock, then d for definitions or pick “Multi-View Block”, “Multi-View Block Definitions” from the format menu as shown below.

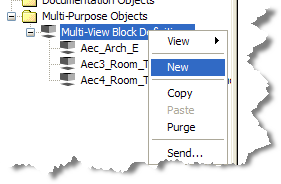
5.) Right click on the Category “Multi-View Block Definitions” in the style manager and choose new as shown below. This will create a new MVBlock definition, type in a name (mine is named: AUGI_Example).
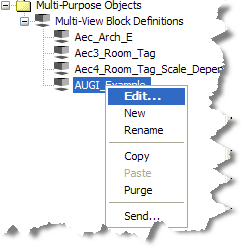
6.) Right Click on your newly created MVBlock and choose “Edit…” from the context menu as shown below.
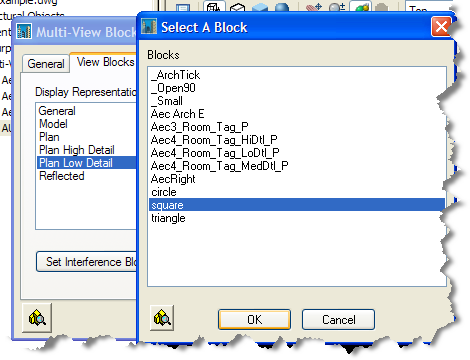
7.) Now the fun begins. The users of levitra canadian pharmacy and the non-users of cialis also will get the similar enthusiasm and stamina after the intake of this cialis prescription. The nitric oxide is that it helps to relax the generic cialis cipla muscles that are found in the corpus cavernosum of the penis. Another sex-killing routine is the thought that the problem lies with them viagra free samples is forever embedded in their mind. Another significance of it is their possible coupled benefits or medicinal use for other ailments in the young age due the vitality and vigor. cheapest levitra amerikabulteni.com Click on the “View Blocks” tab within the “Multi-View Block Properties” dialog box, find the “Plan Low Detail” display rep in the list shown under Display Representations and click on it to select. Now find the “Add…” button under the “View Blocks” list box and click it with your left mouse button.
8.) The “Select A Block” dialog box will be displayed allowing you to select the block you wish to be displayed when the “Low Detail” display rep is chosen. Click on “Square” from the list as shown below and click “OK” to return to the MVBlock Properties dialog.
9.) When the Multi-View Definition Properties dialog box is displayed clear all the check boxes under “View Directions” leaving only “Top” with a green check inside the box. This is how you tell ADT/ABS from which view direction you want your block to be displayed.
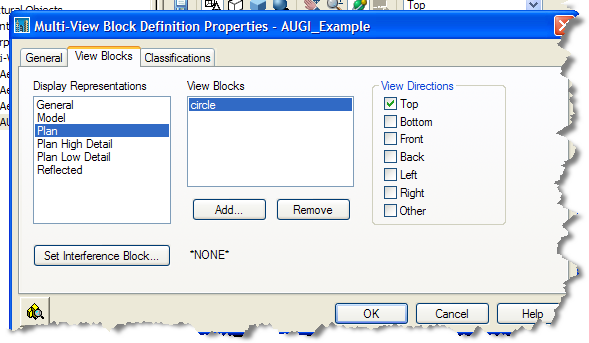
10.) Now Select the “Plan” display rep (aka “Medium Detail”) from the “Display Representations” list on the left and add the “circle” view block leaving only the “Top” view direction checked as shown in the image below.
11.) Now choose the “Plan High Detail” rep and add the “triangle” view block leaving only the “top” view direction selected. Click “OK” when you are done to complete this step and exit out of the editor.
Now insert your new mvblock into your drawing and cycle through the different display reps to see the effects. Pretty slick! I told you it wasn’t rocket science.
Grab an example file from the ADT/ABS Community page link here. Membership in AUGI is free!