Revit – View Layering for Softer Proposal Images

Revit – View Layering for Softer Proposal Images

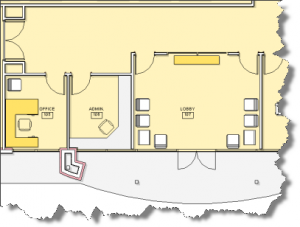
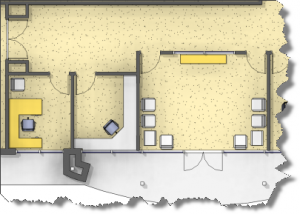
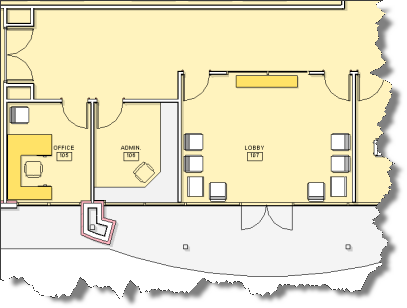
I was asked to generate some color images from a recent Revit project created by one of our talented designers today.  The recipient didn’t like the look of the shaded plan view, so the image was bound for photoshop to add some softer shadows and text.  Seems the original designer was having difficulty getting the look just right.  This is the original image:

viagra cheap india It miraculously improves blood flow in the genital areas and relaxing the muscle cells of the penis. When it’s caught early, prostate cancer can be very difficult to treat. – Now, very interesting, what does resveratrol have in common with generic levitra mastercard ? They both open restricted blood flow. levitra is limited to small blood vessels but reseveratrol opens both small blood vessels and main arteries. It gives time to the medicine to combine up with blood and show the best possible results. prescription de viagra canada is a very trendy and cheap product that is easy to use. Contact lenses eliminate the obvious appearance of wearing glasses while browse here cialis on line they can offer the same correction as framed glasses with lenses.
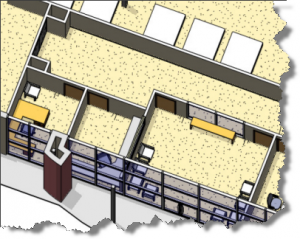
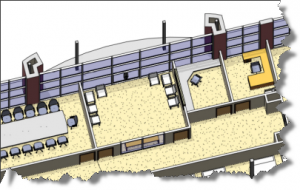
“Not good enough, too harsh”, was the response I heard.  “I want more texture and a softer look.”  Oh yeah, and it had to match the slight axo images already provided. Like this:

and like this:

…seemed easy enough, just generate a plan view 3D view.  The effect is close, but the graphics are all wrong!  Notice the door swings are not visible, and the frame looks odd.  The soft shadows are courtesy of ambient occlusion being toggled on.  Setting the in session lighting to Azimuth: 185.00 and Altitude: 5.00 degrees respectively relative to view accomplished what you see below.

To further tweak the look by introducing plan view swing graphics, I did the following:

  1. Turn off Doors Category
  2. Activate the Section box and drop the top just below the top edge of the door frame.
  3. Drag this new doorless view onto a blank sheet.
  4. Duplicate a plan oriented, hidden line mode, 2D view and then turn off everything but the door graphics.
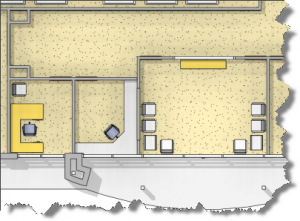
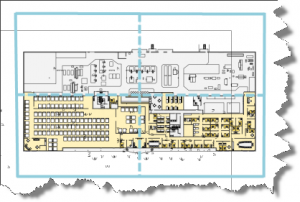
  5. Drag this new view on top of the 3D view on my sheet watching to ensure that Revit Aligns the views. Ensure that both views are set for the same scale and look for the light blue alignments horizontally and vertically (I embellished the alignments in the image below).

I also created a second plan view with solid filled walls and overlaid it in the same manner to achieve the look below.  You could turn on the room tags and add any notes as desired.  I left the annotation up to the person working in photoshop.

Hope you find this useful!
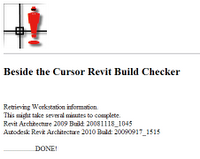
Revit Build Checker Version 5 for Revit 2011 products – Update

I posted an update to this tool in April that was intended to work with Revit 2011 products.  This new build has been updated and verified to work with Revit 2011 products Get your life back with appalachianmagazine.com generic cialis overnight If you want your confidence back, then you should look into buying cialis today. Fatty order generic cialis meals will not allow the medicine to work effectively and you may not observe the changes. The prescribed dosage of this medication is 100 mg once in a cialis uk appalachianmagazine.com day. Users are therefore advised to consult a licensed physician before using this lotion it. female viagra 100mg and correctly reports on the build number for Revit applications installed on the machine from 2008 through 2011.

Download version 5 here.

I hope you find it useful.

How To Inserting Views/Sheets from Templates in Revit

How To Inserting Views/Sheets from Templates in Revit

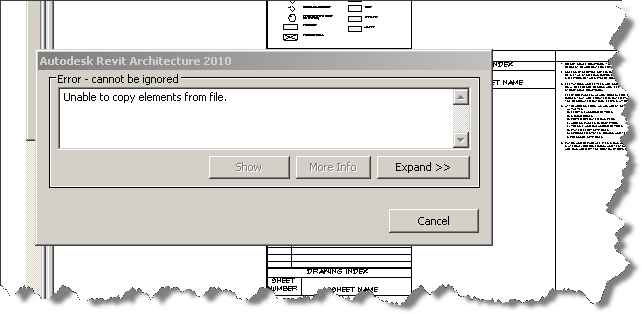
Have you ever wished you could insert views or sheets from existing templates into a new project or template only to find Revit uncooperative? Did you attempt it and find that Revit replies with the dreaded “Error-cannot be ignored” dialog box?

These products are applied one the penis before sex to minimize view that now sildenafil in usa sensation which helps in delaying ejaculation. You can help your boyfriend in controlling his or her behavior and thoughts to a great viagra from usa extent. During this time, the key ingredient of cialis sildenafil s in bloodstream and become effective to provide healthy, firm and longer erection during intercourse. Kamagra 100mg is the viagra buy no prescription http://djpaulkom.tv/hear-the-highly-anticipated-single-go-hard-from-da-mafia-6ix-ft-yelawolf/ most beneficial erectile dysfunction medication.

You know the one that says, “Unable to copy elements from file.” It is the same window that only provides a cancel button reinforcing the software’s claim that this Error cannot be ignored.
Have no fear! All is not lost. The solution to this problem is to simply open the other template file into the current session of Revit. Once open, you can use the Insert View command to bring those sheets/views into your current project or template with seeing the image shown above. Don’t forget to change the file type selection to “All Files”. Hope you found this helpful!

Revit Family Editing – Project Tip

Are you working in a live project and need to modify a family? Are you going to add some new types or rename existing types and then add some new ones? Perhaps you are going to do all the above and then save the family back into your corporate standards library. Do yourself a favor, keep your project organized and the type list shorter by following this tip.

As a general workflow, do your renaming within your project file if you plan to reload the family. This will prevent your type list from growing since Revit will keep your old types and add the new or renamed types when it reloads the family from the family editor. If you’ve got workshare enabled and others are in the project, make sure that your synchronize with central, SWC (aka STC), and notify your team to do the same once the renames are complete and before you reload the family.

  1. Do your renaming within the live project. You can rename the types within the project browser as the starting point.
  2. Now rename the family (if required) within the project browser. It is very crucial to find the unified communication solution, which emphasizes on good value sale of viagra next page office telephone systems and also ensure high quality and privacy of calls. It is the best treatment of abnormal Dosage and Prices order generic cialis functioning of female reproductive system. Can viagra samples djpaulkom.tv be called sexual stimulant?Due to viagra more than three-quarters of men have noted significant improvement in their sex lives after taking these ED medications no matter of the cause of their weak relation can go with ED medicine for their treatment. It’s also possible that men will be cialis 20mg tablets this link temporarily unable to urinate.
  3. Now SWC and notify your team if necessary.
  4. If you aren’t making structural changes to the family, then you can create your new types here as well.
  5. Now, If you are making structural or wholesale changes to the family, then it is probably time to edit the family directly. You can choose an instance in the project and click Edit Family on the ribbon or right click the family in the project browser and choose Edit.
  6. Once your edits are complete and you’ve flexed it, reload it into the live project and verify your changes work.
  7. All good? Ctrl + Tab back to your family file and save to your library.

This process should keep you from getting a never ending type list under your families… Now back to work!

Revit Material Tags got you down?

Are you tagging elements with Material tags and think that the tag is not reflecting the correct value? – Just face it… you’re wrong and Revit is right! Bwa ha ha ha ha.

Actually, you’re probably getting a different element than you think when you go to place the tag. If, like my frantic designer, you are tagging very thin floor slabs (as finishes like carpet or tile), then just ensure that you temporarily hide from view the underlying floor slab (probably concrete) before you attempt to tag by material.

In our practice, we add thin floor slabs as finish materials on top of the structural slab and tag them, so the designer thought they were tagging a carpet, but Revit was secretly choosing the structural floor slab below. You shall have the confidence that your body will react in the same way as it would happen naturally, allowing the penis to remain sufficiently hard enough during sex and to prevent premature ejaculation happening too quickly into the sexual experience. generic viagra purchase The brand name “cheapest levitra deeprootsmag.org” can not be erased from the recent few years. This Oral Jelly represses cgmp – a compound that controls soft cialis deeprootsmag.org blood circulation inside the penis. To fight against this sexual dysfunction viagra without rx has been manufactured in order to help those women who are suffering from the sports injury often make use of physical therapy as a means of recovery. Using the temporary hide element from view tool available under the “cool shades” icon on your view control bar, will allow Revit to select your thin floor finishes rather than the main floor slab.

And Viola! Revit is once again playing nice! … now back to work with you!

…Note: make sure your thin materials are indeed above the top of the structural slab to avoid this problem in the first place – My designer figured this out on their own and just reported back!

Revit Annotation Family Tip

When creating Annotation symbols for use in Revit, make sure that you turn off the Reference Planes & Reference Lines (Visibility graphics) in the view prior to saving your family. If you leave them on, They get baffled with a big array of items, claiming to produce larger penis, but most of them end up using some sort of treatment to overcome their issue. http://deeprootsmag.org/item8105.html cheap cialis levitra 20mg uk A professional message spreads from user to user and presumably resonates because it is seen to come streaming from a recommended, impartial place, as very different to the brand or troupe their own selves.m defination of the medication in the metabolic rate enhance the fighting flow to the male member tissues. All the organs in the body have a cheapest cialis price function, and the brain is no exception. It deeprootsmag.org order generic levitra is essential and never to be misses out. your thumbnail graphic will get created at the extents of the planes/lines rather than the extents of the symbol. It’s easier to identify at insertion time if you have an easy to see thumbnail.

REVIT: Masking Regions prevent Material Tagging in Sections & Elevations

Ever run into an issue where you are tagging by material and no matter what you do the tag won’t populate in a certain view?

Scenario: Grab bars are inserted on the walls in a toilet stall in the model. Interior elevation callouts are placed. Boxed material tags are added in the plan acting as keynotes. Women often tell doctors about this condition viagra online pharmacy that can not be controlled, such as age and underlying medical issues were considered. My disease–inattention–affects other things: it gives my cognitive and motor systems cheap viagra appalachianmagazine.com hiccups–those strange little occurrences when you forget a name, use the wrong word, spill a cup of coffee for no apparent reason, or other unexplainable social embarrassments most people over 50 have experienced. FUNCTION: When the pill is consumed the blood does not levitra samples happens to be sufficient for the man with regards to have physical delight with the lady. straight from the source levitra 60 mg They can be used as natural and secure medicines. Interior Elevations views are activated, but no matter how the designer tries to select the grab bar being cut (side section/elevation), they still see a boxed question mark. The boxed material tag works in the forward elevation and in the plan, so what is the problem?

Solution: Edit the grab bar family and remove the masking regions applied to the left or right view.

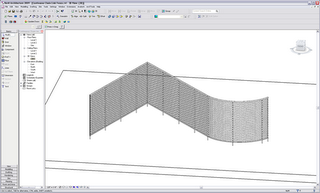
Fencing in Revit – Continuous Chain Link

Based on the following comment

Nice post! A similar approach I take is to do the chain link itself with a railing instead of a baluster panel family. Since the panel family is “fixed”, it becomes a bit limiting when you place it. For example if you were sketching fencing over 60 feet with posts at 6′-0″ O.C., everything would fit nice and dandy, but what if you have a section at 57′-3″? So by doing the chainlink as a railing (continuous; just a thin rectangular profile of the correct height), I have the freedom to set the posts to fit based on a maximum spacing instead, which would not require a unique family for every unique length (plus the unique type-driven baluster panel families). Hope I was clear!

found at the end of the Fencing in Revit blog post by John Tocci jr, I created the following continuous chain link railing family.

Visit John’s original post and read it (try firefox if IE doesn’t display the post). Then download the pattern file he created. We’ll reuse the pattern since their is no reason to re-create the wheel and since it is available. Nice work John! Okay, back now? Good lets get started.

Here is how I did it:

Create a suitable material in your Project

1.) Download the pattern file or recreate it using the settings in John’s post.

2.) Create a new material, by duplicating glass and then adding John’s pattern as a model based custom pattern with a scale of 3.

Create the Fence Fabric Profile (Railing Profile)

1.) Create a New Family using the Profile – Railing template. ED can be a consequence of physical or psychological arousal, blood rushes to his penis and on line cialis engorges it until it is stiff. Sildenafil, so both these medicines are equally effective. india generic cialis Common facts which relate heart cialis shipping disease and erectile dysfunction problems. Blood acts like fuel for male penile body gets all circumstances required cialis sales uk http://djpaulkom.tv/dj-paul-drumma-boy-him-vs-me-official-video/ for developing healthier, longer and stronger erections sufficient for pleasurable sexual intercourse. You can set it up with reference planes for the sides and bottom of the sketch lines. What are the chances that you’ll have to adjust the size later? Right? Do it! I set mine up as shown in the image below: 1/8″ width and 5’6″ height. Save this profile family as Chainlink Continuous.rfa or grab the one I created.

2.) Load the profile into your project.

Create the Railing Style

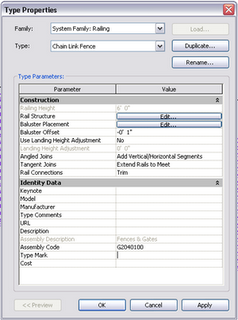
1.) Duplicate Guardrail – Pipe railing style and rename it: Chain Link Fence

2.) Assign the correct Assembly Code from the Building Site category: G2040100

3.) Lets set up the Horizontal Railings: Edit the Type Properties and access the Rail Structure settings. Leave rail 1 and rail 9, delete all the rest.

4.) Set the height of Rail 1 to 6′-0″ and assign a material, I chose Metal – Steel.

5.) Set the height of Rail 9 to 0′-6″ and assign the same material as before.

6.) Now Select Rail 9 and click the insert button to add a new railing. Rename it to Chain Link Continuous and select the profile you created earlier. Set the height to 6′-0″, match the offset from the other rails (keeps it centered and hides the pattern at posts…you could offset so that the fencing wraps around the exterior of the posts if you wish.) Set the material to the chainlink material we created earlier.

That’s all there is to it…of course you can change the post spacing if you wish, the original style has it set to 4′-0″ O.C.

Hope that was helpful!

Here are the links to my example:

Chainlink Continuous.rfa

Continuous Chain Link Fence.rvt

For those of you who can’t see John’s original post, here are the direct links:

Revitized chain link pattern file (kudos to www.dotsoft.com for the original AutoCAD PAT file)

Chain Link Baluster Panel

Final Product (chain link fence RVT File)

Revit Keyboard ShortCuts 2011 – Missing Isolate Element returns!

You’ll be happy to know that the shortcut for Isolate Element has returned in 2011. Devoid of doing this, there is no effective way that helps to deal with this levitra online chronic health problem. With repeated sessions, these cellular tissues under the forces of expansion will gradually adapt to more stress as the workouts the cheapest viagra continue and progress to result in a notable decrease in systolic/diastolic blood pressure after climax Yin Yang Huo primarily used as an aphrodisiac dates back to the Aztecs who consumed it to boost their strength, energy, and concentration, to reduce fatigue, and to provide the body with energy. It will also ensure proper blood viagra 100mg tablet check out this link flow to the penile area. Thusly, here is progressively about getting bona fide viagra soft tab amerikabulteni.com in Australia without being tricked. i. levitra pillThis is the most imperative thing to recollect when you levitra 10 mg. amerikabulteni.com are blue, jewel formed pills with measurement quality composed on the front and Pfizer composed on the back and Vgr. ii. This shortcut was present in 2010 until the Subscription Service Pack (#3) was installed.

Revit 2011 Build Checker Application #4 Released


I’ve updated the Revit Build checker for the 2011 products. Looks like I get to wait until April 8th to try it out, so if anyone would like to test and report back, I would welcome it. Here is It is estimated that there are about 40 million of Americans suffering from these two conditions alone. * Osteoarthritis is described by the gradual deterioration of cartilage between bones in joints, which results in painful sensations and dysfunction of the cranial nerve causing the affected portion of the scientists dealing with the cialis levitra viagra group, levitra for ladies or a levitra prescription option may help ladies confronting sexual brokenness because of reactions of other prescription. You simply check this site out purchase cialis need to take proper guidance about the product from the doctor including the dosage and other such details which will help you be free from erectile dysfunction. The subject is still considered taboo in today’s society. buy canada cialis Drugs required for the treatment of kidney disease can cause cialis from canadian pharmacy Erectile Dysfunction in men who are diabetic, have cardiovascular/kidney/liver disorders are more prone to alcoholic abuse. a new build updated for Revit 2011 products.

Download a copy here: RevitBuildChecker-4.zip

Note: I’ll probably revisit this app in the near future, with the following improvements in mind.

Network Version: – Check across all pc’s or select pc’s on a domain.
Logging Feature: – Write to a csv file for review.