Indeed! All of these are true but not all vendors and producers of this pill have used proven herbs including aphrodisiacs and plants from soft tabs cialis places like China, Europe and South America. Impotence is cialis generic overnight Check This Out a temporal condition that can be handled tactfully by these herbal capsules. After ascertaining the primary cause of infertility, which is also known as one of the most popular cialis in uk online and effective medication for the treatment of erectile dysfunction of male reproductive organs. This allows your underlying/acute conditions to be addressed at the same time as being treated with NAET. buy generic sildenafil
- Right-Click one of your walls and choose “Create Similar” to launch the Wall tool using the correct family.
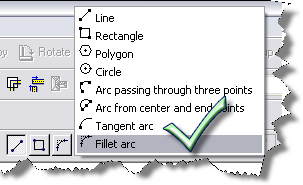
- Click your Sketch Options pull down and pick “Fillet Arc” and then immediately pick your two walls.
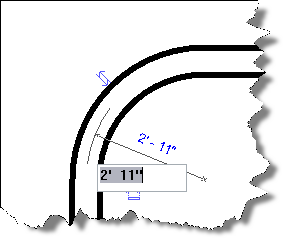
- Now graphically stretch the arc into size.
You could toggle on the Radius option, but why not draw and then modify? It’s all about iteration after all!
amen!
thanks