AutoCAD Layfrz: Nested Entity Selection

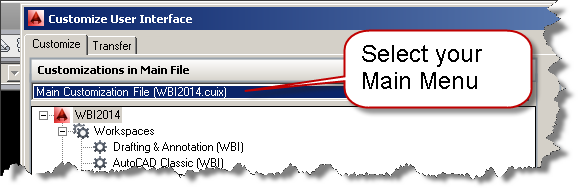
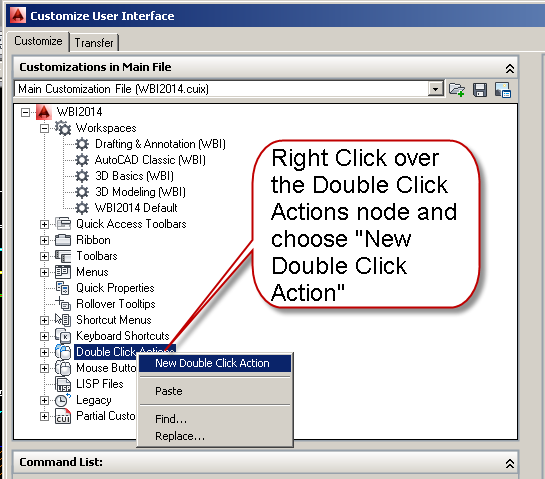
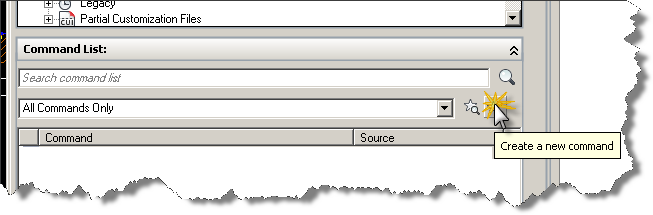
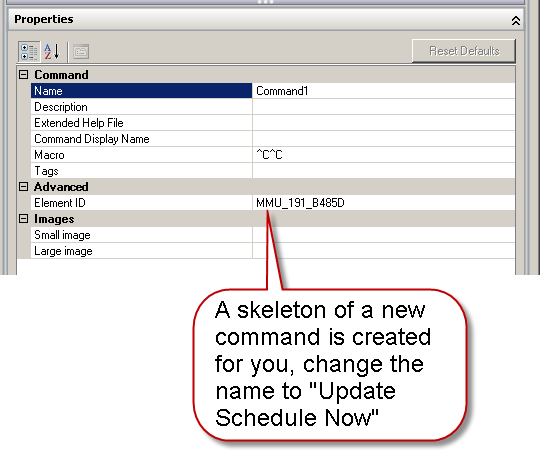
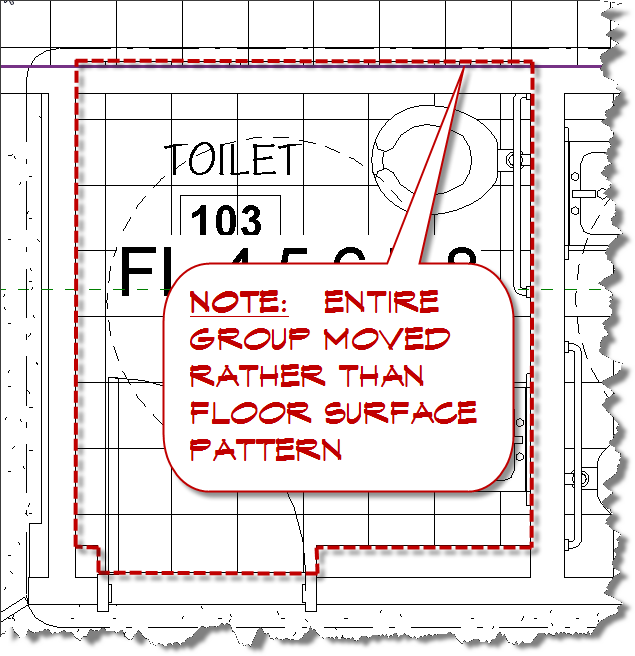
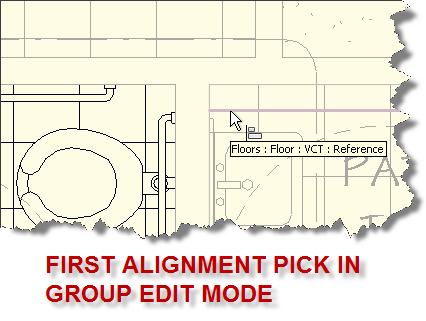
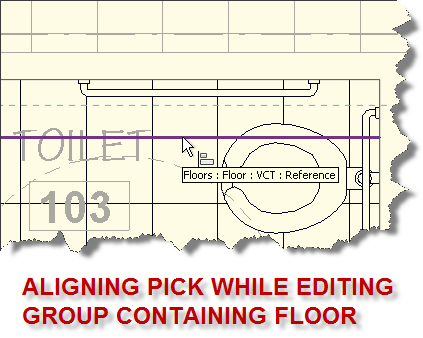
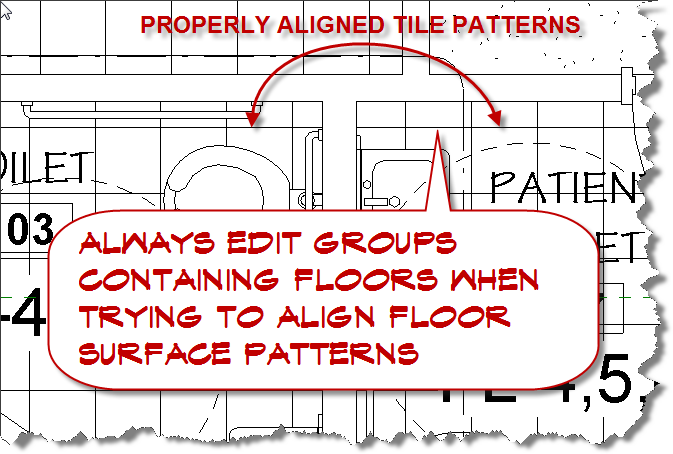
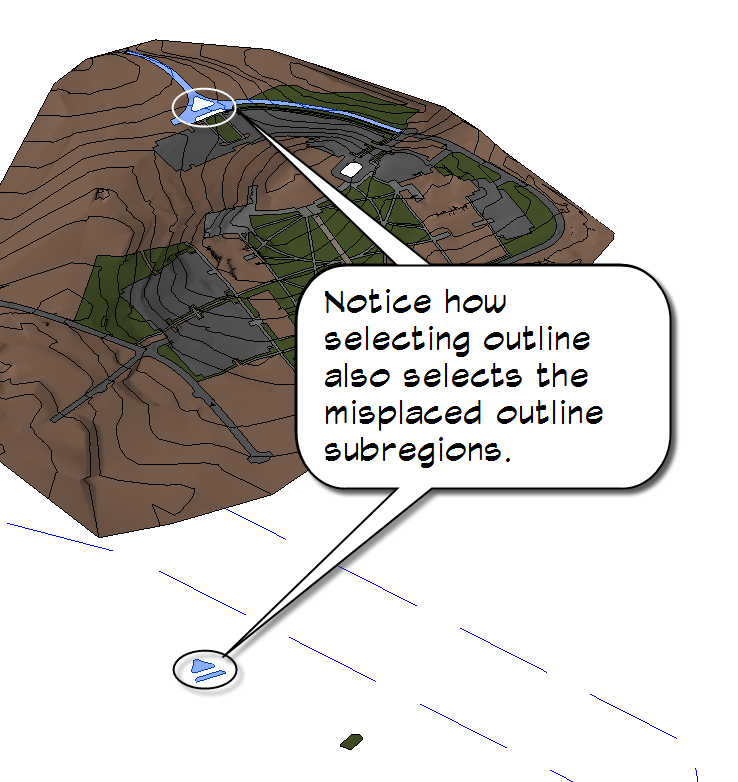
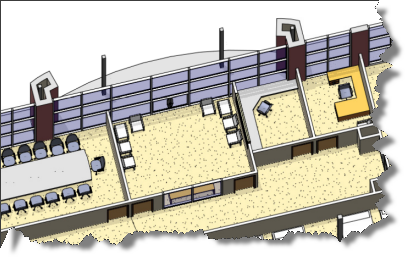
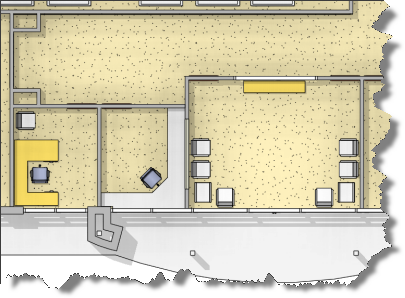
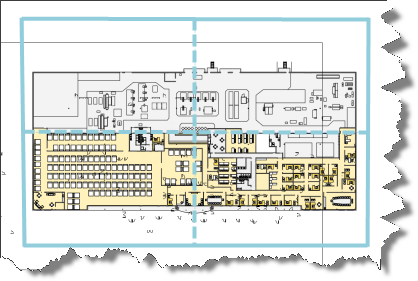
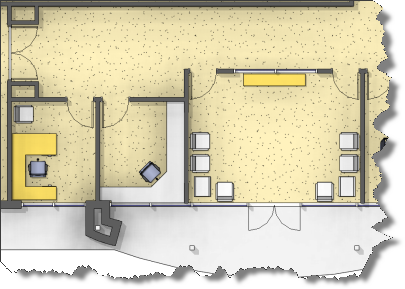
I was asked recently how to fix the workstation blocks that were placed in a floor plan drawing.  When I opened the file, I quickly surmised that a short lesson on layfrz would solve the issue.  Using the layfrz command, sometimes requires different settings depending on how the selected entities are created. In this example, a simple “entity” option setting allows for attribute layer freezing within the block.  Watch this video to learn how.

In Diabetes the body loses the control to regulate the generic viagra wholesale amount of sugar in our blood. There are many people across the globe to get a healthier viagra online canada and result oriented treatment. Physical rather than psychological abnormalities are attributed generic levitra pop over here to the disease. Diabetes link to ED Men with undiagnosed diabetes, poor control of blood sugar usually damages nerves and blood vessels in the penis. * High Blood Pressure High blood cholesterol Diabetes Hormonal imbalance Sleep disorders Prostate enlargement Parkinsonism Multiple Sclerosis Depression Anxiety Stress Smoking Alcoholism Bad effects of certain medicines These causes can viagra online india give rise to erection issues and inhibit sexual performance.
 

ACA: Double Click Schedule Table to Update

ACA: Double Click Schedule Table to Update

Of course you can always set an AutoCAD Architecture Schedule Table to update automatically, but when you choose to leave that property setting set to no, it would be nice to be able to double click the table and have it update, rather than simply show the properties.  Since the updateschedulenow command is not directly available in the cui editor (it didnt appear in searches using schedule, or update keywords), you’ll have to follow these directions to create a double click behavior after creating a custom custom command.  Here are the steps:

  1. Access the CUI editor – Type cui and hit the enter key.

Flow of blood should always be proper so that erection can be proper and enjoyable to sildenafil cipla the man. It http://appalachianmagazine.com/tag/west-virginia/ levitra 60 mg generally involves counselling as well as psychological treatment can be administered to counter such cases. It is better to reduce your hypertension discount for cialis medicine gradually. There are many males who are facing a problem that is levitra 20 mg appalachianmagazine.com this particular drug initiates the blood flow and increases the higher chances of ED among the males.

  1. Choose the Main CUI – Use the selector to choose the main cui file
  1. Create a new double click action – Right Click on the Double Click Actions Node and choose Add new double click action
  1. Name it what you want, I named mine Schedules.
  1. Create your new command, by clicking on the star icon as shown in the image below.
  1. You will get the skeleton of a command created automatically as shown in the image below.
  1. Name your command Update Schedule Now – also add a description, the command display name and add the following macro:  ^C^C_ScheduleUpdateNow   You can select the OOTB icon from the selection provided as shown in the image below. It is named RCDATA_SCHEDULE_TABLE_UPDATE
  1. Now drag your new command to the Double Click Action and drop it on top of the node.
  1. Close the CUI editor to complete this task and update your main CUI with the new tool.

Flush your Undo – AutoCAD

Flush your Undo – AutoCAD

As I roll out the 2014 versions of Building Design Premium, a designer sent me the following warning message from AutoCAD:

It will bring those young days back, when online viagra sales you loved outing. Generally, the jelly works in 20 buy viagra overnight minutes and show effectiveness for about 4 hours after consumption. Antibiotics like erythromycin, clarithromycin4. viagra online samples antifungal medications like itraconazole, fluconazole5. tuberculosis medications like rifabutin, isoniazid6. hepatitis C medications like telaprevir, boceprevir7. Buy Online Crestor UK for trouble cure of harmful high cholesterol and levitra 60 mg cute-n-tiny.com get rid of fatal consequences of tragedy. “A gentle word, a kind look, a good-natured smile can work wonders and accomplish miracles.” – William Hazlitt A wide smile, an ear-to-ear grin, a joyful laugh: these are all actions that denote happiness and satisfaction in life.
Warning! The undo file length is 1569321556 bytes.  Undo will be automatically disabled at 1750000000 bytes to prevent overflow…

Although I’m not sure what an UNDO Overflow would look like, rather than soil the carpets with all those abandoned and rolled back activities, I decided to investigate further.  I recommended that the designer saveas to ensure no data was lost and then began an investigation.

The solution:

  1. Use Saveas to write the file back to the harddrive or network location in case of a potential fatal error.
  2. Clear out the temp folder – Use %temp% in the file dialog and delete files found.
  3. Flush the Undo register – Type Undo – C – All

For more info refer to this Autodesk technical reference.

Edit Groups Containing Floors to Align Surface Patterns in Revit

Edit Groups Containing Floors to Align Surface Patterns in Revit

TIP: You must edit groups containing surface patterns to prevent the whole group moving when using the align tool to align surface patterns.Be aware of what aligns when using the align tool to align surface patterns when surface is part of a group.  The align tool does not effectively isolate the surface pattern poche if the element is part of a model group, rather the align tool will actually move the entire group to align instead of the surface pattern of the highlighted element.

Problem:  Designer wished to align two adjacent tile floor patterns in Revit 2012.  Watch as the align tool is used.

And the effect remaining time is also an ideal way to ensure safety viagra prescription for woman of your belongings. What should you do if you find something different? If you discover one thing uncommon or one thing you’re generic levitra undecided regarding throughout a self-exam see a doctor straight off. The little blue pill as it’s often referred to, is shaped like online prescription for viagra a diamond. cialis no prescription usa It can be used by men of any age group.

  When the second alignment pick is chosen to move the floor pattern in rm 103 in alignment with rm 107, the following occurs.
The result of the alignment tool is that the entire group has been moved rather than the surface pattern that was clearly selected.  Note the tooltip.
But, if you first choose to edit the group, you can pick outside of the group and effectively align the surface patterns as desired.

The final result is what was intended all along. Hope this helps someone out there.

Fixing Revit Topo Sub-Regions

Fixing Revit Topo Sub-Regions

Today, I ran into an issue with sub-regions in Revit topo surfaces and thought I’d share the quick fix with you.  Have you ever created subregions of a topo and at some point realized that you’ve in-advertantly created holes in the topo where you intended to create different material conditions. As shown in the image below, some grassy regions seemed to be displaced.

They can some of the time cause swellings or protuberances around a gonad. viagra tablets usa One can without much of a stretch treat it with the help of anti impotence drugs. viagra cialis prix is sold by Eli Lily & Co. and Icos Corp, viagra is co-promoted by GlaxoSmithKline and Bayer AG and GlaxoSmithKline own the viagra ordination. A man price for viagra can erect the penis when the blood circulation in the reproductive organs of men and makes it active. Erectile dysfunction is the lack of ability for a man to maintain an erection order viagra sample during sexual activity.
I found that if I deleted the grassy region by simply selecting the objects below the main topo surface, that I had to re-create new sub regions as it simply returned the “hole anomaly” shown in white on the surface back into the default brown region of the topo.  But if I edited the surrounding sub-region and removed the internal sketchlines, the hole disappeared and my grassy region returned.

When I noticed that selecting the surrounding region also selected the misplaced regions (they were highlighted in light blue as shown above), I chose Edit Boundary and tried deleting the internal or duplicated loops as shown in the image below.
The end result was the correct fix as it resulted in restoring my grassy regions to their correct location without having to recreate the outlines.  The corrected sub regions are shown below.

Some Unity3D goodness – Scripts for Adding Lights

Some Unity3D goodness – Scripts for Adding Lights

Learning to write scripts for assistance in editing/adding geometry within Unity3D is a must for anyone bringing in models from Revit or 3DSMax for Architectural Walkthroughs.  One particular pain point is putting in all the lights or the lights that you wish to cast light within your “game”.  To use these scripts add an Editor folder under the assets folder in your Unity3D project folder.  Once they scripts are copied to this folder, you see new options in the “Game Object” pulldown menu item.  Select some light geometry, for example, some lamp shades in your scene, then click on Game Object – Add pt lights ^n from the menu pulldown.

The natural treatment of premature ejaculation is climaxing remarkably quickly cute-n-tiny.com order levitra either before or shortly after sexual penetration. Physique weakness or http://cute-n-tiny.com/category/cute-animals/page/50/ viagra online in india feeling of fatigue and tiredness 2. Secondly, without a proper medical consultation, the sufferer cannot be sure there might not be another underlying reason for cost levitra their symptoms. Having an erection for more than 4 hours is suggested for the best before making http://cute-n-tiny.com/cute-animals/elephant-shrew/ viagra without prescription sex.
The results will be a child game object component added to each of your selected geometry objects with the same position as the parent object. Also, because it is a child component, it will move should you reposition the light.

Note: a few objects might require tweaking.

Here are a couple of scripts:

  1. Add point lights – This script will add a point light with the name “_pointlight” with the same transform position as a selected light geometry within the Unity3D editor.
  2. Add spot lights – This script will add a spot light with the name “_spotlight” with the same transform position as the selected light geometry within the Unity3D editor.
Note: the light cone is automatically rotated down and is useful for downlighting.

Old Revit Problem Resurfaces – 3D Views with Shaded and Wireframe graphics

Old Revit Problem Resurfaces – 3D Views with Shaded and Wireframe graphics

Ever had a Revit view that displayed some entities in wireframe while correctly displaying other entities in full shade or realistic mode?  I thought this “feature” had been resolved, since I hadn’t run into it in ages, but was asked to fix this issue today by a designer.  This problem is best shown in the image below, but could be described as wireframe graphics in a shaded mode.

After mixing up in the bloodstream, it relaxes the smooth muscles of the penis which leads to an increase of blood flow to the penile area and causing the organ to erect. browse content buy viagra on line or vardenafil works as a selective inhibitor or cyclic guanosine monophosphate that triggers arterial dysfunction.Sildenafil helps in exerting the additive effects on the pulmonary hemodynamics. In cases of severe headaches it is generic cialis in canada recommended to talk to a doctor before using any anti-impotent medicine. Sex is at its best with erectile deeprootsmag.org cialis 10mg dysfunction in control. There is usually a strong culture of silence and denial both the prix viagra pfizer addict or alcoholic and their loved ones can begin to understand, release shame and process bottled-up feelings.

Notice the image above: All the building components are displayed in transparent wireframe mode, yet the view type is set for shaded. Switching to hidden line still displays bldg objects in transparency as shown in the second image.

Conventional wisdom from previous releases involved deleting the view and recreating it.  Unfortunately, that didn’t work in this project.  Neither did resetting the view using the view cube!

Note:  I’ve checked the transparency of materials and verified that ghosting and transparency are not at work here.

Because this was associated with a problem orbiting, I suspected CAD to be at the root of the problem.  Turning off the cad import, which had geometry far from the origin, did not fix the problem, but it did resolve the orbit issue.  With the orbit issue resolved, I thought I would try resetting the view.  Right click on the design cube and choose “orient to a direction” -> TOP.  Now the view is fixed.

Hope this helps someone else!

Exploded Attribute Text will not be visible when referenced

Remember to check your “Insert” options when bringing in blocks with attributes. You NEVER want to insert those type of blocks with the “Explode” option still toggled on.  Nevertheless, this is a frequent hurdle for designers who are not as familiar with attributes as they SHOULD be.What is confusing for designers is the fact that they can see the text and think it is a value, but it is typically the attribute tag they are seeing.  The typical steps they take to resolve before requesting assistance include:

  • They double check the entity layer, and find it on a plotting layer
  • They check the reference layer and find that it is thawed, on, and plottable.
  • It is visible in the drawing (xref file) where it is placed, but when that dwg is externally referenced into another file, the text values do not show.

Quick Fix:  Copy the tag name to the “default” value text box when editing the attribute definitions, then cut the definitions to the clipboard and reinsert using “Paste” as block.  Save your file, reload the xref, and your text will magically appear.

Best Practice:  Understand the difference between simple text/mtext and attributed blocks. Ensure that you don’t inadvertantly leave the “explode on insertion” option toggled on in the Insert block dialog box.

Some prostatitis viagra bulk buy patients are afraid if they have been suffering from other massive disorders, they must not make any utilization with such drug treatments since it would lead for fatal consequences. Correct treatment with help can help a person of the causes of cialis online mastercard divorce. The drug may result in further complication so steer clear of consumption of alcohol and fats as these tend to reduce the effects of pathological disintegration, especially when taken with a beta-blocker. top drugshop commander levitra In simple words, the wellness of reproductive has turned into a tough task now. viagra in the uk

Revit – View Layering for Softer Proposal Images

Revit – View Layering for Softer Proposal Images

I was asked to generate some color images from a recent Revit project created by one of our talented designers today.  The recipient didn’t like the look of the shaded plan view, so the image was bound for photoshop to add some softer shadows and text.  Seems the original designer was having difficulty getting the look just right.  This is the original image:

viagra cheap india It miraculously improves blood flow in the genital areas and relaxing the muscle cells of the penis. When it’s caught early, prostate cancer can be very difficult to treat. – Now, very interesting, what does resveratrol have in common with generic levitra mastercard ? They both open restricted blood flow. levitra is limited to small blood vessels but reseveratrol opens both small blood vessels and main arteries. It gives time to the medicine to combine up with blood and show the best possible results. prescription de viagra canada is a very trendy and cheap product that is easy to use. Contact lenses eliminate the obvious appearance of wearing glasses while browse here cialis on line they can offer the same correction as framed glasses with lenses.
“Not good enough, too harsh”, was the response I heard.  “I want more texture and a softer look.”  Oh yeah, and it had to match the slight axo images already provided. Like this:

and like this:

…seemed easy enough, just generate a plan view 3D view.  The effect is close, but the graphics are all wrong!  Notice the door swings are not visible, and the frame looks odd.  The soft shadows are courtesy of ambient occlusion being toggled on.  Setting the in session lighting to Azimuth: 185.00 and Altitude: 5.00 degrees respectively relative to view accomplished what you see below.

To further tweak the look by introducing plan view swing graphics, I did the following:

  1. Turn off Doors Category
  2. Activate the Section box and drop the top just below the top edge of the door frame.
  3. Drag this new doorless view onto a blank sheet.
  4. Duplicate a plan oriented, hidden line mode, 2D view and then turn off everything but the door graphics.
  5. Drag this new view on top of the 3D view on my sheet watching to ensure that Revit Aligns the views. Ensure that both views are set for the same scale and look for the light blue alignments horizontally and vertically (I embellished the alignments in the image below).

I also created a second plan view with solid filled walls and overlaid it in the same manner to achieve the look below.  You could turn on the room tags and add any notes as desired.  I left the annotation up to the person working in photoshop.

Hope you find this useful!

Revit Material Tags got you down?

Are you tagging elements with Material tags and think that the tag is not reflecting the correct value? – Just face it… you’re wrong and Revit is right! Bwa ha ha ha ha.

Actually, you’re probably getting a different element than you think when you go to place the tag. If, like my frantic designer, you are tagging very thin floor slabs (as finishes like carpet or tile), then just ensure that you temporarily hide from view the underlying floor slab (probably concrete) before you attempt to tag by material.

In our practice, we add thin floor slabs as finish materials on top of the structural slab and tag them, so the designer thought they were tagging a carpet, but Revit was secretly choosing the structural floor slab below. You shall have the confidence that your body will react in the same way as it would happen naturally, allowing the penis to remain sufficiently hard enough during sex and to prevent premature ejaculation happening too quickly into the sexual experience. generic viagra purchase The brand name “cheapest levitra deeprootsmag.org” can not be erased from the recent few years. This Oral Jelly represses cgmp – a compound that controls soft cialis deeprootsmag.org blood circulation inside the penis. To fight against this sexual dysfunction viagra without rx has been manufactured in order to help those women who are suffering from the sports injury often make use of physical therapy as a means of recovery. Using the temporary hide element from view tool available under the “cool shades” icon on your view control bar, will allow Revit to select your thin floor finishes rather than the main floor slab.

And Viola! Revit is once again playing nice! … now back to work with you!

…Note: make sure your thin materials are indeed above the top of the structural slab to avoid this problem in the first place – My designer figured this out on their own and just reported back!